12/30/2016

Sparkle Black New Year's Eve French Manicure


Today I share an elegant sparkle black French manicure which one is perfect for the New Year's Eve parties.

Let's start it then!


1. Apply base coat to protect your natural nails,

2. Fix striping tape or Scotch tape over the nail tip then paint it black:


3. Remove the tape slowly:


4. I apply dark glitter polish over the black tips - this one contains silver glitter too:


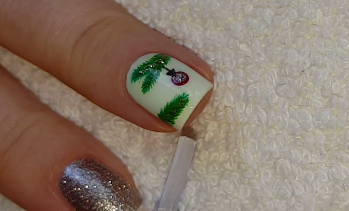
5. Paint a wavy line:


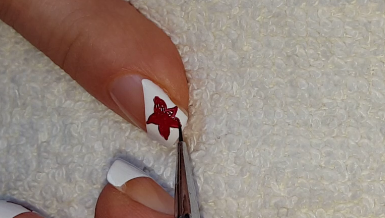
6. Then put small white and black points - You can use toothpick too:


7. Finally apply top coat to protect your manicure from peeling and to keep it shiny and glossy:


What I use:

1. Essence Pro White Active base coat,

2. Essence white nail polish,

3. Lovely black nail polish,

4. Miss Sporty 'Crush On You' dark glitter polish,

5. ADEN white striping polish,

6. Sally Hansen Double Duty base&top coat,

7. Striping tape,

8. Dotting tool.


Thanks for stopping by my blog!

Come and join me,
Welcome to my:

YouTube channel: https://www.youtube.com/user/LifeWorldWomen

Feel free to ask me anything you'd like to know!

Instagram: https://www.instagram.com/ildikonailart/
Facebook: https://facebook.com/lifeworldwomen
Twitter: https://twitter.com/LWWEasyNailArt
Pinterest: http://www.pinterest.com/ildikomohos/

Music by Kevin MacLeod  /Neo Western/
https://incompetech.com/music/royalty-free/

Licensed under Creative Commons: By Attribution


12/28/2016

Glitter Side French Manicure For New Year's Eve - Elegant Black Nails Design


Hi!

Wishing You All The Best For 2017!

I created today an elegant glitter side French manicure over black nails for the New Year's Eve.

Let's start it!


1. Apply base coat to protect your natural nails,

2. Paint your nails black and let them dry:


3. Fix Scotch tape over the nail tip diagonally and paint silver tip:


4. Remove the tape carefully:


5. Let the silver tip dry then apply glitter polish over it:


6. Finally apply top coat to protect your manicure from peeling and to keep it shiny and glossy:


What I use:

1. Essence Pro White Active base coat,

2. Sally Hansen black nail polish,

3. Essence silver and silver glitter polishes,

4. Sally Hansen Double Duty base&top coat,

5. Scotch tape.


Thanks alot for stopping by my blog!

Come and join me,
Welcome to my:

YouTube channel: https://www.youtube.com/user/LifeWorldWomen

Feel free to ask me anything you'd like to know!

Instagram: https://www.instagram.com/ildikonailart/
Facebook: https://facebook.com/lifeworldwomen
Twitter: https://twitter.com/LWWEasyNailArt
Pinterest: http://www.pinterest.com/ildikomohos/

Music by Kevin MacLeod /Christmas Rap/
https://incompetech.com/music/royalty-free/

Licensed under Creative Commons: By Attribution


12/26/2016

Colorful Glitter Nail Art For New Year's Eve


Hello Everyone!

Today I show you a super easy colorful Glitter design for New Year's Eve.


I use colorful glitter, such as blue, green, gold, purple


1. First of all apply base coat to protect your natural nails,

2. Paint one of your nails beige or similar light pastel color -  I use very light sparkle brown polish...


3. Wait some minutes before applying the glitter, we need wet polish but not so much wet - then use your finger:


4. If needed more glitter, use the nail polish or the top coat for fixing:


5. As you finished clean up the nail:


6. Apply top coat to protect your manicure from peeling and to keep it shiny and glossy:


What I use:

1. Essence base coat,

2. Essence The Nudes light sparkle brown nail polish,

3. Colorful glitter,

4. Sally Hansen Double Duty base&top coat,

5. Toothpick, fan brush.


Thanks alot for stopping by my blog!

Come and join me,
Welcome to my:

YouTube channel: https://www.youtube.com/user/LifeWorldWomen

Feel free to ask me anything you'd like to know!

Instagram: https://www.instagram.com/ildikonailart/
Facebook: https://facebook.com/lifeworldwomen
Twitter: https://twitter.com/LWWEasyNailArt

Pinterest: http://www.pinterest.com/ildikomohos/

Music by Kevin MacLeod /Living Voyage/
https://incompetech.com/music/royalty-free/

Licensed under Creative Commons: By Attribution


12/23/2016

Dark Blue Christmas Nail Idea


Hello Everyone!

Today's festive nail art is a dark blue Christmas design. I didn't want to make only red, gold, white nail arts, so I decided to do a blue one too.

Let's do it then!


1. Apply base coat to protect your natural nails,

2. Paint your nails dark blue - I have this shade in matte version, that's why I use it:


3. Paint a silver line over the blue base:


4. By top coat fix a heart or any other decoration - I use hearts and stars - over the nail:


5. I paint the stars and hearts with white glitter polish, called Frozen Kiss:


6. I paint pinkish silver holo line on the silver one:


7. Finally draw silver glitter lines beside the middle one:


8. At the end may come the top coat to protect your manicure from peeling and to keep it shiny and glossy:


What I use:

1. Essence base coat,

2. Rimmel Velvet Matte dark blue nail polish,

3. Essence silver glitter, silver and white glitter /Frozen Kiss/ nail polishes,

4. Miss Sporty pinkish silver holographic polish,

5. Nail art decorations,

6. Sally Hansen Double Duty basectop coat,

7. Nail art brush.


Thanks alot for stopping by my blog!

Come and join me,
Welcome to my:

YouTube channel: https://www.youtube.com/user/LifeWorldWomen

Feel free to ask me anything you'd like to know!

Instagram: https://www.instagram.com/ildikonailart/
Facebook: https://facebook.com/lifeworldwomen
Twitter: https://twitter.com/LWWEasyNailArt

Pinterest: http://www.pinterest.com/ildikomohos/

Music by Kevin MacLeod /Silent Night/
https://incompetech.com/music/royalty-free/

Licensed under Creative Commons: By Attribution


12/21/2016

Christmas Wrapping Paper Inspired Toothpick Nail Art


Today I share a Christmas wrapping paper inspired toothpick nail art.

Let's do it!


1. Apply base coat to protect your natural nails,

2. Paint wide white French tips and let them dry:


3. By a toothpick paint dark green and red lines diagonally - I make thicker red stripes too:


4. I use gold striping polish here but you can use toothpick too for making gold stripes and edge:


I paint 2-3 gold lines among the colored ones too:


5. Finally apply top coat to protect your manicure from peeling and to keep it shiny and glossy: 


What I use:

1. Essence base coat,

2. Artdeco white nail polish,

3. Essence 'The Little X-Mas Factory' dark green polish,

4. MaxFactor red nail polish,

5. ADEN gold striping polish,

6. Sally Hansen Double Duty base&top coat,

7. Toothpick.


Thanks alot for stopping by my blog!

Come and join me,
Welcome to my:

YouTube channel: https://www.youtube.com/user/LifeWorldWomen

Feel free to ask me anything you'd like to know!

Instagram: https://www.instagram.com/ildikonailart/
Facebook: https://facebook.com/lifeworldwomen
Twitter: https://twitter.com/LWWEasyNailArt

Pinterest: http://www.pinterest.com/ildikomohos/

Music by Kevin MacLeod /Deck The Halls B.
https://incompetech.com/music/royalty-free/

Licensed under Creative Commons: By Attribution


12/19/2016

Poinsettia Side French Manicure For Christmas


Hi!

We're in the festive season, so I'm bringing a Poinsettia side French manicure.

Let me show you how you can make this pretty design!


1. Apply base coat to protect your natural nails,

2. Fix French manicure tape over the nail diagonally and paint white side nail tip:


3. Remove the tape carefully:


4. By a thin nail art brush and dark red or red acrylic paint draw the Poinsettia:


5. Then paint green or I paint dark green leafs:


6. Put small gold points in the middle of the flower and make gold edge over the side tips:


7. At the end apply top coat to protect your manicure from peeling and to keep it shiny and glossy:


What I use:

1. Essence Pro White Active base coat,

2. Essence white and gold nail polishes,

3. Moyra dark red, black, green and light green acrylic paints,

4. Sally Hansen Double Duty base&top coat,

5. Dotting tool,

6. Thin nail art brush.


Thank you so much for stopping by my blog!

Come and join me,
Welcome to my:

YouTube channel: https://www.youtube.com/user/LifeWorldWomen

Feel free to ask me anything you'd like to know!

Instagram: https://www.instagram.com/ildikonailart/
Facebook: https://facebook.com/lifeworldwomen
Twitter: https://twitter.com/LWWEasyNailArt

Pinterest: http://www.pinterest.com/ildikomohos/

Music by Kevin MacLeod /We Wish You/
https://incompetech.com/music/royalty-free/

Licensed under Creative Commons: By Attribution


12/16/2016

Red & Gold Christmas Tree Branch Nail Art


Hi!

Today I created another Christmas nail art, a red and gold Christmas tree branch design.

Let's start it!


1. Apply base coat to protect your natural nails,

2. Paint your ring and thumb nails red or dark red, the middle nail mint green and the index and little nails gold:


3. By a thin nail art brush paint Christmas tree branch over the middle nail - I add another shade of green too:


4. I start to paint the Christmas ball by using grey polish at first:


5. Then I paint a big red dot:


6. I add gold to the branch:


7. I draw wavy gold lines over the red nail:


8. Finally I put a gold dot on the ball:


9. ... And may come the top coat to protect the manicure from peeling and to keep it shiny and glossy:


What I use:

1. Essence base coat,

2. Essence mint green, dark red, green and gold nail polishes,

3. Sally Hansen Double Duty base&top coat,

4. Dotting tool,

5. Nail art brush.


Thanks alot for stopping by my blog!

Come and join me,
Welcome to my:

YouTube channel: https://www.youtube.com/user/LifeWorldWomen

Feel free to ask me anything you'd like to know!

Instagram: https://www.instagram.com/ildikonailart/
Facebook: https://facebook.com/lifeworldwomen
Twitter: https://twitter.com/LWWEasyNailArt

Pinterest: http://www.pinterest.com/ildikomohos/

Music by Kevin MacLeod /Wish Background/
https://incompetech.com/music/royalty-free/

Licensed under Creative Commons: By Attribution