9/30/2015

Pumpkin Nail Art / Fall Nail Designs


Hi Guys!

Today's nail art is a cute pumpkin nail design which is perfect for fall days.

Let's start it!


1. Apply base coat to protect your natural nails from discoloration,

2. Paint your index- and little finger nails orange:


3. Paint pumpkin over the thumb-, middle- and ring finger nails:


4. Paint around the pumpkin by using a bit darker orange polish and a striping brush:


5. Apply dry brush technique over each nail by using beige nail polish:


6. Then continue the pumpkin:


7. I use now pastel green:


8. Over the 'simple' orange nails paint three darker lines and three sparkly orange lines:


9. Finally apply top coat:


That's it!

Hope you like this pumpkin nail art.
Feel free to tell me your opinion!


What I use:

1. Essence base coat,

2. Miss Sporty orange nail polish,

3. Maybelline ColoRama orange nail polish,

4. Crystal Nails sparkly orange nail polish,

5. Lovely nude nail polish / beige,

6. S-he pastel green nail polish,

7. Essence QuickDry top coat.


Thanks for stopping at my blog!

Come and join me!
Welcome to my:

YouTube: https://www.youtube.com/user/LifeWorldWomen
Facebook: https://facebook.com/lifeworldwomen
Twitter: https://twitter.com/LWWEasyNailArt
Pinterest: http://www.pinterest.com/ildikomohos/

Music by Kevin MacLeod /Clear Air/
http://incompetech.com/music/royalty-free/


9/28/2015

Green Nails With Pink Dotting Tool & Toothpick Design


Hi Guys!

Today I'm brining a Brazilian green nail art with pink pattern.

This green is a kind of pastel color so you may use simple pastel or light green polish.

Let's start this cute nail art!


1. Apply base coat to protect your natural nails from discoloration,

2. Paint each nail green:


3. We need: a big headed dotting tool, baby pink - pink - dark pink nail polishes and a toothpick for the pattern:


That's it! We're done :)

I didn't use top coat for this design but for being long lasting manicure use your favorite one.

Feel free to share your opinion!


What I use:

1. Essence base coat,

2. Essence Brazilian green nail polish,

3. Lovely pink and baby pink nail polishes,

4. NYC dark pink nail polish.


Thanks for reading my blog!

Come and join me... Welcome to my:

YouTube: https://www.youtube.com/user/LifeWorldWomen
Facebook: https://facebook.com/lifeworldwomen
Twitter: https://twitter.com/LWWEasyNailArt
Pinterest: http://www.pinterest.com/ildikomohos/

Music by Kevin MacLeod /Continue Life/
http://incompetech.com/music/royalty-free/


9/25/2015

Red & White Elegant Leopard Nails Using Dotting Tool & Nail Brush


Hi Guys!

Today I'm bringing an elegant leopard nail design in red and white.

Let's start this pretty nail art!


1. Apply base coat to protect your natural nails from discoloration,

2. Paint the thumb- and index finger nails red:


3. Paint the white parts on middle-, ring- and little finger nails /You can see above these are not the same sizes - little finger one is the least then growing:


I paint only one coat because the pattern will covet it up.

4. Paint the red tip - and here we need two coats:


5. For the leopard pattern I use small headed dotting tool:


6. I paint around the red spots black and using more small tool:


7. Take a striping brush and 'nickel' nail polish for the line between the red and white parts - silver polish is perfect as well:


8. Finally apply top coat - Be careful! Let the nails dry before it to avoid the smudging:


That's it! We're done.

Hope you like this nail art.. Let me know it! :)

Always feel free to ask me anything you like to know!


What I use:

1. Essence base coat,

2. MaxFactor Glossfinity red nail polish,

3. Essence white nail polish,

4. Lovely black nail polish,

5. Catrice 'Nickel Minaj' nail polish,

6. Essence QuickDry top coat.


Thanks for reading my blog!

Come and join me... Welcome to my:

YouTube: https://www.youtube.com/user/LifeWorldWomen
Facebook: https://facebook.com/lifeworldwomen
Twitter: https://twitter.com/LWWEasyNailArt
Pinterest: http://www.pinterest.com/ildikomohos/

Music by Kevin MacLeod /Finding the Balance/
http://incompetech.com/music/royalty-free/


9/23/2015

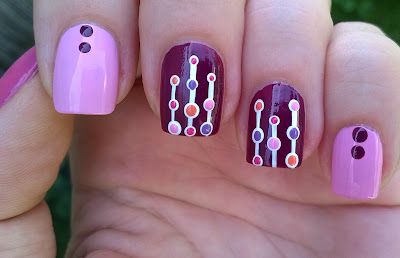
Stripes & Dots Nail Art In Purple & Pink


Hi Guys!

Today's nail art is a striped and dottied design in purple and pink.

Let me show you how to do this pretty design!


1. Apply base coat to protect your natural nails from discoloration,

2. Paint your nails:

- Pink: thumb nail,
- Baby pink: index- and little finger nails,
- Purple: middle- and ring finger nails.

3. Paint three lines alongside over the purple nails:


4. We now need big- and medium headed dotting tools and white nail polish:


5. Over the baby pink nails put two bigger purple dots, over the pink nails paint a white dot and two small baby pink ones:


6. Now take a medium and a small headed tools and drop colorful dots over the white ones - I use orange, pink, baby pink and pastel purple:


That's it! We're done :)

Today I didn't use top coat, but of course for being long lasting manicure apply your favorite one.

Please feel free to ask me anything you like to know and share your opinion!


What I use:

1. Essence base coat,

2. Miss Sporty dark and pastel purple, orange nail polishes,

3. Lovely pink and baby pink nail polishes.


Thanks for reading my blog!

Join me... Welcome to my:

YouTube: https://www.youtube.com/user/LifeWorldWomen
Facebook: https://facebook.com/lifeworldwomen
Twitter: https://twitter.com/LWWEasyNailArt
Pinterest: http://www.pinterest.com/ildikomohos/

Music by Kevin MacLeod /Continue Life/
http://incompetech.com/music/royalty-free/


9/21/2015

Fall Flower Nail Art / Toothpick Nail Design


Hi Guys!

Today's nail art is a pastel fall design. I use toothpick only for drawing the flowers.

Let's start this vintage nail art!


1. Apply base coat to protect your natural nails,

2. Paint your nails:

- Thumb-, index- and ring finger nails are pastel pink,
- Middle- and little finger nails are mauve/pale pink


3. Put four spots over the pastel pink nails, using: mauve, orange, baby pink and yellow nail polishes:


4. Grab a toothpick and white nail polish and shape the flowers/roses:


5. For the leaves I use pastel green polish:


6. Apply dry brush technique over the mauve nails using the pastel pink polish:


7. Apply top coat:


That's it! We're done.

Hope you liked this fall design... Let me know it! :)


What I use:

1. Essence base coat,

2. Moyra pastel pink nail polish,

3. Essence mauve/pale pink nail polish,

4. Lovely white and baby pink nail polishes,

5. Maybelline orange nail polish,

6. Rimmel yellow nail polish,

7. S-he pastel green nail polish,

8. Essence QuickDry top coat.


Thanks for reading my blog!

Come and join me... Welcome to my:

YouTube: https://www.youtube.com/user/LifeWorldWomen
Facebook: https://facebook.com/lifeworldwomen
Twitter: https://twitter.com/LWWEasyNailArt
Pinterest: http://www.pinterest.com/ildikomohos/

Music by Kevin MacLeod /Easy Jam/
http://incompetech.com/music/royalty-free/


9/18/2015

Sparkly Greenish Blue Gradient Striped Nail Art


Hi Guys!

Today I'm bringing a sparkly nail art.

I use greenish blue nail polish, black and white liner nail polishes - You may use simple nail brush with white and black nail polishes.


Let's start it!

1. Apply base coat to protect your natural nails from discoloration,

2. Paint your each nail sparkly green or blue if you don't have greenish blue, but don't use dark color:


3. By the black liner polish give a frame to the nail:


4. Draw a black line alongside in the middle area:


5. Paint three skew stripes on the both sides:


6. We now need the white polish for the next step:


7. Finally a thin white line over the tip:


8. Finish the nail art with top coat:


That's it! We're done.

Hope you loike this cute design.

Feel free to share your thoughts and opinions.


What I use:

1. Essence base coat,

2. Moyra sparkly greenish blue nail polish,

3. ADEN black and white liner polishes,

4. Essence QuickDry top coat.


Thanks for reading my blog!

Come and join me!
Welcome to my:

YouTube: https://www.youtube.com/user/LifeWorldWomen
Facebook: https://facebook.com/lifeworldwomen
Twitter: https://twitter.com/LWWEasyNailArt
Pinterest: http://www.pinterest.com/ildikomohos/

Music by Kevin MacLeod /Anamalie/
http://incompetech.com/music/royalty-free/


9/16/2015

Fall Nail Art - Leaves / Nail Brush Designs


Hi Guys!

The nail art I show you today is a fall design using nail brush.

Every season has its own beauty and colors - which ones for the autumn are mostly the orange, yellow and brown.

So let's get start it!


1. Apply base coat to protect your natural nails from discoloration,

2. Paint your nails:

- Thumb-, index- and middle finger nails are white - I use white sand nail polish,
- Ring- and little finger nails are salmon - This is a sparkly polish,

3. We now need a simple striping brush for the pattern, first draw the side lines using salmon nail polish - you may use dark orange instead of salmon:


4. For the leaves we need orange, yellow and burgundy nail polishes - also you may use dark red if you don't have burgundy polish:


5. Finally apply top coat - Important to wait 20-25 minutes or more before apply it because the light and dark colors may smudge each others easily:


That's it!

Hope you liked this fall nail design.

Feel free to ask me and tell me your opinion! :)


What I use:

1. Essence base coat,

2. Crystal Nails salmon and burgundy nail polishes,

3. Lovely white sand nail polish,

4. Maybelline orange nail polish,

5. Rimmel yellow nail polish,

6. Essence QuickDry top coat.


Thanks for reading my blog!

Join me... Welcome to my:

YouTube: https://www.youtube.com/user/LifeWorldWomen
Facebook: https://facebook.com/lifeworldwomen
Twitter: https://twitter.com/LWWEasyNailArt
Pinterest: http://www.pinterest.com/ildikomohos/

Music by Kevin MacLeod /Autumn Day/
http://incompetech.com/music/royalty-free/