11/28/2014

Matte nail art - Christian nails


One of my favorite designs is the matte nail design.

I used dark blue nail polish, but it looks black maybe. (Before the blue polish I used base coat.)

After I applied the matte top coat, then started dotting.

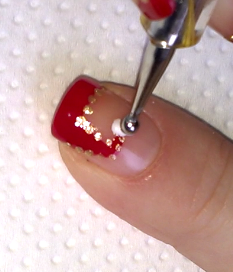
At first the silver and white dots by larger headed dotting tool:


Then I chose smaller tool for the other colours:


When I finished with dotting, I put a line of sparkly silver glitter polish on the edge of dots.


What I use:

1. Essence base coat,

2. Crystal Nails dark blue polish/47/,

3. Lovely Matte top coat,

4. Catrice Nickel Minaj/42/,

5. Crystal Nails white polish,

6. Astor, Sweet Lavender/201/,


7. Astor Quick&Go/321/, Essence silver sparkle sand.


I hope you like that matte Christian nail design.


Welcome to my Facebook:
https://facebook.com/lifeworldwomen

Music by Kevin MacLeod /Easy Lemon/
http://incompetech.com/music/royalty-free/


11/26/2014

Santa Nail: Red / White and Gold dots


Cute Santa nails! Easy as well!

Let's see how it made.

First I apply base coat to protect my nails, then start with the red Santa Claus hat:


Second the gold dotting:


I think it's so nice but not hard to do..

And finally a bigger dot end of the hat:


And we done it!


What I used:

1. Essence base coat,

2. Crystal Nails red polish,

3. Crystal Nails white polish,

4. Miss Sporty sparkly glitter polish.


I hope you like it! :-)


My Facebook:
https://facebook.com/lifeworldwomen

Music by Kevin MacLeod /Montauk Point/
http://incompetech.com/music/royalty-free/


11/23/2014

Black matte nail art with silver dotted design


A new matte nail design!

It's not a secret that I love black nails, especially the black matte nail art.

Today I used silver polish with it.

First of all I paint my nails with base coat to protect my nail.

Then I apply black polish after it the matte top coat. As I finish them, start dotting:


First the bigger silver dots..

Then may come the smaller black dots top of silver ones:


You can see I painted 3 different designs, and thumbs are almost the same as forefinger paint.

So it's a nice and cute nail art, black and silver look always good together :-)


What I use:

1. Essence base coat,

2. Lovely black polish,

3. Lovely Matte top coat,

4. Catrice Nickel Minaj/42/.


I hope you like it!

My Facebook:
https://facebook.com/lifeworldwomen

Music by Kevin MacLeod /Clean Air/
http://incompetech.com/music/royalty-free/


11/21/2014

3 in 1 easy flower dotted nail design


Flower nails!

It's already winter here, so feel good to bring back the summer time by this cute flowers :-).

3 in 1 because I painted 3 different designs on my hands using 5 colours.

At first I apply, as always, base coat.

Then I paint one of my nails with blue polish and other ones dark pink polish.

And we can start the flowers:


When all petals are ready then may come the middle dots, I used lilac for it:


Unfortunately, I forgot to record my thumb design :-)) , but I shared a link of my other video in this video, you can check it out there how to do... It's so easy and beautiful.


What I use:

1. Essence base coat,

2. Lovely Crystal Strenght/dark pink/,

3. Essence/light blue/,

4. Miss Sporty quick dry: orange, yellow, light lilac.


I hope you like it.


My Facebook
https://facebook.com/lifeworldwomen

Music of video by Kevin MacLeod /Cut and Dry/
http://incompetech.com/music/royalty-free/


11/18/2014

French manicure tips - Black & White dotted nails


Cute French manicure!

First of all I apply base coat to protect my nails.

Then I paint the nail tips black and white (you can see that).

When I finished it, start dotting, bigger dots then top of bigger ones smaller dots:


So easy nail design, if you try you see :-)

When all dots are ready just one thing to do, top coat.


 What I use:

1. Essence base coat,

2. Lovely black polish,

3. Crystal Nails white polish,

4. Essence Quick Dry top coat.


I hope you like that nail art!

My Facebook: https://facebook.com/lifeworldwomen

Music of video by Kevin MacLeod /Finding the Balance/
http://incompetech.com/music/royalty-free/


11/15/2014

Waterfall nail art - White based lilac and silver glitter nail design


Very nice! I love it, I hope that you'll like too :-)

First of all I apply always base coat to protect my nails.

Second the white nail polish... then I start making strips.

I paint shorter lilac strips and longer lavender strips:


After it finish with the silver glitter polish:


And we are ready this nice nail design! :-)

What I use:

1. Essence base coat,

2. Crystal Nails white polisih,

3. Crystal Nails lilac polish/37/,

4. Astor/Sweet Lavender 201,


5. Essence sparkle sand effect/silver glitter/ polish.


Try and see how it's beautiful and easy.


My Facebook: https://facebook.com/lifeworldwomen

Music by Kevin MacLeod /Easy Lemon/
http://incompetech.com/music/royalty-free/


11/12/2014

2014 Fall/Winter Nails - Red & Black Nail Design


Easy nail art for Fall with trendy red and black colours.

First of all I use base coat to protect my nails.

Then may come the red nail polish in special shape:


After it the black tips:


Maybe it seems a little hard but it isn't :-)

When black tips are ready I use some dots (but it's not important).


We just finished!

I didn't use top coat now, these polishes are shiny enough; but if you need long lasting nails I suggest quick dry top coat by Essence.


 What I use:

1. Essence base coat,

2. Astor, Mexican Cherry/32/300/4097,

3. Lovely black polish,

(I didn't apply top coat, but if yes then it's Essence quick dry top coat.)


I hope you like this design.

Try it, so easy :-)

My Facebook
https://facebook.com/lifeworldwomen

Music by Kevin MacLeod /Funkorama/
http://incompetech.com/music/royalty-free/


11/07/2014

Dripping paint nail art design - Warm chocolate


Dripping nails - Easy nail design in many variations.

I chose natural colours, beige and brown with sand nail polish.

First I apply base coat to protect my nails.
Then may come beige/nude nail polish - one of my nails I paint with brown polish.
If my nails are ready then draw small waves on tips:


After waves I paint drips with a toothpick:


When all of nails are ready I finish with the quick dry top coat.

Try it, it's not hard to do!

I hope you'll like it :-)

My facebook: https://facebook.com/lifeworldwomen


11/03/2014

Black matte nails with colouful dotted design


Matte nails with colourful dots and we can finish it with a white flower.

Easy nail design for anyone and no special tool needed, only toothpick.

At first I apply base coat, then black nail polish and finally matte top coat.


I use two different sizes toothpick - thicker one for white and red dots and thinner one for blue dots and the flower.


What I use for painting:

1. Essence base coat,

2. Lovely black polish,

3. Lovely matte top coat,

4. Crystal Nails white polish/500,

5. Crystal Nails red polish/42,

6. Essence colour&go light blue.


I hope you'll like it!

Have a great day! :-)

Facebook: https://facebook.com/lifeworldwomen