9/30/2016

Easy Toothpick Nail Art With Flower Motifs For Beginners


Hello Everyone!

Today I show you an easy toothpick flower nail art over black nails.

Let's start it!


1. Apply base coat to protect your natural nails from hard discoloration,

2. Paint one of your nails black - we need wet nail polish:


3. Paint a pink line over the wet base:


4. By a toothpick and white polish, start to make the flower-like patter:


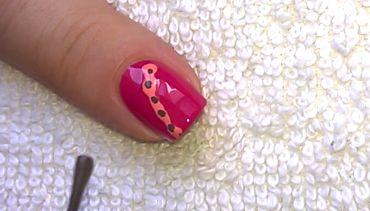
5. I change the place of the flower on each nail, and the other color I use is the peach:


6. Paint small peach points over the pink flower and pink points over the peach flowers:


7. Finally I put small white points over the black part:


8. At the end apply top coat to protect your manicure from peeling and to keep it shiny and glossy:


That's it! We're done.


What I use:

1. Essence base coat,

2. Sally Hansen Miracle Gel black nail polish,

3. Lovely pink nail polish,

4. Essence peach and white nail polishes,

5. Toothpick,

6. Sally Hansen Double Duty base&top coat.


Thanks for stopping by my blog!

Join me,
Welcome to my:

YouTube channel: https://www.youtube.com/user/LifeWorldWomen

Feel free to ask me anything you'd like to know!

Facebook: https://facebook.com/lifeworldwomen
Twitter: https://twitter.com/LWWEasyNailArt

Pinterest: http://www.pinterest.com/ildikomohos/

Music by Kevin MacLeod /Easy Lemon/
https://incompetech.com/music/royalty-free/

Licensed under Creative Commons: By Attribution


9/28/2016

Blue Nail Art: Elegant Easy Rhinestone Bow Nail Design


Hello Everyone!

Today I share an elegant blue nail art, a rhinestone bow design.

Let's start it!


1. Apply base coat to protect your natural nails from hard discoloration,

2. Paint your nails blue:


3. The bow will be over the ring nail. Firstly I place a pearl over the nail by using top coat:


4. Then I make the bow by rhinestones:


5. Over the other nails I put two rhinestones:


6. Finally may come the top coat to protect the manicure from peeling and to keep it shiny and glossy:


That's it! We're done.


What I use:

1. Essence base coat,

2. Essence blue nail polish,

3. Rhinestones,

4. Pearl nail decoration,

5. Sally Hansen Double Duty base&top coat.


Thanks alot for reading my blog!

Join me,
Welcome to my:

YouTube channel: https://www.youtube.com/user/LifeWorldWomen

Feel free to ask me anything you'd like to know!

Facebook: https://facebook.com/lifeworldwomen
Twitter: https://twitter.com/LWWEasyNailArt

Pinterest: http://www.pinterest.com/ildikomohos/

Music by Kevin MacLeod /Finding the Balance/
https://incompetech.com/music/royalty-free/

Licensed under Creative Commons: By Attribution


9/26/2016

Black Nails With Drag Marble Flowers Using Needle


Hello Everyone!

Today I share a black nail design with colorful drag marble flowers.

I hope you'll like this easy nail idea.

So, let's do it!


1. Apply base coat to protect your natural nails.

2. We start it with the little nail... paint it black and don't let it dry:


3. Put four medium pastel green dots over the wet polish and by a needle make the petals:


4. The ring nail has blue flower, the middle nail has purple flower and the index nail has baby pink flower:


5. The thumb has light orange flower:


6. I place rhinestone on the middle of each flower... I fix it by top coat:


7. At the end apply top coat to protect the manicure from peeling and to keep it shiny and glossy:


That's it! We're done.


What I use:

1. Essence base coat,

2. Sally Hansen Miracle Gel black nail polish,

3. Essence Colour&Care pastel green nail polish,

4. Lovely blue polish,

5. Miss Sporty pastel purple nail polish,

6. Essence baby pink and light orange nail polishes,

7. Sally Hansen Double Duty base&top coat,

8. Rhinestones S5,

9. Needle.


Thanks alot for stopping by my blog!

Join me,
Welcome to my:

YouTube channel: https://www.youtube.com/user/LifeWorldWomen

Feel free to ask me anything you'd like to know!

Facebook: https://facebook.com/lifeworldwomen
Twitter: https://twitter.com/LWWEasyNailArt

Pinterest: http://www.pinterest.com/ildikomohos/

Music by Kevin MacLeod /Dream Culture/
https://incompetech.com/music/royalty-free/

Licensed under Creative Commons: By Attribution


9/23/2016

Fall Flower Nail Design Using Dotting Tool


Hello Everyone!

Today I share an easy Fall flower nail art by using dotting tools.

Let's start it!


1. Apply base coat to protect your natural nails from hard discoloration,

2. Paint your nails pastel yellow:


3. By a medium dotting tool paint a light orange flower and a pink one:


4. By a small dotting tool paint a blue flower and a pastel purple one:


5. By your smallest dotting tool paint pastel green leaves:


6. Put orange dot in the middle of pink flower, pink dot in the middle of orange flower, etc...:


7. Finally put small black points over the big flowers:


8. At the end apply top coat to protect the manicure from peeling and to keep it shiny and glossy:


That's it! We're done.


What I use:

1. Essence base coat,

2. Essence Colour&Care pastel yellow nail polish,

3. Essence light orange nail polish,

4. Rimmel Salon Pro pink polish,

5. Lovely blue nail polish,

6. Maybelline ColoRama pastel green nail polish,

7. Miss Sporty pastel purple polish,

8. Sally Hansen Double Duty base&ctop coat,

9. Catrice black nail polish,

10. Dotting tools.


Thanks alot for stopping by my blog!

Join me,
Welcome to my:

YouTube channel: https://www.youtube.com/user/LifeWorldWomen

Feel free to ask me anything you'd like to know!

Facebook: https://facebook.com/lifeworldwomen
Twitter: https://twitter.com/LWWEasyNailArt

Pinterest: http://www.pinterest.com/ildikomohos/

Music by Kevin MacLeod /Autumn Day/
https://incompetech.com/music/royalty-free/

Licensed under Creative Commons: By Attribution


9/21/2016

Black Side French Manicure With Needle Nail Art / How I Paint My Right Hand With Left Hand


Hello Everyone!

Today's manicure is a black side French design with needle nail art.

You can see in the video, how I paint my right hand with my non dominant left hand.
I had more requests about it, so I have put it in the video.

Let's start it!


1. Apply base coat to protect your natural nails from hard discoloration,

2. Fix Scotch tape over the nail diagonally and paint black side French nail tip:


3. Put: Peach or light orange, pink, purple and blue blobs over the wet black base:


4. By dragging a needle across the blobs make heart-like motifs:


5. Slowly remove the tape:


6. Paint white line over the edge of black tip:


7.... And my left hand what I paint usually:


8. Finally apply top coat to protect the manicure from peeling and to keep it shiny and glossy:


That's it! We're done.


What I use:

1. Essence base coat,

2. Sally Hansen Miracle Gel black nail polish,

3. Essence peach polish,

4. Rimmel pink nail polish,

5. Catrice purple nail polish,

6. Lovely light blue nail polish,

7. Sally Hansen Double Duty base&top coat,

8. Scotch tape,

9. ADEN white striping polish,

10. Needle.


Thanks alot for stopping by my blog!

Join me,
Welcome to my:


Feel free to ask me anything you'd like to know!


Music by Kevin MacLeod /Anamalie/

Licensed under Creative Commons: By Attribution


9/19/2016

Pink Needle Nail Art With Fall Impact


Hello Everyone!

I didn't make pink nail design lately, so today I share one.

This is a needle drag marble nail art with Fall impact, as I use brown and peach nail polishes.

Let's start it!


1. Apply base coat to prorect your natural nails from hard discoloration,

2. Paint one of your nails pink - we need wet nail polish that's why do one nail at the same time:


3. Paint a diagonal peach or light orange line over the wet base:


4. Put small brown dots over the light line:


5. Grab a needle and start to make the marble design
/You can see in the video how I do that exactly/:


6. Finally may come the top coat to protect your manicure from peeling and to keep it shiny and glossy:


That's it! We're done.


What I use

1. Essnce Hardening Nail Base,

2. Rimmel Salon Pro pink nail polish,

3. Essence peach and brown nail polishes,

4. Sally Hansen Double Duty base&top coat,

5. Needle.


Thanks for stopping by my blog!

Come and join me,
Welcome to my:

YouTube channel: https://www.youtube.com/user/LifeWorldWomen

Feel free to ask me anything you'd like to know!

Facebook: https://facebook.com/lifeworldwomen
Twitter: https://twitter.com/LWWEasyNailArt

Pinterest: http://www.pinterest.com/ildikomohos/

Music by Kevin MacLeod /Double Drift/
http://incompetech.com/music/royalty-free/

Licensed under Creative Commons: By Attribution


9/16/2016

Needle Nail Art: Purple Drag Marble Nails


Hello Everyone!

In this time I decided to make a purple nail design.
This is a drag marble nail art using a single needle.

Let's start it!


1. Apply base coat to protect your natural nails from hard discoloration,

2. Paint one of your nails purple - one, because we need wet nail polish:


3. Apply a pastel purple, then a gold line over the wet base:


4. Grab a needle and start to drag it across the wet polish:


5. Finally apply top coat to protect your manicure from peeling and to keep it shiny and glossy:


That's it! We're done.


What I use:

1. Essence base coat,

2. Rimmel Salon Pro purple nail polish,

3. Miss Sporty pastel purple nail polish,

4. Essence gold nail polish,

5. Sally Hansen Double Duty base&top coat,

6. Needle.


Thanks alot for stopping by my blog!

Come and join me,
Welcome to my:

YouTube channel: https://www.youtube.com/user/LifeWorldWomen

Feel free to ask me anything you'd like to know!

Facebook: https://facebook.com/lifeworldwomen
Twitter: https://twitter.com/LWWEasyNailArt

Pinterest: http://www.pinterest.com/ildikomohos/

Music by Kevin MacLeod /Continue Life/
https://incompetech.com/music/royalty-free/

Licensed under Creative Commons: By Attribution