8/31/2016

Elegant Floral Nail Design Over Wide French Tips


Hello Everyone!

This time I show you an elegant floral nail design.

I use regular white nail polish, gold striping polish and acrylic paints.


Let's get started!

1. Apply base coat to protect your natural nails from hard discoloration,

2. Paint wide white French tips - No need tape because the edge won't be perfectly straight:


3. After the polish gets dry, paint gold little bit messy line over the edge:


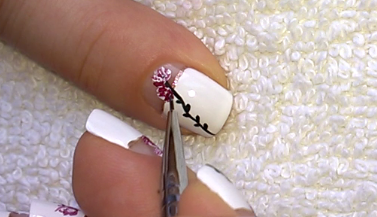
4. For the leaves and stalk I mix black, green and light green acrylic paints:


5. For the flowers I use burgundy and white paints - as you see above, I change the flowers on each nail:


6. Finally may come the top coat to protect the manicure from peeling and to keep it shiny and glossy:


That's it! We're done.


What I use:

1. Essence Ultra Nail Repair base coat,

2. Artdeco white nail polish,

3. ADEN gold striping polish,

4. Moyra acrylic paints: black, burgundy, green, light green and white,

5. Sally Hansen Double Duty base&top coat,

6. Thin nail art brush.


Thanks alot for stopping by my blog!

Come and join me,
Welcome to my:

YouTube channel: https://www.youtube.com/user/LifeWorldWomen

Feel free to ask me anything you'd like to know!

Facebook: https://facebook.com/lifeworldwomen
Twitter: https://twitter.com/LWWEasyNailArt

Pinterest: http://www.pinterest.com/ildikomohos/

Music by Kevin MacLeod /Clear Air/
https://incompetech.com/music/royalty-free/

Licensed under Creative Commons: By Attribution


8/29/2016

Colorful Dotticure Nail Art Inspired By Aboriginal Art


Hello Everyone!

This time I'm bringing you a colorful dot design inspired by Aboriginal art.
I hope you'll like this cheerful nail art.

Let's get started!


1. Apply base coat to protect your natural nails from hard discoloration,

2. Paint your nails light brown / dark beige:


3. I start the pattern on my middle nails by a medium blue dot then small pink ones around it:


4. Then I use my smallest dotting tool for the next colors,like: light orange and light blue: 


5. The next color is the greyish blue, in the same time I start to paint a wave-like pattern over my other nails by the same color:


6. As you see I use the same colors over the middle and the other 'wavy' nails:


7. I paint small light blue points over each nail tip:


8. Also blue points go on the upper side of middle nail:


9. The 'wavy' nails get new pattern over the upper section, started with light blue, then pink and yellow dots:


10. I fill the empy space:


11. Finally may come the top coat:


... And that's it! We're done.


What I use:

1. Essence Ultra Nail Repair base coat,

2. Catrice Luxury Nudes dark beige polish,

3. Rimmel pink and yellow nail polishes,

4. Lovely blue nail polish,

5. Essence light orange and blue, greyish blue nail polishes,

6. Lovely matte top coat,

7. Dotting tools.


Thanks for reading my blog!

Come and join me,
Welcome to my:

YouTube channel: https://www.youtube.com/user/LifeWorldWomen

Feel free to ask me anything you'd like to know!

Facebook: https://facebook.com/lifeworldwomen
Twitter: https://twitter.com/LWWEasyNailArt

Pinterest: http://www.pinterest.com/ildikomohos/

Music by Kevin MacLeod /Living Voyage/
http://incompetech.com/music/royalty-free/

Licensed under Creative Commons: By Attribution


8/24/2016

Gradient Dotticure Nail Art In Purple & Green


Today's nail art is a pastel green and purple gradient dotticure design.

I've already seen similar designs and I liked them, so I decided to make one.

Let's get started!


1. Apply base coat to protect your natural nails from hard discoloration,

2. Paint your nails pastel green and let them dry:


3. You can fix the edge by a nail art brush and nail polish remover:


4. Paint purple side French tip:


5. Grab a medium dotting tool and start to paint the purple dots:


6. Then paint some small dots too:


7. After the purple polish gets dry may come the green dots by the same way:


8. Finally apply top coat to protect your manicure from peeling and to keep it shiny and glossy:


That's it! We're done.


What I use:

1. Essence Hardening Nail Base,

2. Essence Colour&Care Strengthening pastel green nail polish,

3. Rimmel Salon Pro purple nail polish,

4. Sally Hansen Double Duty base&top coat,

5. Dotting tools.


Thanks for stopping by my blog!

Come and join me,
Welcome to my:


Feel free to ask me anything you'd like to know!


Music by Kevin MacLeod /Easy Lemon/

Licensed under Creative Commons: By Attribution


8/22/2016

Fall Tree Nail Art


Hello Everyone!

Today I'm bringing a Fall tree nail design.

We needed black and white acrylic paints and some colors of the Fall.

Let's start it!


1. Apply base coat to protect your natural nails from hard discoloration,

2. Paint your nails beige or very light brown,

3. For the tree design we need:

- a thin nail art brush,
- black and white acrylic paints for the tree and the branch (I mix dark grey from them),
- and nail polishes: orange, light orange, brown and dark brown.

4. First I paint the tree over the middle nail and the branches over the index and ring nails:


5. I start the Fall leaves by the orange by using toothpick:


6. Also paint falling leaves under the tree... I paint the 'branch' nails by the same way:


.. After orange may come the other colors and I finish it by the light orange:


7. The little and the thumb nails get dot tips:


8. Finally may come the top coat to protect your manicure from peeling and to keep it shiny and glossy... Don't forget! The water can wash away the acrylic paints, so apply the top coat carefully:


That's it! We're done.


What I use:

1. Essence Ultra Nail Repair base coat,

2. Essence The Nudes very light brown and brown nail polishes,

3. Moyra black and white acrylic paints,

4. Essence light orange nail polish,

5. Maybelline orange polish,

6. Miss Sporty dark brown polish,

7. Sally Hansen Double Duty base&top coat,

8. Toothpick,

9. A thin nail art brush.


Thanks for stopping by my blog!

Welcome to my:


Feel free to ask me anything you'd like to know!


Music by Kevin MacLeod /Daily Beetle/

Licensed under Creative Commons: By Attribution


8/19/2016

Brown Drag Marble Nail Art For Fall Using Needle & Toothpick


Hello Everyone!

Today's manicure is my first Fall design in this year.

This one is a brown drag marble nail art using needle and toothpick.

Let's start it then!


1. Apply base coat to protect your natural nails from hard discoloration.

2. Paint one of your nails dark brown - we need wet nail polish:


3. Put a brown blob, a light brown blob and a gold blob over the wet base:


4. Grab a needle and start to drag it over the blobs: 


5. By a toothpick paint brown and gold points around the marble design:


This is the result:


6. Finally apply top coat to protect your manicure from peeling and to keep it shiny and glossy:


That's it! We're done.


What I use:

1. Essence Hardening Nail Base,

2. Essence light brown, brown, dark brown and gold nail polishes,

3. Sally Hansen Double Duty base&top coat,

4. Needle,

5. Toothpick.


Thanks for stopping by my blog!

Come and join me,
Welcome to my:

YouTube channel: https://www.youtube.com/user/LifeWorldWomen

Feel free to ask me anything you'd like to know!

Facebook: https://facebook.com/lifeworldwomen
Twitter: https://twitter.com/LWWEasyNailArt

Pinterest: http://www.pinterest.com/ildikomohos/

Music by Kevin MacLeod /Autumn Day/
https://incompetech.com/music/royalty-free/

Licensed under Creative Commons: By Attribution


8/17/2016

Drag Marble Needle Nail Art For Short Nails


Hello Everyone!

I share today a drag marble nail art using a single needle.

We need mint green and purple nail polishes for this pretty nail design.

Let's do it!


1. Apply base coat to protect your natural nails from hard discoloration,

2. Paint your nails mint green.. for the marble design, apply another layer and don't let it dry:


3. Paint a purple line over the middle section:


4. Grab a needle and start to make the pattern:


5. After getting dry, paint a bigger and a smaller dots on the lower part:


6. Finally apply top coat to protect the manicure from peeling and to keep it shiny and glossy:


That's it! We're done.


What I use:

1. Essence Ultra Nail Repair base coat,

2. Essence mint green and gold nail polishes,

3. Rimmel Salon Pro purple nail polish,

4. Sally Hansen Double Duty base&top coat,

5. Needle.


Thanks alot for stopping by my blog!

Come and join me,
Welcome to my:

YouTube channel: https://www.youtube.com/user/LifeWorldWomen

Feel free to ask me anything you'd like to know!

Facebook: https://facebook.com/lifeworldwomen
Twitter: https://twitter.com/LWWEasyNailArt

Pinterest: http://www.pinterest.com/ildikomohos/

Music by Kevin MacLeod /Continue Life/
http://incompetech.com/music/royalty-free/

Licensed under Creative Commons: By Attribution