7/17/2015

Summer Floral Nails By Using Nail Art Brush


Still Summer!!

So I'm coming again with one of my favorite colors... the PINK.

I hope you don't mind it :)

Today I used only a nail art brush for making the floral design.

Let's bebin this pretty nail art!


1. Apply base coat to protect the natural nails from discoloration,

2. Paint your nails:

- Thumb and index finger nails are orange,
- Ring and little finger nails are pink,
- Middle finger nail is beige

3. We now start the flowers by using a nail art brush and green nail polish:


4. Go on by painting of petals and use dark pink, pink and baby pink colors:


5. For the yellow flowers I use pastel green nail polish and of course the yellow one (Unfortunately my camera didn't record the 'yellow flower part' that's why you see them as ready, so I draw second layer on the top to show you how to do) :


6. Some green at the edge and over the darker green leaves as well:


7. I paint pink and orange tips over the other nails, it's similar to ombre design:


8. Finally apply the top coat:


That's it!

We're done :)

I'm excited for you to see this summer nail art... I really like this design so much because of colors and the floral pattern.

Please share your thoughts, ask me anything you need to know :)


What I use:

1. Essence base coat,

2. Lovely Nude nail polish,

3. Lovely Summer Trend pink and baby pink nail polishes,

4. Essence green nail polish,

5. S-he pastel green nail polish,

6. Maybelline ColoRama orange nail polish,

7. NYC dark pink nail polish,

8. Rimmel yellow nail polish,

9. Essence QuickDry top coat.


Thanks for visiting my blog!

Join me... Welcome to my:

YouTube: https://www.youtube.com/user/LifeWorldWomen
Facebook: https://facebook.com/lifeworldwomen
Twitter: https://twitter.com/LWWEasyNailArt
Pinterest: http://www.pinterest.com/ildikomohos/

Music by Kevin MacLeod /Easy Jam/
http://incompetech.com/music/royalty-free


7/15/2015

Pink & Mint Green Floral Nail Design


Hi Guys!

Today I am bringing a fully pink design with a little mint green :)

I used three-size dotting tool, pink-baby pink-dark pink-mint green colors.

Let me show you how to do!


1. Apply base coat always if you have natural nails, that will protect them from discoloration,

2. Paint you nails:
- Thumb, middle and little finger nails are pink,
- Index and ring finger nails are baby pink.

3. Grab a big headed dotting tool and start the flowers by using at first the pink and mint green nail polishes:


4. For thr next layer take a smaller headed tool:


5. And the small headed tool with the dark pink nail polish:


6. On the top of flowers put 1-1 dot by using the first colors:


7. Finally paint a row of dots over each nail on the middle part:


That's it! We're done :)

I did not use top coat today - these nail polishes are so shiny - but of course for being more shiny you can use your favorite one.


What I use:

1. Essence base coat,

2. Lovely Summer Trend pink and baby pink nail polishes,

3. Maybelline mint green nail polish,

4. NYC dark pink nail polish.


Thanks for visiting my blog!

Join me... Welcome to my:

YouTube: https://www.youtube.com/user/LifeWorldWomen
Facebook: https://facebook.com/lifeworldwomen
Twitter: https://twitter.com/LWWEasyNailArt
Pinterest: http://www.pinterest.com/ildikomohos/

Music by Kevin MacLeod /Double Drift/
http://incompetech.com/music/royalty-free


7/13/2015

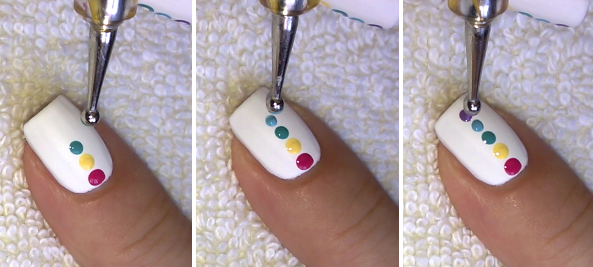
Matte White Nail Art With Dot Design In The Colors Of Rainbow


I did not make white nail art for long time so today I am bringing one.

White matte nails with colorful dot design.

Let's begin!


1. Apply base coat to protect the natural nails from discoloration,

2. Paint each nail by using matte white nail polish, or you can use simple white nail polish and matte top coat over it:


3. Grab a bigger headed dotting tool for the pink and yellow dots:


4. By a smaller headed tool paint the green, blue and violet dots:


5. Finally by a smaller headed tool than the previous one - but not the smallest one - put white dots over the colorful ones:


That's it! Done :)

Hope you like this easy design and will try it out.


What I use:

1. Essence base coat,

2. Lovely Matte White nail polish,

3. Miss Sporty light blue, violet, yellow and green nail polishes,

4. Rimmel pink nail polish.


Thanks for stopping at my blog!

Join me!
Welcome to my:

YouTube: https://www.youtube.com/user/LifeWorldWomen
Facebook: https://facebook.com/lifeworldwomen
Twitter: https://twitter.com/LWWEasyNailArt
Pinterest: http://www.pinterest.com/ildikomohos/

Music by Kevin MacLeod /Living Voyage/
http://incompetech.com/music/royalty-free


7/10/2015

Beach Inspired Blue & Gold Summer Nail Design


Today's video I made a blue and gold Summer nail art.

Needs blue nail polish - I used sparkly blue - light blue, light brown, gold, red - I used darker red - white and black nail polishes... And two-size dotting tool.

Let's begin this cute nail design!

1. Apply base coat to protect the natural nails from discoloration,

2. Paint you nails:

- Thumbs and index fingers are blue
- Middle fingers are light blue
- Little- and ring fingers are gold.

3. Paint light blue tips over the ring finger nails:


4. Smudge the middle finger nails by using light brown nail polish then on the top ot it apply the gold color - try to draw a gradient shape:


5. Grab a small headed dotting tool and th red nail polish and paint a starfish over the gold part of middle finger nails:


6. By using a big headed tool and the small headed one as well create a little goldfish over the index finger nails:


7. The thumbs were made by the same way like ring finger nails but I used red for tips:


8. Finally apply top coat:


That't it! Done!

I really hope you love this easy beach nail art for the warm days even you'll try it out :)


What I use:

1. Essence base coat,

2. Essence sparkly blue and gold nail polishes,

3. Lovely red, white and black nail polishes,

4. Rimmel light blue nail polish,

5. Miss Sporty light blue nail polish,

6. Essence Quick Dry top coat.


Thanks for visiting my blog!

Join me!
Welcome to my:

YouTube: https://www.youtube.com/user/LifeWorldWomen
Facebook: https://facebook.com/lifeworldwomen
Twitter: https://twitter.com/LWWEasyNailArt
Pinterest: http://www.pinterest.com/ildikomohos/

Music by Kevin MacLeod /Montauk Point/
http://incompetech.com/music/royalty-free


7/08/2015

My Super Easy Nail Care Routine!


I had some requests for nail care routine video, so I did one today :)

My nail care is really so easy. I do not like to use much chemicals over my skin and nails.. but let me show you how I do this.

1. I shape my nails with a simple nail file - my nails are square shape and it has a slightly curved edge, even no need much filing:


2. For those whose nails are a bit yellow by nail polishes, I made a mix:

- 1-2 dls water,
- a teaspoon of baking soda,
- a few drops of lemon.


You may keep your nails in this mix at least for 15 minutes.

You should repeat this 2-3 times a week.. I usually suggest to use base coat that is protect the natural nails from discoloration.


3. Then I take my 2 in 1 hand and nail balm by Essence and put it over the cuticles... as it becomes softer then push back by this tool:


4. With this three-side file I smooth and gloss my nails - no need to do often:
/ Just a little trick, you can gloss your nails by something like a towel as well :) /


5. Finally care your hands and nails together by using the hand balm:


That's it!

Hope I could help you by these ideas.

Thanks for stopping at my blog!

Join me... Welcome to my:

YouTube: https://www.youtube.com/user/LifeWorldWomen
Facebook: https://facebook.com/lifeworldwomen
Twitter: https://twitter.com/LWWEasyNailArt
Pinterest: http://www.pinterest.com/ildikomohos/

Music by Kevin MacLeod /Finding The Balance, Laid Back Guitars/
http://incompetech.com/music/royalty-free


7/06/2015

French Manicure Ideas - White/Pink Flower & Net Nail Design


Today's nail art is a pink French manicure with flower and net design.

I used toothpick for the net. I did not want to make it by liner nail polish if you do not have one sure you can get a toothpick instead.

So, let's begin this nice floral nails!


1. Apply base coat to protect the natural nails from discoloration,

2. Paint each nail tip baby pink ( do not worry if the edge is not perfect because it will be covered:


3. Take a toothpick and put six points that will help you for making the net pattern:


4. By using white nail polish and the toothpick draw the lines between the points and even do not miss out the corners of nails:


5. When you are done, grab a big headed dotting tool and pink nail polish and paint four dots above the French tip over the middle and ring finger nails - then by using dark red poilsh and the toothpick, make the flower by mixing the colors:


6. We now need two shades of green for the leaves... first use the darker green nail polish then on the top of dark leaves put light green shade:


7. Finally apply top coat - but never forget to wait at least 20 minutes before apply it to avoid the smudging:


We're done!

Hope you like this cute summer design.

Feel free to ask me anything you want to know about my nail designs, or how to do, or if you do not understand something.

What I use:

1. Essence base coat,

2. Lovely white, baby pink and pink nail polish,

3. Essence green and light green nail polishes,

4. Astor dark red nail polish,

5. Essence Quick Dry top coat.


Thanks for stopping at my blog!

Join me... Welcome to my:

YouTube: https://www.youtube.com/user/LifeWorldWomen
Facebook: https://facebook.com/lifeworldwomen
Twitter: https://twitter.com/LWWEasyNailArt
Pinterest: http://www.pinterest.com/ildikomohos/

Music by Kevin MacLeod /Double Drift/
http://incompetech.com/music/royalty-free


7/03/2015

Simply Summer Nails - Pink-Yellow-Orange Nail Design


This nail art I've done today really a super easy and cheerful by these summer colors.
I used dark pink, pink, orange and yellow nail polishes even two sized dotting tool.

Let's begin this cute design!


1. Apply base coat to protect the natural nails from discoloration,

2. Paint each nail dark pink,

3. By using the orange polish paint the tips over the thumb-, middle- and ring finer nails:


4. By a bigger headed dotting tool and yellow nail polish put dots:


5. By a small headed dotting tool put three yellow, two orange and a violet points alongside over the index- and little finger nails:


6. Finally over the big yellow dots put small pink points - on my ring finger nails I applied small violet points:


That's it! Done! :)

Hope you'll try it out.


What I use:

1. Essence base coat,

2. NYC dark pink nail polish,

3. Maybelline ColoRama orange nail polish,

4. Lovely pink nail polish,

5. Miss Sporty violet nail polish,

6. Rimmel yellow nail polish.


Thanks for visiting my blog!

Join me... Welcome to my:

YouTube: https://www.youtube.com/user/LifeWorldWomen
Facebook: https://facebook.com/lifeworldwomen
Twitter: https://twitter.com/LWWEasyNailArt
Pinterest: http://www.pinterest.com/ildikomohos/

Music by Kevin MacLeod /Easy Jam/
http://incompetech.com/music/royalty-free