6/27/2016

Beach Inspired Needle Marble Nail Art


Hello Everyone!

This nail art is a needle marble design inspired by the beach.

I use only a signle needle for this blue summer nail art.. Hope you'll love it guys!

Let's start it!


1. Apply base coat to protect your natural nails from hard discoloration,

2. Paint one nail at the same time light blue - One, because we need wet nail polish:


3. Put light brown nail polish over the nail tip, then gold and sparkly green or blue blobs:


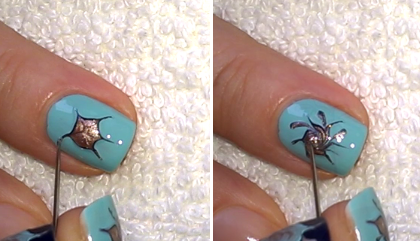
4. Grab a needle and start to make the marble design:


5. By a nail art brush and nail polish remover you can make nice edge:


6. Finally apply top coat to protect your manicure from peeling and to keep it shiny and glossy:


That's it! We're done.


What I use:

1. Essence Ultra Nail Repair base coat,

2. Essence light blue and gold nail polishes,

3. Rimmel Salon Pro light blue nail polish,

4. Moyra sparkly greenish blue nail polish,

5. Sally Hansen Double Duty nail polish,

6. Needle.


Thanks for stopping by my blog!

Come and join me,
Welcome to my:

YouTube: https://www.youtube.com/user/LifeWorldWomen

Feel free to ask me anything you'd like to know!

Facebook: https://facebook.com/lifeworldwomen
Twitter: https://twitter.com/LWWEasyNailArt

Pinterest: http://www.pinterest.com/ildikomohos/

Music by Kevin MacLeod /Daily Beetle/
https://incompetech.com/music/royalty-free/

Licensed under Creative Commons: By Attribution


6/24/2016

Black Based Floral Nails


Hello Everyone!

Today I wanted to make a matte design but as I was doing this nail art I realized that it will be great as shiny design.

So, let's start it!


1. Apply base coat to protect your natural nails from hard discoloration,

2. Paint each nail black and let them dry:


3. By a nail brush and nail polishe remover you can fix the edge:


4. Grab a thin nail brush and by light green polish start to paint the stalk:


5. Draw some leaves too:


6. By a small dotting tool and white nail polish paint flowers:


7. I put some tiny yellow points too:


8. By a medium dotting tool paint colorful dots in the middle - I use pink, orange, blue and purple nail polishes:


9. Finally apply top coat to protect your manicure from peeling and to keep it shiny and glossy:


That's it! We're done.


What I use:

1. Essence Ultra Nail Repair base coat,

2. Essence white and yellow nail polishes,

3. Catrice black nail polish,

4. Lovely blue nail polish,

5. Miss Sporty orange, purple and light green nail polishes,

6. Rimmel pink nail polish,

7. Sally Hansen Double Duty base&top coat,

8. Dotting tool,

9. Nail art brushes.


Thanks for stopping by my blog!

Come and join me,
Welcome to my:

YouTube: https://www.youtube.com/user/LifeWorldWomen

Feel free to ask me anything you'd like to know!

Facebook: https://facebook.com/lifeworldwomen
Twitter: https://twitter.com/LWWEasyNailArt

Pinterest: http://www.pinterest.com/ildikomohos/

Music by Kevin MacLeod /Autumn Day/
http://incompetech.com/music/royalty-free/

Licensed under Creative Commons: By Attribution


6/22/2016

Blue Needle Nail Art Design


Hello Everyone!

I've grabed a needle did this blue nail art for you today.

I'm excited for your opinions guys! :)

Let's start it then!


1. Apply base coat to protect your natural nails from hard discoloration and to give the manicure fixed base,

2. Paint your middle nail medium blue - Do one nail at the same time because we need wet nail polish - and put a dark blue blob in the middle and a gold one on the top of it:


3. Grab a needle and start to make the pattern, 

First pull the needle from inside to outside then the opposite way:


4. The other nails will be dark blue - I use suede effect nail polish but of course the ordinary blue is also perfect - and blobs are light blue and the gold:


5. If needed clean up the edges by a nail brush and nail polish remover:


6. Finally apply top coat to protect the manicure from peeling and to keep it shiny and glossy:


That's it! We're done.


What I use:

1. Essence Ultra Nail Repair base coat,

2. Essence 'The Suede' dark blue nail polish,

3. Rimmel SalonPro medium blue nail polish,

4. Catrice gold nail polish,

5. Sally Hansen Double Duty base&top coat,

6. Needle.


Thanks for reading my blog!

Come and join me,
Welcome to my:

YouTube: https://www.youtube.com/user/LifeWorldWomen

Feel free to ask me anything you'd like to know!

Facebook: https://facebook.com/lifeworldwomen
Twitter: https://twitter.com/LWWEasyNailArt

Pinterest: http://www.pinterest.com/ildikomohos/

Music by Kevin MacLeod /Clear Air/
https://incompetech.com/music/royalty-free/

Licensed under Creative Commons: By Attribution


6/20/2016

Colorful Summer Nail Art With Black & Gold Stripes


Hello Everyone!

Today's nail art is a colorful summer nail design with black and gold stripes.

Let's do it!


1. Apply base coat to protect your natural nails from hard discoloration,

2. Paint one side of your little, ring and middle nails - I use yellow, blue and peach over them:


3. Start to make the other side of the nails:

- beside the yellow paint blue, over the ring nail paint peach part and over the middle nail paint pink section:


If needed paint a second layer too. Some nail polishes are thin :)


4. The index nail will be pink and light greenish blue:


I paint the thumb nail also greenish blue and yellow.

5. You can fix the edges by using a nail brush and nail polish remover:


6. I use black striping polish for the short lines which ones I paint over the middle part, then I apply gold striping polish over the black lines:


7. At the end apply top coat to protect your manicure from peeling and to keep it shiny and glossy:


We're done!


What I use:

1. Essence ultra nail repair base coat,

2. Essence yellow and light greenish blue nail polish,

3. Lovely Summer Beauties blue nail polish,

4. Rimmel Salon Pro peach and pink nail polishes,

5. Aden black and gold striping polishes,

6. Sally Hansen Double Duty base&top coat.


Thanks alot for stopping by my blog!

Come and join me,
Welcome to my:

YouTube: https://www.youtube.com/user/LifeWorldWomen

Feel free to ask me anything you'd like to know!

Facebook: https://facebook.com/lifeworldwomen
Twitter: https://twitter.com/LWWEasyNailArt

Pinterest: http://www.pinterest.com/ildikomohos/

Music by Kevin MacLeod /Sunshine A./
https://incompetech.com/music/royalty-free/

Licensed under Creative Commons: By Attribution


6/17/2016

Colorful Leopard Nail Art For Girls


Hello Everyone!

Today I share a cheerful nail art for girls.
My niece was so nice and gave her hands for doing this cute design :)

Hope you'll like it.

Let's start it!


1. Apply base coat to protect your natural nails from hard discoloration and to give the manicure fixed base,

2. Paint each nail light blue - Its name is 'pure blue' what color I use, this is a very light shade of blue:


3. The leopard pattern we need small dotting and:

- Greenish blue for the little nail,
- Pink for the ring nail,
- Orange for the middle nail,
- Purple for the index nail,
- Light green for the thumb nail:


4. For the black parts around the colorful spots I use my smallest dotting tool:


5. After the nails getting dry apply top coat to protect the manicure from peeling and to keep it shiny and glossy:


That's it! We're done.


What I use:

1. Essence base coat,

2. Catrice pure blue and black nail polishes,

3. Essence purple and light green nail polishes,

4. Miss Sporty orange nail polish,

5. Lovely pink nail polish,

6. Rimmel greenish blue nail polish,

7. Sally Hansen Double Duty base&top coat,

8. Dotting tool.


Thanks for reading my blog!

Come and join me,
Welcome to my:

YouTube: https://www.youtube.com/user/LifeWorldWomen

Feel free to ask me anything you'd like to know!

Facebook: https://facebook.com/lifeworldwomen
Twitter: https://twitter.com/LWWEasyNailArt

Pinterest: http://www.pinterest.com/ildikomohos/

Music by Kevin MacLeod /Daily Beetle/
https://incompetech.com/music/royalty-free/

Licensed under Creative Commons: By Attribution


6/15/2016

Easy 3D Strawberry Nails Tutorial


Hello Everyone!

Today I show you a super easy 3D strawberry nail design.

We need a nail art brush and a small dotting tool for this fruit nail art.

Let's do it!


1. Apply base coat to protect the natural nails from hard discoloration,

2. Paint your nails red - apply two coats:


3. Put light green nail polish at the upper side of the nail:


4. For the leaves we need a thin nail art brush:


Don't worry if the edge is messy, we can fix it by a nail brush and nail polish remover:


5. Apply top coat and wait some minutes before contiue the design - We need not so wet but not dry base:


6. Now grab the smallest dotting tool you have and start to make little holes over the red part:


...And that's it! We're done.


What I use:

1. Essence Ultra Nail Repair base coat,

2. MaxFactor red nail polish,

3. Essence ligh green nail polish /Brazilian green/

4. Sally Hansen Double Duty base&top coat,

5. Dotting tool,

6. Nail art brush.


Thanks for stopping by my blog!

Come and join me,
Welcome to my:

YouTube: https://www.youtube.com/user/LifeWorldWomen

Feel free to ask me anything you'd like to know!

Facebook: https://facebook.com/lifeworldwomen
Twitter: https://twitter.com/LWWEasyNailArt

Pinterest: http://www.pinterest.com/ildikomohos/

Music by Kevin MacLeod /Anamalie/
http://incompetech.com/music/royalty-free/

Licensed under Creative Commons: By Attribution