8/03/2015

Three Easy Nail Designs In Blue & White


Today I'm bringing three really easy nail ideas by using blue and white nail polishes.

Don't want to waste your time, let's start it!


1. Apply base coat - as always :) - to protect the natural nails.

2. Paint your nails:

- Thumb nail is white,
- The index- and little finger nails are dark blue,
- The middle- and ring fingers nails are light blue.

3. Let's start the abstract pattern over the dark nails - we need a white liner polish or a simple white nail polish and a nail art brush:


4. For the light blue nails we need also the white polish and the dark blue nail polish - it'll be a chevron pattern:


5. The thumb nail needs both of blue colors - we paint a 'V' shape as well using the lines:


6. Finally the top coat:


That's it! We're done :)

Hope you liked these easy designs.


What I use:

1. Essence base coat,

2. Essence light blue nail polish,

3. Crystal Nails dark blue nail polish,

4. Lovely white nail polish,

5. ADEN white liner polish,

6. Essence QuickDry top coat.


Thanks for visiting my blog!

Join me... Welcome to my:

YouTube: https://www.youtube.com/user/LifeWorldWomen
Facebook: https://facebook.com/lifeworldwomen
Twitter: https://twitter.com/LWWEasyNailArt
Pinterest: http://www.pinterest.com/ildikomohos/

Music by Kevin MacLeod /I Feel You/
http://incompetech.com/music/royalty-free


7/31/2015

Mix & Match Orange, Pink, Yellow, Gold Nails Using Toothpick


Hi Guys!

Today's nail art tutorial is a pink-orange-yellow-gold design using only a toothpick! :)

Amazing summer colors in one nail art.. Let's begin!


1. Apply base coat to protect the natural nails,

2. Paint your nails:

- Thumb, middle- and ring finger nails are white,
- Index- and little finger nails are gold.

3. We need now orange, pink, yellow nail polishes and 3×3 blobs:


4. Grab a toothpick and start the mixing:


5. Do the same act over the gold nails but only on a corner of nail:


6. Finally apply top coat:


That's it! We're done :)

Hope you love this beautiful colored summer design.

Feel free to ask me anything you like to know and share your thoughts in comments.


What I used:

1. Essence base coat,

2. Lovely white and pink nail polishes,

3. Essence gold nail polish,

4. Rimmel yellow nail polish,

5. Maybelline orange nail polish,

6. Essence QuickDry top coat.


Thanks for visiting my blog!

Join me... Welcome to my:

YouTube: https://www.youtube.com/user/LifeWorldWomen
Facebook: https://facebook.com/lifeworldwomen
Twitter: https://twitter.com/LWWEasyNailArt
Pinterest: http://www.pinterest.com/ildikomohos/

Music by Kevin MacLeod /Life Of Riley/
http://incompetech.com/music/royalty-free


7/29/2015

Ikat Nail Art


Hi Guys!

Today's nail art is an ikat design using cheerful colors.

Let me show you how to do it!


1. Apply base coat to protect the natural nails,

2. Paint each nail pastel pink,

3. Grab the pink nail polish and start the pattern:


4. We now need a nail art brush, blue and light blue nail polishes:


You can see the picure above, I changed the position of colors even I used plus color - brown - over my ring finger and thumb nails..

5. Let's continue by the rhombus ikat:


6. Finally apply top coat:


That's it!
We're done :)

Please feel free to share your thoughts.


What I used:

1. Essence base coat,

2. Miss Sporty light blue and brown nail polishes,

3. Lovely pink nail polish,

4. Essence blue /sparkly/ and pastel yellow nail polishes,

5. Essence QuickDry top coat.


Thanks for stopping at blog!

Join me!
Welcome to my:

YouTube: https://www.youtube.com/user/LifeWorldWomen
Facebook: https://facebook.com/lifeworldwomen
Twitter: https://twitter.com/LWWEasyNailArt
Pinterest: http://www.pinterest.com/ildikomohos/

Music by Kevin MacLeod /The Complex/
http://incompetech.com/music/royalty-free


7/27/2015

Super Easy Purple & Green Nails - Dotting Tool Flowers & French Manicure Design


Hi there!

Here comes my latest nail art!

Today I chose to make an easy and quick purple and green flower design... Sorry for too much flowers but I love them even it's still summer.

Let me show you how to do :)


1. Apply base coat to protect the natural nails from discoloration,

2. Paint your nails:

- Thumb nail is purple,
- Other nails are pastel purple.

3. We can go on by painting the purple and green tips over the pastel nails:


4. By using a big headed dotting tool paint the flowers:


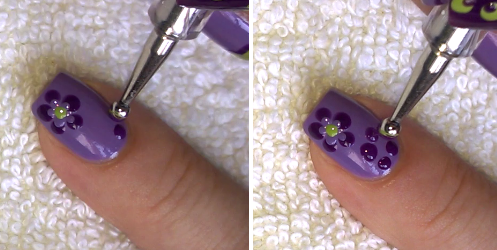
5. Then grab a small headed tool and put points close to middle over the big dots, and finish it by a small green dot:


6. Finally we need two rows of purple dots:


That's t! We're done!

Hope you liked this really easy nail design :)


What I use:

1. Essence base coat,

2. Miss Sporty, purple, pastel purple and light green nail polishes.

/I didn't use top coat for this nail art, these polishes are so shiny/


Thanks for visiting my blog!

Join me... Welcome to my:

YouTube: https://www.youtube.com/user/LifeWorldWomen
Facebook: https://facebook.com/lifeworldwomen
Twitter: https://twitter.com/LWWEasyNailArt
Pinterest: http://www.pinterest.com/ildikomohos/

Music by Kevin MacLeod /Laid Back Guitars/
http://incompetech.com/music/royalty-free


7/24/2015

Dry Brush Flowers - Floral Nail Art Without Tool


Hi Guys!

This floral nail art I've created today needs no any tools!

I chose matte white nail polish under the floral pattern so it looks like the real paintings without top coat / because I did not even use it /.

Let's begin this pretty flower nail design!


1. Apply base coat to protect the natural nails from discoloration,

2. Paint your nails:

- The thim nail is pink,
- The index and little finger nails are baby pink,
- The middle and ring finger nails are matte white - you can use a simple white nail polish plus matte top coat :)

3. Let's start the flowers first using baby pink, then pink and dark pink on the top - before painting have to clean the brush from too much polish:


Don't worry if the edge is not perfect we can correct it easily:


4. The 'half' flower is inverse of the other one about colors - that means we finish it with the light shades / pink - baby pink - white - on the top white - around the edge dark pink:


Over the middle finger nails I changed position of colors, you may see on the picture above.

5. By using light green nail polish paint some leaves:


6. Still using the green polish draw tips like leaves over the pink and baby pink nails:


And we're done!

Hope you liked this pretty floral nail art and will try it out.


What I use:

1. Essence base coat,

2. Lovely Matte White and white nail polish, Summer Trend baby pink nail polishes,

3. Rimmel pink nail polish,

4. Essence green nail polish,

5. Astor dark pink nail polish.


Thanks for stopping at my blog!

Join me!
Welcom to my:

YouTube: https://www.youtube.com/user/LifeWorldWomen
Facebook: https://facebook.com/lifeworldwomen
Twitter: https://twitter.com/LWWEasyNailArt
Pinterest: http://www.pinterest.com/ildikomohos/

Music by Kevin MacLeod /Daily Beetle/
http://incompetech.com/music/royalty-free


7/22/2015

Five Easy Summer Nail Art Designs Using Dotting Tool & Toothpick


Hi there nail art lovers! :)

Today I've made five easy nail designs for summertime!

Don't want to talk much, let's begin!


1. Apply base coat to protect the natural nails,

2. Paint your nails:

- Thumb and little finger nails are yellow,
- The index finger nail is pink,
- The ring finger nail is light blue.

3. We paint white clouds over the ring finger nail by using a big headed dotting tool, and by toothpick a bird - and sorry for the blurred picture, I think my camera doesn't like much this kind of hot weather we're living now:


4. Then using black nail polish start the butterfly:


5. Take a small headed dotting tool and a toothpick and paint other parts of the butterfly:


6. We need for the next step, pink, yellow and white nail polish for the pattern of wings:


7. Paint yellow flowers over the pink nail and pink flowers over the yellow nail:


8. For the thumb we need a medium headed tool and a small headed one, pink and light blue nail polish:


9. Finally apply top coat:


That't it! We're done :)

Hope you love these ideas or at least 1-2 of them :)


What I use: 

1. Essence base coat,

2. Rimmel light blue, pink and yellow nail polish,

3. Lovely white, black and Summer Trend nail polish,

4. Essence Quick Dry top coat.


Thanks for visiting my blog!

Join me!
Welcome to my:

YouTube: https://www.youtube.com/user/LifeWorldWomen
Facebook: https://facebook.com/lifeworldwomen
Twitter: https://twitter.com/LWWEasyNailArt
Pinterest: http://www.pinterest.com/ildikomohos/

Music by Kevin MacLeod /Sunshine A/
http://incompetech.com/music/royalty-free


7/20/2015

Dark Blue Dotticure Nail Art Using 'Suede' Nail Polish


Hi Guys!

Today I used one of my favorite nail polish the dark blue 'Suede' effect one.

It's similar to matte nail polishes but not fully matte.

Let's begin this dark design! :)

We need:
- two-size dotting tool,
- medium blue nail polish,
- light blue nail polish,
- light brown and yellow nail polishes... and of course the dark blue polish - you can use a simple dark blue polish plus a matte top coat, but it's pefect if it's shiny too :)

1. Apply base coat to protect the natural nails from discoloration,

2. Paint your each nail dark blue,

3. Grab a bigger headed dooting tool and the medium blue polish and start the dots:


4. Change the tools, needs a small headed one, and the light blue / light brown and yellow nail polishes:


5. Paint a row of medium blue dots over the index and little finger nails as well then using the small headed dooting tool put light blue points on the top:


6. Finally may come the thumb nails where I applied the two kind of blue :


That's it! We're ready..

I really love this blue nail polish, even the light colors look great over it :)


What I use:

1. Essence base coat,

2. Essence 'Suede' dark blue,

3. Miss Sporty medium blue nail polish,

4. Rimmel light blue, light brown and yellow nail polishes.


Thank you so much for visiting my blog! Hope you like it :)

Feel free to leave me comment or questions about what you'd like to see in next designs.

Join me!
Welcome to my:

YouTube: https://www.youtube.com/user/LifeWorldWomen
Facebook: https://facebook.com/lifeworldwomen
Twitter: https://twitter.com/LWWEasyNailArt
Pinterest: http://www.pinterest.com/ildikomohos/

Music by Kevin MacLeod /Life of Riley/
http://incompetech.com/music/royalty-free