11/11/2015

Pretty Nails In Pure Blue, Purple & Gold


Hello Everyone!

I'm bringing a floral design in pure blue, pastel purple and gold colors.

Let's start it!


1. Apply base coat to protect your natural nails from discoloration,

2. Paint your nails:

- Thumb, little- and index finger nails are pastel purple,
- Middle- and ring finger nails are light blue /pure blue/:


3. For the flower we need:

- Big-, medium- and small headed dotting tools,
- Pastel and dark purple nail polish, gold- and light blue,
- Striping brush


4. I use light blue and dark purple for the flower over the thumb nail:


5. Finally I paint messy gold tips on the index- and little finger nails:


6. At the end may come the top coat:


We're done!

Feel free to share what you think!
Ask me anything you'd like to know :)


What I use:

1. Essence base coat,

2. Catrice Pure Blue, pastel purple and gold nail polishes,

3. Miss Sporty dark purple nail polish,

4. Essence QuickDry top coat,

5. Dotting tools,

6. Striping brush.


Thanks for reading my blog!

Subscribe for more easy nail ideas... Welcome to my:

YouTube: https://www.youtube.com/user/LifeWorldWomen

Feel free to ask me, share your nail designs or recreations:

Facebook: https://facebook.com/lifeworldwomen
Twitter: https://twitter.com/LWWEasyNailArt

Pinterest: http://www.pinterest.com/ildikomohos/

Music by Kevin MacLeod /Dream Culture/
http://incompetech.com/music/royalty-free/


11/09/2015

Minnie Mouse Inspired Red Nail Art


Hello Everyone!

Today's nail art is inspired by Disney's Minnie Mouse.

This is a red nail art, including a red French manicure, bow and 'mouse heads' designs.

Let's start this cute nail art!


1. Apply base coat to protect your natural nails from discoloration,

2. Paint your nails: Thumb-, middle- and ring finger nails are red:


3. The index- and little finger nails get red French tips and a black line at the edge:


4. The bow design is over the ring- and thumb nails by uisng a small headed dotting tool and white nail polish:


5. May come the black mouse heads over the middle finger nail, using big- and medium headed dotting tools:


6. At the edge I put black 'half' dots by a small headed tool:


7. Finally the top coat:


We're done!

I'm excited for you what you think about this red design... Feel free to share it!


What I use:

1. Essence base coat,

2. MaxFactor red nail polish,

3. Lovely black nail polish,

4. Essence white nail polish,

5. ADEN black liner polish,

6. Essence QuickDry top coat,

7. Dotting tools.


Thanks for reading my blog!

Join me... Welcome to my:

YouTube: https://www.youtube.com/user/LifeWorldWomen
Facebook: https://facebook.com/lifeworldwomen
Twitter: https://twitter.com/LWWEasyNailArt
Pinterest: http://www.pinterest.com/ildikomohos/

Music by Kevin MacLeod /Life Of Riley/
http://incompetech.com/music/royalty-free/


11/06/2015

White Sand Nails With Watercolor Flowers


Hello Everyone!

Today's nail art is a white design, a sand nail art with watercolor flowers.

Let's start it!


1. Apply base coat to protect your natural nails from discoloration - I use 'Peel Off' base coat because of the sand nail polish. The sand polish is similar to glitter nail polish, so hard to remove it by normal nail polish removal.

2. Paint your each nail with white sand nail polish - I use it, but if you don't have it apply simple white polish,

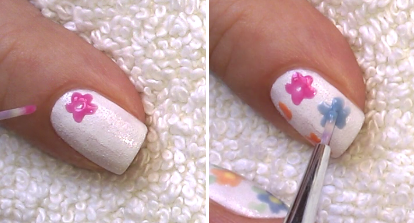
3. For the watercolor flowers we need pink, orange, light blue and green nail polishes.
    For making the colors thinner I use base coat, then a nail brush for painting the floral pattern.

Put a small drop of nail polish and put 2-3 drops of base coat then mix them:


4. Paint some leaves around the flowers by the same technique:


5. By using yellow polish paint the center of flowers:


6. Finally apply top coat:


That's it! We're done.

Please feel free to share how you like this pastel design.


What I use:

1. Miss Sporty 'Peel Off' base coat,

2. Lovely white sand nail polish,

3. Lovely pink nail polish,

4. Miss Sporty orange nail polish,

5. Essence pastel yellow and light blue nail polishes,

6. Maybelline ColoRama pastel green polish,

7. Essence base coat and QuickDry top coat,

8. Nail art brush.


Thanks for visiting my blog!

Join me... Welcome to my:

YouTube: https://www.youtube.com/user/LifeWorldWomen
Facebook: https://facebook.com/lifeworldwomen
Twitter: https://twitter.com/LWWEasyNailArt
Pinterest: http://www.pinterest.com/ildikomohos/

Music by Kevin MacLeod /Autumn Day/
http://incompetech.com/music/royalty-free/


11/04/2015

Pastel Galaxy Nail Art


Hi Guys!

I was thinking for long time about a pastel galaxy nail art and now I did it!
Hope you'll love it :)

Let's start this nail design!


1. Apply base coat to protect your natural nails from discoloration,

2. Paint your each nail pastel pink,

3. For the galaxy design we need:

 - A small sponge,
 - Pastel purple nail polish,
 - Baby pink nail polish,
 - Light blue nail polish,
 - White nail polish,
 - Silver glitter polish and
 - White liner polish or a striping brush plus white nail polish....

I start it with the purple:


4. After finishing the colors I apply silver glitter polish:


5. Finally I paint stars over my each nail:


6. I finish the design with top coat:


That's it! We're done.

Feel free to share your opinion!
Ask me anything you'd like to know.


What I use:

1. Essence base coat,

2. Moyra pastel pink nail polish,

3. Miss Sporty pastel purple nail polish,

4. Lovely baby pink nail polish,

5. Rimmel light blue polish,

6. Lovely white nail polish,

7. Essence silver glitter polish,

8. ADEN white liner polish,

9. Essence QuickDry top coat,

10. Makeup sponge.


Thanks for reading my blog!

Join me... Welcome to my:


Music by Kevin MacLeod /Anamalie/


11/02/2015

No Tools Needed Easy Fall Nail Design


Hi Guys!

Today I've created a super easy and quick Fall design which one needs no any tools.

Hope you'll love it... Let's start it!


1. Apply base coat to protect your natural nails from discoloration,

2. Paint your each nail sparkly orange,

3. For the gradient design we need orange and sparkly red nail polishes:


4. Finally apply top coat:


5. On my other hand I painted dark red tips.. I wonder which design you prefer :)


That's it!

Please feel free to ask me anything you'd like to know and share your opinion! :)


What I use:

1. Essence base coat,

2. Crystal Nails sparkly orange nail polish,

3. Miss Sporty orange nail polish,

4. Lovely sparkly red nail polish,

5. Astor dark red nail polish,

6. Essence QuickDry top coat.


Thanks for visiting my blog!

Join me... Welcome to my:

YouTube: https://www.youtube.com/user/LifeWorldWomen
Facebook: https://facebook.com/lifeworldwomen
Twitter: https://twitter.com/LWWEasyNailArt
Pinterest: http://www.pinterest.com/ildikomohos/

Music by Kevin MacLeod /Continue Life/
http://incompetech.com/music/royalty-free/


10/30/2015

Striping Brush Nail Art - Stripes In Pink & Yellow


Hi Guys!

Today I've used my striping brush and made a colorful striped design in pink and yellow plus purple.

Let's start it!

1. Apply base coat to protect your natural nails from discoloration,

2. Paint your nails:

- Pastel purple: Thumb nail,
- Pink: Index- and little finger nails,
- Pastel yellow: Middle- and ring finger nails:


3. For the stripes we need:

- Pink nail polish /I use sparkly one/,
- Light blue nail polish,
- Pastel purple nail polish:


4. Over the pink nail I apply yellow polish for painting the lines:


5. Finally I finish it with top coat:


That's it! We're done.

Hope you like this colorful striped nail art.. Please share your opinion :) Thank you!


What I use:

1. Essence base coat,

2. Essence pastel yellow nail polish,

3. Lovely sparkly pink nail polsih,

4. Rimmel Salon Pro Lycra light blue nail polish,

5. Miss Sporty pastel purple nail polish,

6. Essence QuickDry top coat,

7. Striping brush.


Thanks for reading my blog!

Come and join me... Welcome to my:

YouTube: https://www.youtube.com/user/LifeWorldWomen
Facebook: https://facebook.com/lifeworldwomen
Twitter: https://twitter.com/LWWEasyNailArt
Pinterest: http://www.pinterest.com/ildikomohos/

Music by Kevin MacLeod /Finding the Balance/
http://incompetech.com/music/royalty-free/


10/28/2015

African Night Ombre Nail Art Design


Hi Guys!

This is an African nail design which one includes negative space and ombre nail designs.

Let's start it!


1. Apply base coat to protect your natural nails from discoloration,

2. Paint your nails:

- Thumb nail is red,
- Middle- and ring finger nails are white,
- Index- and little finger nails have red negative space design:


3. I paint black line alongside the red edge:


4. I apply 'Peel Off' base coat around the white nails before I start to make the ombre design:


5. We need a small sponge, dark red-pink, red and orange nail polishes:


6. By using black liner polish or a striping brush draw an African tree over the ombre nail:


7. For the leaves we need almost dry brush:


8. Finish the design with top coat:


That's it! We're done.

Hope you like this African design... Please feel free to share your thoughts.


What I use

1. Essence base coat,

2. Essence white nail polish,

3. MaxFactor red nail polish,

4. Astor dark red polish,

5. Maybelline orange nail polish,

6. ADEN black liner polish,

7. Lovely black polish,

8. Miss Sporty Peel Off base coat,

9. Sally Hansen Base & Top Coat.


Thanks for reading my blog!

Come and join me... Welcome to my:

YouTube: https://www.youtube.com/user/LifeWorldWomen
Facebook: https://facebook.com/lifeworldwomen
Twitter: https://twitter.com/LWWEasyNailArt
Pinterest: http://www.pinterest.com/ildikomohos/

Music by Kevin MacLeod /Infados/
http://incompetech.com/music/royalty-free/