2/16/2015

French manicure for weddings not only for brides


There is an easy and simple French manicure which one I created for weddings... I hope you'll love it and try it as soos as possible.

Let's start it!

First step is the base coat to protect the natural nails.

Then I begin to paint the white tips:


I didn't use top coat but if you want long-lasting nail art then use the top coat after the painting of white tips, and before the gold decoration. By this way the top coat won't cover the sparkly gold stripes.

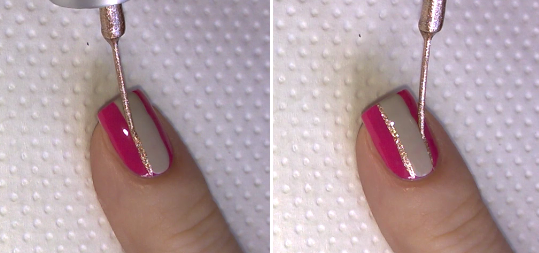
When it's ready then I draw a gold stripe alongside the tip:


Now only one things is missing, four short stripes:


We've done it :)

This is  really an easy even not a simple French manicure nail art.

 Let's see what I use:

1. Essence base coat,

2. Rimmel Brit Manicure /Nail Tip Colour-Porcelain/

3. ADEN golden liner nail polish.


Thank you for visiting my blog!


Please join me :) Welcome to my

Facebook: https://facebook.com/lifeworldwomen
Twitter: https://twitter.com/IldikoMohos
Pinterest: http://www.pinterest.com/ildikomohos/

Music by Kevin MacLeod /Clear Air/
http://incompetech.com/music/royalty-free/


2/13/2015

My easy cupcake nails


I bring today a really easy cupcake nail design.

There are nothing special to do with it only we need a dotting tool, a liner nail polish and three kind of colors.

Let me show you how it made :)

First of all I apply base coat against discoloration... then brown tips:


Now may come the red stripes top of brown tips:


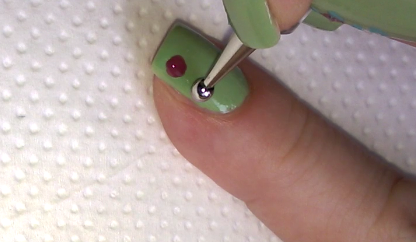
If these are ready then start to draw the white spot:


( For the white part we need a medium headed dotting tool. )

Next step is a big pink dot and small pink dots alongside:


And finally a small dot top of the pink one by using sparkly brown 'Baltic Sand' nail polish:


Done! :)

You see it's cute and really not hard to do. Of course everyone can may uses the own favorite colors, I just chose mine favorite ones.


What I use:

1. Essence base coat,

2. Miss Sporty brown nail polish,

3. Moyra white nail polish,

4. Lovely pink and so called 'Baltic Sand' nail polishes,

5. Moyra red liner nail polish.


Thank you so much for visiting my blog!

Please join me :) Welcome to my

Facebook: https://facebook.com/lifeworldwomen
Twitter: https://twitter.com/IldikoMohos
Pinterest: http://www.pinterest.com/ildikomohos/

Music by Kevin MacLeod /Autumn Day/
http://incompetech.com/music/royalty-free/


2/11/2015

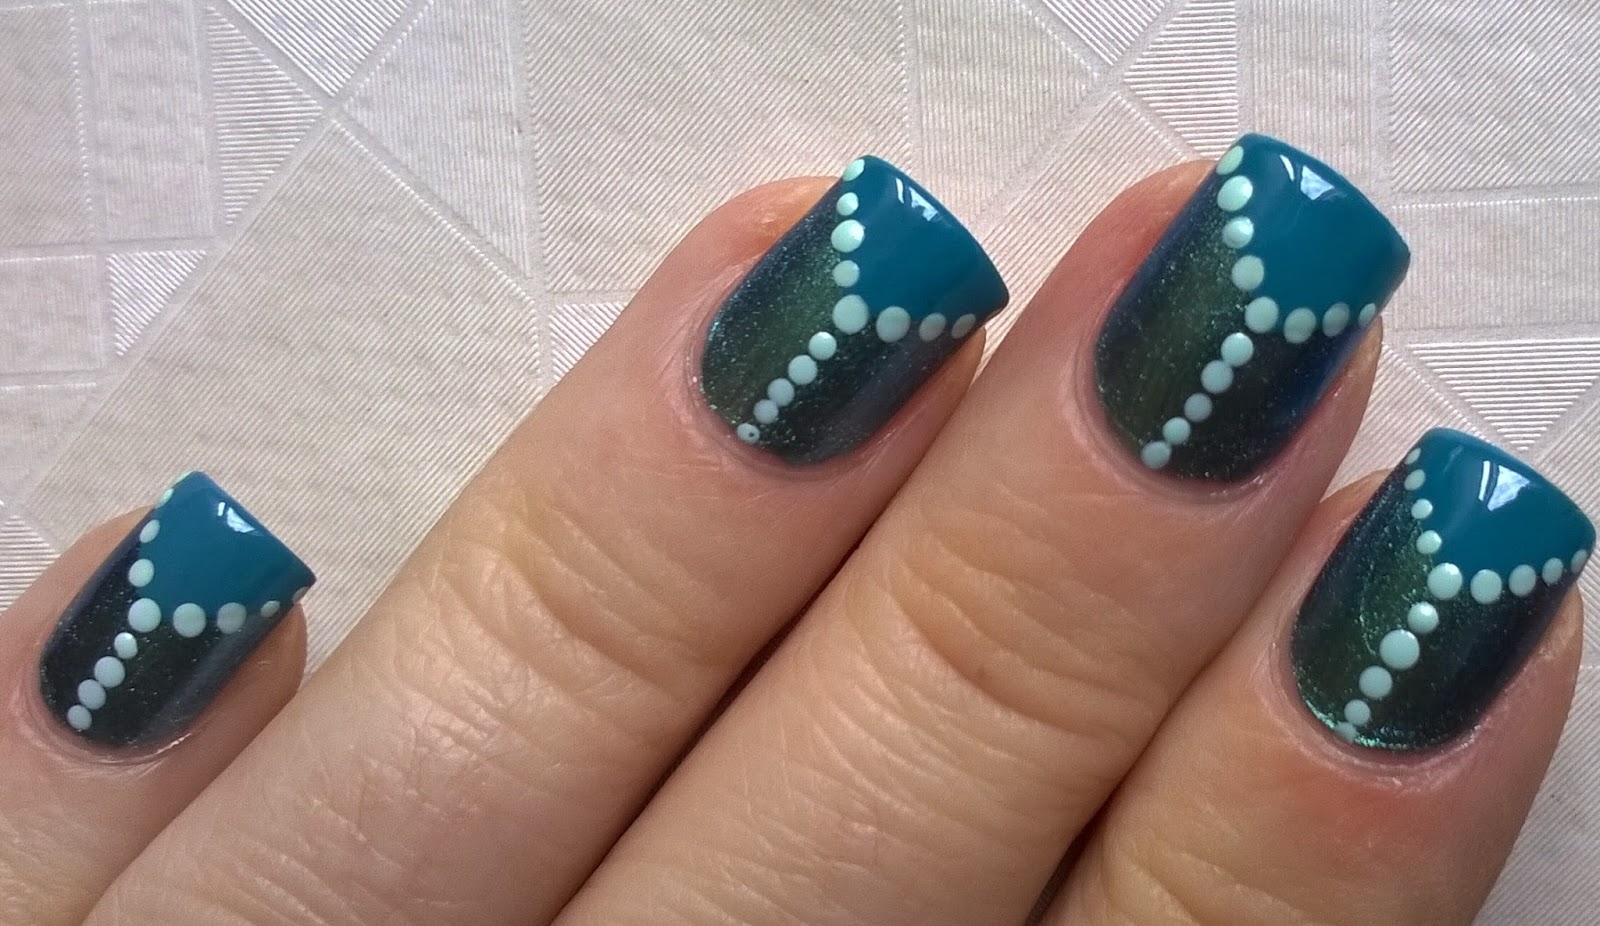
Aquamarine colored sparkly nail art


I was thinking how to name this design. There are green and blue are found in these colors, so I decided aquamarine but we can call it colors of ocean or just greenish blue nails.

That's a really easy and sparkly design, let me show you I make it :).

As usually first I apply the base coat to protect my nails from discoloration /do it as well!/.

Then I paint my each nail with the Agua Jeans sparkly nail polish.. after it drawing 'V' shaped tips:


The pictures show a simple blue color / I don't know how :) / but it's really beautiful greenish blue.

Now we have only one thing to do dawing the dots :


Done it!!

Hope you like it! Try and send me comment about like or not / I hope you do like :)) /.

Thank you so much for visiting my blog!


What I use:

1. Essence base coat,

2. Rimmel light blue and greenish blue nail polish,

3. Moyra Aqua Jeans sparkly nail nail polish.


Join me :) Welcome to my

Facebook: https://facebook.com/lifeworldwomen
Twitter: https://twitter.com/IldikoMohos
Pinterest: http://www.pinterest.com/ildikomohos/

Music by Kevin MacLeod /Clear Waters/
http://incompetech.com/music/royalty-free/


2/09/2015

A simple mosaic inspired nail design


There's a really easy nail design without any tools.

I use three colors and a liner nail polish for doing it :).

Let's begin!

First I apply base coat then start to paint the parts by blue and pink spots:


Don't worry if the edges are not perfect because the brown polish will cover them.


When we are ready all of these parts then use the liner nail polish for finish:


And done it!

You see it's really not hard I hope you'll try it soon :).

Thanks for visiting my blog!


What I use:

1. Essence base coat,

2. Rimmel light brown, light blue and pink nail polish,

3. ADEN white liner nail polish.


Join me :) Welcome to my

Facebook: https://facebook.com/lifeworldwomen
Twitter: https://twitter.com/IldikoMohos
Pinterest: http://www.pinterest.com/ildikomohos/

Music by Kevin MacLeod /Continue Life/
http://incompetech.com/music/royalty-free/

2/06/2015

Black and pink leopard nail art


What I made today a leopard design by using black and dark pink nail polishes.

It looks like a French manicure because I painted pink tips.

Let's me show you how I do! :)

First of all as usually I apply base coat then I start to make the pink tips:


I put some pink dots randomly by using a small headed dotting tool:


After it let's begin the leopard pattern by using a toothpick:


Finally apply the top coat, but important!  Wait at least 15 minutes before the top coat to avoid smudging..

I hope you love it and will try it. :)


What I use:

1. Essence base coat,

2. Lovely black and dark pink nail polish,

3. Essence top coat,

4. a small headed dotting tool and a toothpick.


Join me :) Welcome to my

Facebook: https://facebook.com/lifeworldwomen
Twitter: https://twitter.com/IldikoMohos
Pinterest: http://www.pinterest.com/ildikomohos/

Music by Kevin MacLeod /Savannah Sketch/
http://incompetech.com/music/royalty-free/


2/04/2015

Pink striped nail art


I chose for this design pink, camel light brown nail polishes but of course you can use any other colors as well.

First of all I use base coat then I paint one of my nails with pink and other one with light brown polish.

Next step to draw a brush size stripe on the middle part:


After it I use the gold liner polish between the pink and brown parts:


And finally two black stripes next to gold ones:


Done!

I hope you'll love this nail design! :)

Thanks for your attention.


What I use:

1. Essence base coat,

2. Rimmel pink and camel light brown,

3. ADEN black and gold liner nail polish.


Join me :) Welcome to my

Facebook: https://facebook.com/lifeworldwomen
Twitter: https://twitter.com/IldikoMohos
Pinterest: http://www.pinterest.com/ildikomohos/

Music by Kevin MacLeod /Clear Air/
http://incompetech.com/music/royalty-free/


2/02/2015

Romantic flower nail art


Romantic flower nail art not only for dreamers :)

This nail design does not needs many things, only one nail polish for the base, three colors for the flowers plus a green nail polish for the leaves.

Let's begin!

First I apply base coat to protect my nails from discoloration.. then I paint my each nail with green nail polish (on the upper picture green looks like a neon green but it's a simple pastel green polish :)) and start to draw the flowers:


After the two big dots I put small white dots top of them:


I take then a toothpick and mix the colors:


For finish I use the small headed dotting tool to make leaves around the flowers:


We've done!

Really easy and nice design and I hope you'll love it too! :)

Thanks alot for your attention!


What I use:

1. Essence base coat,

2. S-he green nail polish,

3. Astor Quick'N Go nail polish,

4. Astor Sweet Lavender nail polish,

5. Crystal Nails white nail polish,

6. Miss Sporty green nail polish.


Join me :) Welcome to my

Facebook: https://facebook.com/lifeworldwomen
Twitter: https://twitter.com/IldikoMohos
Pinterest: http://www.pinterest.com/ildikomohos/


Music by Kevin MacLeod /Autumn Day/
http://incompetech.com/music/royalty-free/