9/08/2017

Brown Fall Nail Art With Sunflower Design


Today's manicure is a dark brown Fall nail art with glitter and sunflower design.


1. Apply base coat to protect your natural nails,

2. Paint your ring and thumb nails light brown and the other nails dark brown like coffee - The dark nails have to be wet when we do the pattern:


3. I put glitter polish blobs over the wet base then by a toothpick I fix the pieces:


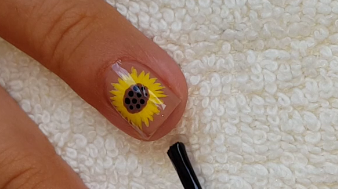
4. Over the light nails I paint sunflower, using pastel yellow nail polish and striping brush:


5. Let the pattern dry a little, then paint another layer by using ordinary yellow nail polish:


6. By a dotting tool paint brown spot in the middle of the flower:


7. By a small dotting tool paint black points in the middle:


8. Finally apply top coat to protect your manicure from peeling and to keep it shiny and glossy:


What I use:

1. Essence base coat,

2. Essence light brown and pastel yellow nail polishes,

3. Astor dark brown nail polish /Coffee Break/,

4. Miss Sporty glitter effect nail polish,

5. Rimmel yellow nail polish,

6. Crystal Nails brown nail polish,

7. Essence black nail polish,

8. Sally Hansen Insta-Dri top coat,

9. Dotting tool,

10. Striping brush.


Thanks for stopping by my blog!

Come and join me,
Welcome to my:

YouTube channel: https://www.youtube.com/user/LifeWorldWomen

Feel free to ask me anything you'd like to know!

Instagram: https://www.instagram.com/ildikonailart/
Facebook: https://facebook.com/lifeworldwomen
Twitter: https://twitter.com/LWWEasyNailArt
Pinterest: http://www.pinterest.com/ildikomohos/

Music by Kevin MacLeod  /Universal/
https://incompetech.com/music/royalty-free/

Licensed under Creative Commons: By Attribution


9/06/2017

Black, Red & White Dry Marble Flame-Like Nail Art Using Needle


Today I'm bringing a dry marble French manicure using needle.


1. Apply base coat to protect your natural nails,

2. Apply clear nail polish and don't let it dry:


3. Put black, white and red blobs diagonally over the wet nail tip:


4. By a needle start to make the flame-like marble pattern:


Clean up the needle between two moves


 5. Finally apply top coat to protect your manicure from peeling and to keep it shiny and glossy:


What I use:

1. Essence base coat,

2. Essence black, pale red, white and clear nail polishes,

3. Sally Hansen Insta-Dri top coat,

4. Needle.


Thanks for stopping by my blog!

Come and join me,
Welcome to my:

YouTube channel: https://www.youtube.com/user/LifeWorldWomen

Feel free to ask me anything you'd like to know!

Instagram: https://www.instagram.com/ildikonailart/
Facebook: https://facebook.com/lifeworldwomen
Twitter: https://twitter.com/LWWEasyNailArt
Pinterest: http://www.pinterest.com/ildikomohos/

Music by Kevin MacLeod  /I Feel You/
https://incompetech.com/music/royalty-free/

Licensed under Creative Commons: By Attribution


9/04/2017

Dry Marble Fall Flower Nail Art


Today I'm bringing a dry marble Fall nail art with flower design.


1. Apply base coat to protect your natural nails,

2. Paint one of your nails dark pink - I use not so dark shade - We need wet polish!


3. Put three yellow blobs over the lower part and three orange blobs over the upper part of the wet base - I change the place of the colors on my other nails:


4. By a needle shape the petals: 


5. When the polish gets dry put some small black points over the flowers:


6. Finally may come the top coat to protect your manicure from peeling and to keep it shiny and glossy:


What I use:

1. Essence base coat,

2. Essence black and dark pink nail polishes,

3. Crystal Nails yellow and orange /mango/ nail polishes,

4. XXXL Volume gel look top coat,

5. Needle,

6. Dotting tool.


Thanks alot for stopping by my blog!

Come and join me,
Welcome to my:

YouTube channel: https://www.youtube.com/user/LifeWorldWomen

Feel free to ask me anything you'd like to know!

Instagram: https://www.instagram.com/ildikonailart/
Facebook: https://facebook.com/lifeworldwomen
Twitter: https://twitter.com/LWWEasyNailArt
Pinterest: http://www.pinterest.com/ildikomohos/

Music by Kevin MacLeod /Autumn Day/
https://incompetech.com/music/royalty-free/

Licensed under Creative Commons: By Attribution


9/01/2017

White Based Polka Dot Nail Art With Roses Using Toothpick


Today's manicure is a white based polka dot nail art with rose design.


1. Apply base coat to protect your natural nails,

2. Paint your nails white and let them dry:


3. By a cut toothpick and black nail polish make polka dot pattern:


4. Make a dark pink and a pinkish red spot on the upper side of the nail:


5. By a toothpick and white polish make the roses:


6. Finally we need some leafs by using green and light green polishes:


7. Finish the nail art with top coat to protect your manicure from peeling and to keep it shiny and glossy:


What I use:

1. Essence base coat,

2. Essence white, black, dark pink, pinkish red, green and light green nail polishes,

3. Sally Hansen Insta-Dri top coat,

4. Toothpicks.


Thanks for stopping by my blog!

Come and join me,
Welcome to my:

YouTube channel: https://www.youtube.com/user/LifeWorldWomen

Feel free to ask me anything you'd like to know!

Instagram: https://www.instagram.com/ildikonailart/
Facebook: https://facebook.com/lifeworldwomen
Twitter: https://twitter.com/LWWEasyNailArt
Pinterest: http://www.pinterest.com/ildikomohos/

Music by Kevin MacLeod  /Dream Culture/
https://incompetech.com/music/royalty-free/

Licensed under Creative Commons: By Attribution


8/28/2017

French Manicure With Purple Heart-Like Design


Today I'm bringing an easy French manicure nail art with purple heart-like design.


1. Apply base coat to protect your natural nails,

2. Paint white French tips and let them dry - You can use French manicure stickers of course:


3. Apply clear nail polish and don't let it dry:


4. Put three dark purple blobs then three purple/lilac blobs on the top of dark ones over the wet base:


5. By a needle make heart-like pattern:


6. Finally apply top coat to protect your manicure from peeling and to keep it shiny and glossy:


What I use:

1. Essence base coat,

2. Rimmel Brit Manicure white polish,

3. S-HE sparkle dark purple nail polish,

4. Crystal Nails purple nail polish,

5. Essence clear nail polish,

6. Sally Hansen Insta-Dri top coat,

7. Needle.


Thanks for stopping by my blog!

Come and join me,
Welcome to my:

YouTube channel: https://www.youtube.com/user/LifeWorldWomen

Feel free to ask me anything you'd like to know!

Instagram: https://www.instagram.com/ildikonailart/
Facebook: https://facebook.com/lifeworldwomen
Twitter: https://twitter.com/LWWEasyNailArt
Pinterest: http://www.pinterest.com/ildikomohos/

Music by Kevin MacLeod /Easy Lemon/
https://incompetech.com/music/royalty-free/

Licensed under Creative Commons: By Attribution


8/25/2017

Black, Pink & White Polka Dot Nail Art


Today I share an easy dotting tool nail art; a black,pink and white polka dot design.


1. Apply base coat to protect your natural nails,

2. Paint your nails:

- Little nail is white,
- Ring and thumb nails are black,
- Index and middle nails are medium pink:


3. By a medium dotting tool, put black dots over the white nail:


4. White dots over the black nails:


5. .. And black and white dots over the pink nails:


6. Finally apply top coat to protect your manicure from peeling and to keep it shiny and glossy:


What I use:

1. Essence base coat,

2. Essence black and white nail polishes,

3. Miss Sporty pink nail polish,

4. Sally Hansen Insta-Dri top coat,

5. Dotting tool.


Thanks for stopping by my blog!

Come and join me,
Welcome to my:

YouTube channel: https://www.youtube.com/user/LifeWorldWomen

Feel free to ask me anything you'd like to know!

Instagram: https://www.instagram.com/ildikonailart/
Facebook: https://facebook.com/lifeworldwomen
Twitter: https://twitter.com/LWWEasyNailArt
Pinterest: http://www.pinterest.com/ildikomohos/

Music by Kevin MacLeod /Universal/
https://incompetech.com/music/royalty-free/

Licensed under Creative Commons: By Attribution