12/07/2018

4 Easy Christmas Tree Nail Art Designs


Today I share 4 easy Christmas tree nail art designs. I hope you like all of them.

Let's begin!


1. Apply base coat to protect your natural nails:


2. Paint your nails:

- the little nail is gold (I use darker gold polish)
- the ring nail is pastel green,
- the middle nail is sparkly red,
- the index nail is light pink.


3. For the first tree I use dark green nail polish and a thin nail art brush:


4. The ring nail Christmas tree is green:


5. Before the polish gets dry fully, I place gold glitters over the tree:


I finish this one with 2 red dots:


6. For the middle nail design I use white nail polish: 


7. The last Christmas tree is light green with a star on its top, what I paint gold - I fix it with top coat:


8. Apply top coat to protect the manicure from peeling and to keep it shiny and glossy:


What I use:

1. Essence Pro White Active base coat,

2. Essence light pink, white, light green and dark gold glitter nail polishes,

3. Essence The Little X-Mas Factory dark green polish,

4. P2 sparkly red nail polish,

5. Essence Colour & Care pastel green nail polish,

6. Sallly Hansen Double Duty base & top coat,

7. Gold glitter,

8. Star nail decoration,

9. Dotting tool,

10. A thin nail art brush.


Thanks for stopping by my blog!

Come and join me,
Welcome to my:

YouTube channel: https://www.youtube.com/user/LifeWorldWomen

Feel free to ask me anything you'd like to know!

Instagram: https://www.instagram.com/ildikonailart/
Facebook: https://facebook.com/lifeworldwomen
Twitter: https://twitter.com/LWWEasyNailArt
Pinterest: http://www.pinterest.com/ildikomohos/

Music by Kevin MacLeod  /Wish Background/
https://incompetech.com/music/royalty-free/

Licensed under Creative Commons: By Attribution


12/05/2018

Sparkly Purple Dotticure Nails


Today I share an easy sparkly dotting tool nail art in two purple shades.

Let's begin!


1. Apply base coat to protect your natural nails,

2. Paint your nails light purple (I use sparkly nail polish):


3. When the polish gets dry paint purple nail tip (This shade is also sparkly what I use):


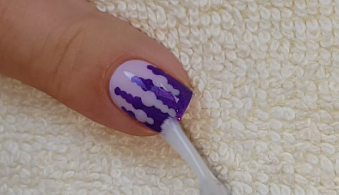
4. With a medium dotting tool I begin the dot pattern:


5. I finish this side with a small dotting tool:


6. I repeat the pattern on the other color too:


7. I apply top coat to protect the manicure from peeling and to keep it shiny and glossy:


What I use:

1. Essence Pro White Active base coat,

2. Essence sparkly purple and light purple nail polishes,

3. P2 Quick + Go top coat,

4. Dotting tool.


Thanks for stopping by my blog!

Come and join me,
Welcome to my:

YouTube channel: https://www.youtube.com/user/LifeWorldWomen

Feel free to ask me anything you'd like to know!

Instagram: https://www.instagram.com/ildikonailart/
Facebook: https://facebook.com/lifeworldwomen
Twitter: https://twitter.com/LWWEasyNailArt
Pinterest: http://www.pinterest.com/ildikomohos/

Music by Kevin MacLeod  /Life Of Riley/
https://incompetech.com/music/royalty-free/

Licensed under Creative Commons: By Attribution


12/03/2018

Sparkly White & Red Snowflake Nail Art


Today's manicure is a sparkly white and red dot snowflake design.


1. Apply base coat to protect your natural nails:


2. Paint your little, middle, index and thumb nails white:


We can fix the edge with a nail art brush and nail polish remover:


3. The ring nail is sparkly red:


4. Paint a white medium dot in the middle of the ring nail, then for the other dots use small dotting tool:


5. Apply sparkly white polish over the white nails, then also apply this sparkly polish over the snowflake dots:


6. Apply top coat to protect the manicure from peeling and to keep it shiny and glossy:


What I use:

1. Essence Pro White Active base coat,

2. P2 sparkly red and white nail polishes,

3. Crystal Nails sparkly white nail polish,

4. Essence 3D Gel Look top coat,

5. Dotting tool.


Thanks for stopping by my blog!

Come and join me,
Welcome to my:

YouTube channel: https://www.youtube.com/user/LifeWorldWomen

Feel free to ask me anything you'd like to know!

Instagram: https://www.instagram.com/ildikonailart/
Facebook: https://facebook.com/lifeworldwomen
Twitter: https://twitter.com/LWWEasyNailArt
Pinterest: http://www.pinterest.com/ildikomohos/

Music by Kevin MacLeod /Clear Air/
https://incompetech.com/music/royalty-free/

Licensed under Creative Commons: By Attribution


11/30/2018

Festive French Manicure With Christmas Balls


This nail art is an easy festive French manicure with colorful Christmas balls.

Let's begin!


1. Apply base coat to protect your natural nails:


2. Fix French manicure sticker over the nail and paint white tip:


3. Remove the tape carefully:


4. For the balls I use:

- a big dotting tool,
- gold nail polish,
- purple, pink, light pink and silver (thumb) nail polishes:


5. I paint tiny white dots above the balls:


6. I add glitter polishes to the balls:

- gold glitter to the gold ball,
- purple glitter to the purple ball,
- pink glitter to the pink ball,
- light pink glitter to the light pink ball and
- silver glitter to the silver ball:


7. Finish the nail art with top coat to protect the manicure from peeling and to keep it shiny and glossy:


What I use:

1. Essence Pro White Active base coat,

2. Essence Glow & Care light pink polish,

3. Crystal Nails pink and purple nail polishes,

4. Essence gold and purple glitter polishes,

5. Astor bronze-gold nail polish,

6. Miss Sporty pink and light pink glitter polishes,

7. Essence Out Of Spaces Stories silver glitter polish,

8. Essence silver polish,

9. Essence 3D Shine Gel Look top coat,

10. Dotting tools,

11. French manicure stickers.


Thanks for stopping by my blog!

Come and join me,
Welcome to my:

YouTube channel: https://www.youtube.com/user/LifeWorldWomen

Feel free to ask me anything you'd like to know!

Instagram: https://www.instagram.com/ildikonailart/
Facebook: https://facebook.com/lifeworldwomen
Twitter: https://twitter.com/LWWEasyNailArt
Pinterest: http://www.pinterest.com/ildikomohos/

Music by Kevin MacLeod  /Jingle Bells 3./
https://incompetech.com/music/royalty-free/

Licensed under Creative Commons: By Attribution


11/28/2018

4 Easy Santa Nail Art Designs


Today I show you 4 Santa nail art ideas.

Let's begin!


1. Apply base coat to protect your natural nails,

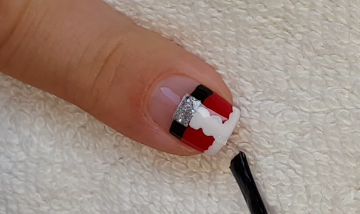
The first design is a sparkly red  and white chevron French manicure over the little nail - I use Scotch tape and dotting tool for this:


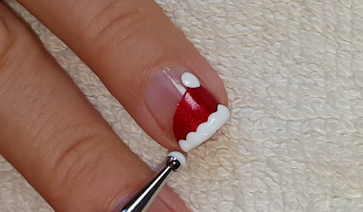
The second design is the Santa hat over the ring nail - I use the same colors as before:


Over the middle nail I paint Santa face using regular red nail polish, white polish and dotting tools - This is the third design:


We still need small black points over the eyes and a mouth, using striping brush:


The last design is the Santa coat over the index nail - Here I use silver and silver glitter polishes for the belt buckle:


I finish the designs with top coat to protect them from peeling and to keep them shiny and glossy:


What I use:

1. Essence Pro White Active base coat,

2. MaxFactor red nail polish,

3. Essence black, white, silver and silver glitter polishes,

4. P2 sparkly red nail polish,

5. Sally Hansen Insta-Dri top coat,

6. Dotting tools,

7. Scotch tape,

8. Striping btush.


Thanks for stopping by my blog!

Come and join me,
Welcome to my:

YouTube channel: https://www.youtube.com/user/LifeWorldWomen

Feel free to ask me anything you'd like to know!

Instagram: https://www.instagram.com/ildikonailart/
Facebook: https://facebook.com/lifeworldwomen
Twitter: https://twitter.com/LWWEasyNailArt
Pinterest: http://www.pinterest.com/ildikomohos/

Music by Kevin MacLeod  /Deck the Halls/
https://incompetech.com/music/royalty-free/

Licensed under Creative Commons: By Attribution