1/30/2019

Easy & Elegant Purple, Gold Toothpick Nail Art


You need only a toothpick for this purple and gold nail art.

Let me show you how you can make it!


1. Apply base coat to protect your natural nails:


2. Paint one of your nails pastel purple and don't let it dry!


3. Paint 2 purple lines over the wet base, then 2 gold lines over the purple ones:


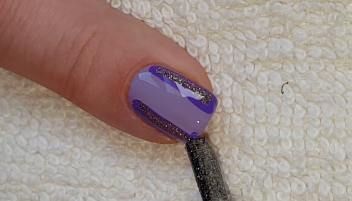
4. With a toothpick make the dry marble pattern:


5. Apply top coat to protect the manicure from peeling and to keep it shiny and glossy:


What I use:

1. Essence Pro White Active base coat,

2. Lovely pastel purple and purple nail polishes,

3. Essence gold glitter polish,

4. P2 Quick + Go top coat,

5. Toothpick.


Thanks for stopping by my blog!

Come and join me,
Welcome to my:

YouTube channel: https://www.youtube.com/user/LifeWorldWomen

Feel free to ask me anything you'd like to know!

Instagram: https://www.instagram.com/ildikonailart/
Facebook: https://facebook.com/lifeworldwomen
Twitter: https://twitter.com/LWWEasyNailArt
Pinterest: http://www.pinterest.com/ildikomohos/

Music by Kevin MacLeod  /Finding The Balance/
https://incompetech.com/music/royalty-free/

Licensed under Creative Commons: By Attribution


1/28/2019

Elegant Purple Nails With Leaf Design


This manicure is a sparkly purple nail art with leaf pattern.


1. Apply base coat to protect your natural nails:


2. Paint your ring and middle nails light purple or light lavender pink and the other nails - I use sparkly purple polish:


If needed, apply 2 coats:


3. We can fix the edge with a nail art brush and nail polish remover:


4. With a striping brush I paint the leaf pattern:


5. I add purple glitter polish to the leafs:


6. Apply top coat to protect the manicure from peeling and to keep it shiny and glossy:


What I use:

1. Essence Pro White Active base coat,

2. Essence light lavender pink nail polish,

3. Essence sparkly purple nail polish,

4. Essence XXXL Gel Look top coat,

5. Sally Hansen Xtreme Wear purple glitter polish,

6. Striping brush.


Thanks for stopping by my blog!

Come and join me,
Welcome to my:

YouTube channel: https://www.youtube.com/user/LifeWorldWomen

Feel free to ask me anything you'd like to know!

Instagram: https://www.instagram.com/ildikonailart/
Facebook: https://facebook.com/lifeworldwomen
Twitter: https://twitter.com/LWWEasyNailArt
Pinterest: http://www.pinterest.com/ildikomohos/

Music by Audio Library - YouTube  /Micro/


1/25/2019

Fishtail French Manicure Nail Art In Blue, Purple & White


Today I share my first fishtail nail art in a French manicure design.


1. Apply base coat to protect your natural nails.

2. Paint the first line diagonally - My first color is purple:


3. The second color is white - I need to apply 2 coats:


4. The next color is baby blue, and I also need 2 coats:


5. The last color is the purple:


6. I finish the pattern with silver glitter striping polish:


7. Apply top coat to protect the manicure from peeling and to keep it shiny and glossy:


What I use:

1. Essence Pro White Active base coat,

2. P2 baby blue and white nail polishes,

3. Crystal Nails purple polish,

4. Aden silver glitter striping polish,

5. Essence 3D Shine Gel Look top coat.


Thanks for stopping by my blog!

Come and join me,
Welcome to my:

YouTube channel: https://www.youtube.com/user/LifeWorldWomen

Feel free to ask me anything you'd like to know!

Instagram: https://www.instagram.com/ildikonailart/
Facebook: https://facebook.com/lifeworldwomen
Twitter: https://twitter.com/LWWEasyNailArt
Pinterest: http://www.pinterest.com/ildikomohos/

Music by Kevin MacLeod /Continue Life/
https://incompetech.com/music/royalty-free/

Licensed under Creative Commons: By Attribution


1/23/2019

Pink Striped Heart Nail Art For Valentine's Day Using Fan Brush & Dotting Tool


Today I recreated of my earlier Valentine's Day nail designs in pinkish red.


1. Apply base coat to protect your natural nails:


2. Paint your nails red or pink, I used pinkish red nail polish:


3. We can fix the edge with a nail art brush and nail polish remover:


4. For the next step I use a fan brush and white nail polish:


5. With a small dotting tool I paint white hearts:


6. I finish the nail art with top coat to protect it from peeling and to keep it shiny and glossy:


What I use:

1. Essence Pro White Active base coat,

2. Essence The Little X-Mas Factory pinkish red nail polish,

3. P2 white nail polish,

4. Essence 3D Shite Gel Look top coat,

5. Dotting tool,

6. Fan brush.


Thanks for stopping by my blog!

Come and join me,
Welcome to my:

YouTube channel: https://www.youtube.com/user/LifeWorldWomen

Feel free to ask me anything you'd like to know!

Instagram: https://www.instagram.com/ildikonailart/
Facebook: https://facebook.com/lifeworldwomen
Twitter: https://twitter.com/LWWEasyNailArt
Pinterest: http://www.pinterest.com/ildikomohos/

Music by Kevin MacLeod /Finding The Balance/
https://incompetech.com/music/royalty-free/

Licensed under Creative Commons: By Attribution


1/21/2019

Elegant Blue & Silver Needle Nail Art


Today I am bringing an elegant baby blue and royal blue needle nail art with silver sparkle.


1. Apply base coat to protect your natural nails:


2. Paint your nail baby blue - I apply 2 layers because my polish is thin. We need wet polish, so don't let it dry!


3. Paint a royal blue line across the wet base and a silver line on the top of it:


4. With a needle draw the marble pattern:


We can fix the edge with a nail art brush and nail polish remover:


5. Finish the nail art with top coat to protect the manicure from peeling and to keep it shiny and glossy:


What I use:

1. Essence Pro White Active base coat,

2. P2 baby blue nail polish,

3. Rimmel royal blue nail polish,

4. Essence Out Of Space Stories silver polish,

5. Essence 3D Shine Gel Look top coat,

6. Sewing needle.


Thanks for stopping by my blog!

Come and join me,
Welcome to my:

YouTube channel: https://www.youtube.com/user/LifeWorldWomen

Feel free to ask me anything you'd like to know!

Instagram: https://www.instagram.com/ildikonailart/
Facebook: https://facebook.com/lifeworldwomen
Twitter: https://twitter.com/LWWEasyNailArt
Pinterest: http://www.pinterest.com/ildikomohos/

Music by Kevin MacLeod  /Universal/
https://incompetech.com/music/royalty-free/

Licensed under Creative Commons: By Attribution


1/18/2019

Valentine's Day Heart Flower Nail Art


Today's manicure is a Valentine's Day nail art with heart flowers.


1. Apply base coat to protect your natural nails:


2. Paint your middle and ring nails light lavender pink, or you may use pastel baby pink polish as well:


3. Paint the other nails pink:


If needed fix the edge with a nail art brush and nail polish remover:


4. For the 'heart flowers' I use a thin nail art brush, greyish green, pink and baby pink nail polishes:


5. Finish the nail art with top coat to protect it from peeling and to keep it shiny and glossy:


What I  use:

1. Essence Pro White Active base coat,

2. P2 pink nail polish,

3. Essence baby pink and greyish green nail polishes,

4. Essence light lavender pink nail polish,

5. Essence 3D Shine Gel Look top coat,

6. A thin nail art brush.


Thanks for stopping by my blog!

Come and join me,
Welcome to my:

YouTube channel: https://www.youtube.com/user/LifeWorldWomen

Feel free to ask me anything you'd like to know!

Instagram: https://www.instagram.com/ildikonailart/
Facebook: https://facebook.com/lifeworldwomen
Twitter: https://twitter.com/LWWEasyNailArt
Pinterest: http://www.pinterest.com/ildikomohos/

Music by Audio Library - YouTube  /Clover_3/