11/30/2015

Silver & Blue Christmas Nail Art Tutorial


Hello Everyone!

I start to make the Christmas nail designs :)

The first one is a blue and silver glitter nail art... I hope you'll try it out ;)

Let's begin!

1. Apply base coat to protect your natural nails from discoloration - I use 'peel off' base coat to make the removal of glitter polish easier.

2. Paint your nails:

- Thumb-, index- and middle finger nails are blue - what I use is a sparkly polish,
- Ring- and little finger nails are silver:


3. I put glitter coat on the silver nails:


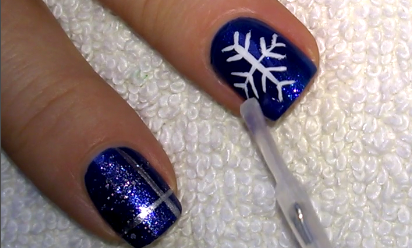
4. For the snowflake I use white liner polish but you may use striping brush plus ordinary white nail polish - this design is over the middle finger- and thumb nails:


5. The next step is the index finger, where I use striping brush, silver nail polish; and at the end a small sponge and glitter polish:


6. Finally the top coat:


We're done!

Hope you like this sparkly nail art for holidays :)


What I use:

1. Miss Sporty Peel Off base coat,

2. Essence silver, white and sparkly blue nail polishes,

3. Essence Sand Effect silver glitter poilsh,

4. ADEN white liner polish,

5. Sally Hansen Double Duty base and top coat,

6. Makeup sponge.


Thanks for visiting my blog!

Join me... Welcome to my:

YouTube: https://www.youtube.com/user/LifeWorldWomen

Feel free to ask me anything you'd like to know!

Facebook: https://facebook.com/lifeworldwomen
Twitter: https://twitter.com/LWWEasyNailArt

Pinterest: http://www.pinterest.com/ildikomohos/

Music by Kevin MacLeod /Windswept/
http://incompetech.com/music/royalty-free/


11/27/2015

No Tools Needed Chevron French Manicure


Hello Everyone!

In today's nail art tutorial I show you a super easy and quick chevron French manicure design, which one no needs any tools.

Let's start it!


1. Apply base coat to protect your natural nails from discoloration,

2. The first section is the gold:


For this nail art the best shape of brush is the straight edged one.

3. The next part is the dark pink:


4. Finally the black section:


5. I finish the design with quick dry top coat:


We're done!

Hope you'll like this easy manicure :)


What I use:

1. Essence base coat,

2. Catrice gold nail polish,

3. NYC dark pink nail polish,

4. Lovely black nail polish,

5. Sally Hansen Double Duty Base & Top Coat.


Thank you for reading my blog!

Join me... Welcome to my:

YouTube: https://www.youtube.com/user/LifeWorldWomen

Feel free to ask me anything you'd like to know!

Facebook: https://facebook.com/lifeworldwomen
Twitter: https://twitter.com/LWWEasyNailArt

Pinterest: http://www.pinterest.com/ildikomohos/

Music by Kevin MacLeod /Windswept/
http://incompetech.com/music/royalty-free/


11/25/2015

Burgundy Dotticure & Gradient Negative Space Nail Art


Hello Everyone!

Today I used one of my favorite nail polishes the burgundy color.
I matched the dotticure and negative space designs... Hope you'll like it.

Let's start it!


1. Apply base coat to protect your natural nails from discoloration,

2. Paint gradient negative space design by using burgundy or other dark shades:


3. Draw white line at the edge:


4. For the dotting tool design we need big- and medium dotting tools:


5. Finally apply quick dry top coat:


That's it! We're done.


What I use:

1. Essence base coat,

2. Crystal Nails burgundy nail polish,

3. Essence white nail polish,

4. ADEN white liner polish,

5. Essence QuickDry top coat,

6. Dotting tools.


Thanks for reading my blog!

Join me... Welcome to my:

YouTube: https://www.youtube.com/user/LifeWorldWomen

Feel free to ask me anything you'd like to know!

Facebook: https://facebook.com/lifeworldwomen
Twitter: https://twitter.com/LWWEasyNailArt

Pinterest: http://www.pinterest.com/ildikomohos/

Music by Kevin MacLeod /Neo Western/
http://incompetech.com/music/royalty-free/


11/23/2015

Super Easy Toothpick Nail Art For Fall In Soft Matte & Glossy Design


Hello Everyone!

Today I share a super easy toothpick nail art for Fall. As I see in the picture even into the video the dark beige is looks like pastel purple or grey... So in real this is really dark beige and gold nail design :)

Let me show you how to do!


1. Apply base coat to protect your natural nails from discoloration,

2. Paint your nails:

- Thumb-, middle- and ring finger nails are dark beige /it's soft matte nude polish/
- Index- and little finger nails are gold:


3. By using black liner polish I paint bough over the nude nails:


You may use striping brush and ordinary black nail polish as well.

4. Grab a toothpick, orange and yellow nail polishes and put some 'spots' like Fall leaves over the bough:


5. On the gold index nail I paint black and yellow dots alongside, the little finger nail gets orange dots beside black ones:


I don't apply top coat because of the soft matte polish.

And we're already done! Let me know what's your opinion ;)


What I use:

1. Essence base coat,

2. Catrice Luxury Nudes Soft Matte /dark beige nail polish/,

3. Catrice gold nail polish /bronze shade/

4. Miss Sporty orange nail polish,

5. Essence The Pastels yellow nail polish,

6. Lovely black nail polish,

7. ADEN black liner polish,

8. Toothpick.


Thanks for reading my blog!

Join me... Welcome to my:

YouTube: https://www.youtube.com/user/LifeWorldWomen

Feel free to ask me anything you'd like to know!

Facebook: https://facebook.com/lifeworldwomen
Twitter: https://twitter.com/LWWEasyNailArt

Pinterest: http://www.pinterest.com/ildikomohos/

Music by Kevin MacLeod /Autumn Day/
http://incompetech.com/music/royalty-free/


11/20/2015

Blue Velvet Matte Nail Art


Hello Everyone!

Today I am bringing a blue velvet matte nail design with gold dotticure.

Let's start it!

1. Apply base coat to protect your natural nails from discoloration,

2. Paint your each nail blue velvet - If you don't have any velvet matte polish you may use dark bue nail polish with matte top coat... let them dry:


3. For the dot design we need:

- Gold nail polish - I use not so yellowish polish, it rather looks like bronze,
- Big-, medium- ans small sized dotting tools,

The ring finger nail:


The middle finger nail - I use here medium tools with a bit different sizes and small sized tool:


The thumb-, index- and little finger nails have the same pattern:


We're done!

Hope you love this matte nail design... Let me know! :)


What I use:

1. Essence base coat,

2. Rimmel Velvet Matte nail polish /blue

3. Catrice gold nail polish,

4. Dotting tools.


Thanks for reading my blog!

Join me... Welcome to my:

YouTube: https://www.youtube.com/user/LifeWorldWomen

Feel free to ask me anything you'd like to know...

Facebook: https://facebook.com/lifeworldwomen
Twitter: https://twitter.com/LWWEasyNailArt

Pinterest: http://www.pinterest.com/ildikomohos/


Music by Kevin MacLeod /Montauk Point/
http://incompetech.com/music/royalty-free/


11/18/2015

Abstract Flower Nail Art - Sponge & Dry Brush Nails


Hello Everyone!

Abstract flower nail art what I've painted today.
I chose the base colors for the Fall.
We don't need many tools for this nail design, only a small sponge, a liner polish or a striping brush.

Let's start it!

1. Apply base coat to protect your natural nails from discoloration,

2. Paint your nails:

- Thumb nail is gold - it's not  yellowish gold rather similar to bronze,
- The index- and ring finger nails are pastel pink,
- The middle- and little finger nails are brown.

3. I paint the flower by using a small makeup sponge, pink and purple nail polishes and a black liner polish:


4. On the brown nails I apply dry brush technique by the gold nail polish:


5. Finally the top coat:


We're done!

Hope you like this easy and soft abstract flower design.


What I use:

1. Essence base coat,

2. Astor pastel pink nail polish,

3. Crystal Nails brown nail polish,

4. Catrice gold nail polish,

5. Lovely pink polish,

6. Miss Sorty purple nail polish,

7. ADEN black liner polish,

8. Sally Hansen Base & Top Coat,

9. Makeup sponge.


Thanks for reading my blog!

Join me... Welcome to my:

YouTube: https://www.youtube.com/user/LifeWorldWomen

Feel free to ask me anything you'd like to know!

Facebook: https://facebook.com/lifeworldwomen
Twitter: https://twitter.com/LWWEasyNailArt
Pinterest: http://www.pinterest.com/ildikomohos/

Music by Kevin MacLeod /Clear Air/
http://incompetech.com/music/royalty-free/


11/17/2015

How To Remove Shattered Nail Art & Glitter Nail Polish In Easy Way


Hello Everyone!

Do you remember of my latest shattered glass nail design?
I applied aluminium foil and glitter nail polish that contains small pieces of cellophane which is similar to glitter polishes.

So I decided to do a video how to remove it easily.

Let's start it!

1. We need: nail polish remover, cotton pad, aluminium foil, tweezers


2. Pour the remover on the cotton pad - I cut it off, we don't need big piece:


3. Fix the cotton pad on the nail then wrap your finger around to keep the pad on its place:


Let the nail soak.... I've waited about 6-8 minutes.

4. Then remove the foil and the cotton pad with some movements:


5. The little triangle foils won't soak of course so we need a tweezers to remove them:


6. At the end I clean up my nails completely:


7. Finally I moisturize my nails by hand&nail balm:


Finished!

Hope you like this easy way of hardly removable nail polishes including the glitter polishes.

Thanks for reading my blog!


Join me... Welcome to my:

YouTube: https://www.youtube.com/user/LifeWorldWomen

Feel free to ask me anything you'd like to know!

 Facebook: https://facebook.com/lifeworldwomen
Twitter: https://twitter.com/LWWEasyNailArt

Pinterest: http://www.pinterest.com/ildikomohos/

Music by Kevin MacLeod /Easy Lemon/
http://incompetech.com/music/royalty-free/


11/16/2015

Shattered Glass ...Or Mirror? Nail Art


Hello Everyone!

In these days there is a new trend the 'shattered glass' nail art.
Today I show my shattered glass nails or I call it even 'shattered mirror' nails as well.

Let's start it!


1. Apply base coat to protect your natural nails from discoloration,

2. Paint your nail - I mean one nail because we need 'half dried' nail for this design, so do one nail at a time:


3. Cut small triangles from a piece of  aluminium foil:


4. By a watery dotting tool put the pieces of foil over the nail carefully, don't push them so hard:


5. Finally I apply polish which contains small pieces of cellophane - I recommend it because it gives more shine to the nail design:


... and we're done!

Feel free to share your opinion!


What I use:

1. Essence base coat,

2. Lovely black nail polish,

3.Lovely 'Blink Blink' spakly nail polish,

4. Aluminium foil,

5. Dotting tool.


Thanks for reading my blog!

Join me... Welcome to my:

YouTube: https://www.youtube.com/user/LifeWorldWomen

Feel free to ask me anything you'd like to know!

Facebook: https://facebook.com/lifeworldwomen
Twitter: https://twitter.com/LWWEasyNailArt

Pinterest: http://www.pinterest.com/ildikomohos/

Music by Kevin MacLeod /Continue Life/
http://incompetech.com/music/royalty-free/