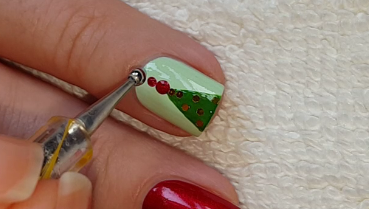
Today I share 4 easy Christmas tree nail art designs. I hope you like all of them.
Let's begin!
1. Apply base coat to protect your natural nails:
2. Paint your nails:
- the little nail is gold (I use darker gold polish)
- the ring nail is pastel green,
- the middle nail is sparkly red,
- the index nail is light pink.
3. For the first tree I use dark green nail polish and a thin nail art brush:
4. The ring nail Christmas tree is green:
5. Before the polish gets dry fully, I place gold glitters over the tree:
I finish this one with 2 red dots:
6. For the middle nail design I use white nail polish:
7. The last Christmas tree is light green with a star on its top, what I paint gold - I fix it with top coat:
8. Apply top coat to protect the manicure from peeling and to keep it shiny and glossy:
What I use:
1. Essence Pro White Active base coat,
2. Essence light pink, white, light green and dark gold glitter nail polishes,
3. Essence The Little X-Mas Factory dark green polish,
4. P2 sparkly red nail polish,
5. Essence Colour & Care pastel green nail polish,
6. Sallly Hansen Double Duty base & top coat,
7. Gold glitter,
8. Star nail decoration,
9. Dotting tool,
10. A thin nail art brush.
Thanks for stopping by my blog!
Come and join me,
Welcome to my:
YouTube channel: https://www.youtube.com/user/LifeWorldWomen
Feel free to ask me anything you'd like to know!
Instagram: https://www.instagram.com/ildikonailart/
Facebook: https://facebook.com/lifeworldwomen
Twitter: https://twitter.com/LWWEasyNailArt
Pinterest: http://www.pinterest.com/ildikomohos/
Music by Kevin MacLeod /Wish Background/
https://incompetech.com/music/royalty-free/
Licensed under Creative Commons: By Attribution


No comments:
Post a Comment