6/15/2015

Matte Black & Brown Leopard Nail Design


Easy and pretty leopard nails!

Today's nail art is a matte design - brown and black leopard nails.

Let's begin it!


1. Apply base coat to protect the natural nails from discoloration,

2. Paint your nails:

   - index fingers' and little fingers' nails are black,

   - ring fingers' nails and thumbs are chocolate brown,

   - middle fingers' nails are light brown / we may call camel brown.

3. After drying of all nails apply the matte top coat:


Now again you should wait until each nail getting dry..

4. Go on by using a toothpick and a drop of chocolate polish and start to paint the leopard pattern over the light brown nails:


Now I show you how to use the colors and how I changed the shape of pattern on the thumbs:


5. Next step is the painting of bows over the black nails using a small headed dotting tool or a toothpick; and gold nail polish:


6. Finally put a chocolate dot in the center of bow:


And that't it! :)

Done...

Hope you love this matte nail art... Feel free to ask me anything you like to know, leave a comment, share your thoughts!


What I use:

1. Essence base coat,

2. Lovely black nail polish,

3. Crystal Nails chocolate brown nail polish,

4. Rimmel light blue nail polish,

5. Essence gold nail polish,

6. Lovely Matte Top Coat.


Thanks for stopping at my blog!

Join me... Welcome to my:

YouTube: https://www.youtube.com/user/LifeWorldWomen
Facebook: https://facebook.com/lifeworldwomen
Twitter: https://twitter.com/LWWEasyNailArt
Pinterest: http://www.pinterest.com/ildikomohos/

Music by Kevin MacLeod /The Complex/
http://incompetech.com/music/royalty-free


6/12/2015

Elegant Blue-Brown-Gold Nail Art / Easy & Cute Nail Designs


Today I'm bringing an easy and elegant nail design which one needs only light blue and brown nail polishes, a gold liner polish a small headed dotting tool.


Let's start this nail art!

1. First of all apply base coat to protect the natural nails from discoloration,

2, Apply the blue nail polish but no need to paint the entire nail:


3. By using the brown polish shape the side pattern:


/ It's really not difficult just do it slowly. /

4. After grab the gold liner polish - or a simple nail art brush with a gold nail polish - and go on by drawing the edges of brown part:


5. Finally pick your smallest dotting tool and paint little points near the gold lines:


That's it!

... And I hope you like it!


What I use:

1. Essence base coat,

2. Rimmel Salon Pro light blue nail polish,

3. Miss Sporty brown nail polish,

4. ADEN gold liner polish.


Thanks for visiting my blog!

Join me... Welcome to my:

YouTube: https://www.youtube.com/user/LifeWorldWomen
Facebook: https://facebook.com/lifeworldwomen
Twitter: https://twitter.com/LWWEasyNailArt
Pinterest: http://www.pinterest.com/ildikomohos/

Music by Kevin MacLeod /Clear Air/
http://incompetech.com/music/royalty-free


6/10/2015

Cheerful Marble Nail Art Using Toothpick


Super easy Summer nail art that needs only a toothpick!

Let me show you how to do :)


1. Apply base coat to protect the natural nails from discoloration,

2. We need a green, a yellow and a pink nail polish to paint the base:


You may see I change the colors on my nails and if you put the yellow on the top it can't cover the darker colors perfectly but a bit mixing version is pretty too :)

3. Grab a toothpick and start to pull it across left and right:


4. Finally apply the top coat:


That's it!

We've done it :)

Hope you like and will try this funny nail art out.


What I use:

1. Essence base coat,

2. Essence green and pink nail polish,

3. Rimmel yellow nail polish,

4. Essence Quick Dry top coat,

5. A toothpick.


Thank you for visiting my blog!

Join me... Welcome to my:

YouTube: https://www.youtube.com/user/LifeWorldWomen
Facebook: https://facebook.com/lifeworldwomen
Twitter: https://twitter.com/LWWEasyNailArt
Pinterest: http://www.pinterest.com/ildikomohos/

Music by Kevin MacLeod /Easy Jam/
http://incompetech.com/music/royalty-free


6/08/2015

White Pearl Nail Art - Flower Nails For Summertime


Pure white pearl floral nail art for Summertime.

We need only a few colors of nail polish, a dotting tool and a toothpick.

Let's start this cute design!


1. Apply base coat to protect natural nails from discoloration,

2. Paint each nail white pearl or you may use silver nail polish as well - in the camera it appears like silver :)

3. Grab a small headed dotting tool and begin the flowers by using baby pink, light blue and violet colors:


4. Then by a toothpick shape the petals:


5. After the pink polish do the same steps by using the blue and violet nail polish:


6. Apply top coat:


7. Then take the base color and the dotting tool and put duoble dots top of the flowers - it will look like a small pearl:


Finished!

Hope it does not seems so hard because it's really easy to do.


What I use:

1. Essence base coat,

2. Maybelline Colo Rama white pearl nail polish,

3. Essence baby pink nail polish,

4. Miss Sporty violet nail polish,

5. Rimmel light blue nail polish,

6. Essence Quick Dry top coat.


Thanks for stopping at blog!

Join me... Welcome to my:

YouTube: https://www.youtube.com/user/LifeWorldWomen
Facebook: https://facebook.com/lifeworldwomen
Twitter: https://twitter.com/LWWEasyNailArt
Pinterest: http://www.pinterest.com/ildikomohos/

Music by Kevin MacLeod /Easy Lemon/
http://incompetech.com/music/royalty-free


6/05/2015

Wedding Nail Art


Today's nail art is a wedding nail design.

I decided no to write too much because I can show you how to do by more pictures, it's more easy :)

Let's begin the 'Big Day' nail art!


1. Apply base coat,

2. Paint with white pearl polish the nails of index fingers, little fingers and thumbs:


3. We need white nail polish and start to paint the 'bride nail' then a part of 'groom nail':


.. You see no need to polish the whole nail of middle finger ..

4. Grab a black liner nail polish or a nail art brush and an ordinary black nail polish, and draw the suit shape:


5. Go on by using a black nail polish and its own brush:


6. By a small headed dotting tool and silver nail polish paint buttons and the tie:


7. Then back to the ring finger and by a bigger headed tool put a dot over it:


8. Grab again the small headed tool and a silver glitter polish and continue:


9. Still we have the 'white pearl' nails so put top of them a white flower with a silver center:


10. The latest step is the top coat:


That's it!  Finished!

Hope you got the steps right :)


What I use:

1. Essence base coat,

2, Maybelline Colo Rama white pearl nail polish,

3. Rimmel Brit Manicure white nail polish,

4. Lovely black nail polish,

5. Aden black liner polish,

6. Catrice Nickel Minaj silver nail polish,

7. Essence silver glitter nail polish,

8. Essence Quick Dry top coat.


Thanks for visiting my blog!

Join me.. Welcome to my:

YouTube: https://www.youtube.com/user/LifeWorldWomen
Facebook: https://facebook.com/lifeworldwomen
Twitter: https://twitter.com/LWWEasyNailArt
Pinterest: http://www.pinterest.com/ildikomohos/

Music by Kevin MacLeod /Montauk Point/
http://incompetech.com/music/royalty-free


6/03/2015

Pink & Gold Dragonfly Nail Art - Pretty Summer Nails


Today I bring a cute dragonfly nail design which one is really easy to do.

We need two shades of  pink nail polish and two sized dotting tool.

Let me show you how to do!


1. Apply base coat to protect the natural nails from discoloration,

2. Paint you nails with different colors /Thumbs are light pink/:


3. Then grab a medium headed dotting tool and the dark pink nail polish and begin to paint the dragonfly's wings:


4. Using the same tool and the light pink nail polish draw the body:


5. Finally two small black eyes with a small headed tool:


That's it! :)

I didn't use top coat for this design it's enough shiny, but for being long lasting you may use your favorite one of course.


What I use:

1. Essence base coat,

2. Lovely dark pink, light pink and black nail polish,

3. Essence gold nail polish.


Thanks for stopping at my blog!

Join me!
Welcom to my:

YouTube: https://www.youtube.com/user/LifeWorldWomen
Facebook: https://facebook.com/lifeworldwomen
Twitter: https://twitter.com/LWWEasyNailArt
Pinterest: http://www.pinterest.com/ildikomohos/

Music by Kevin MacLeod /Living Voyage/
http://incompetech.com/music/royalty-free


6/01/2015

Bright Orange Dotted Nail Art


Today's nail art is a bright orange design - I picked this cute nail polish among the 'average' ones :)

Let me show you how I made this beautiful dotted nail art!


1. Apply base coat to protect the natural nails from discoloration,

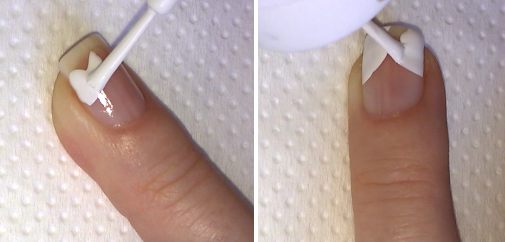
2. Paint the nails of little fingers, index fingers and thumbs orange, then the middle finger and ring finger nails will get French tips:


3. Needs a bigger headed dotting tool and the smallest tool you have, a dark pink nail polish:


4. Decorate the edge of French tips too:


5. Then by a yellow nail polish and a 'normal sized' small headed tool make the little points over the big ones:


6. Finally the top coat - very important that have to wait at least 15-20 minutes or more before it even if we paint more layers!


That't it!

I hope you like this design.


What I use:

1. Essence base coat,

2. Crystal Nails bright orange nail polish,

3. NYC dark pink nail polish,

4. Miss Sporty yellow nail polish,

5. Essence Quick Dry top coat.


Thanks for visiting my blog!

Join me to not miss the new nail ideas!
Welcome to my:

YouTube: https://www.youtube.com/user/LifeWorldWomen
Facebook: https://facebook.com/lifeworldwomen
Twitter: https://twitter.com/LWWEasyNailArt
Pinterest: http://www.pinterest.com/ildikomohos/

Music by Kevin MacLeod /Clear Air/
http://incompetech.com/music/royalty-free