11/16/2016

Purple & Gold Needle Drag Marble Design Over Mint Green Nails


Hi!

Today I made a purple and gold drag marble nail design over mint green base.
I used only a single needle.

So, let me show you how to do this easy and elegant nail art!


1. Apply base coat to protect your natural nails,

2. Paint one of your nails mint green - we need wet nail polish:


3. Paint a purple line over the wet base then a gold line on the top of the purple one:


4. By a needle start to make the marble pattern:


5. Finally apply top coat to protect the manicure from peeling and to keep it shiny and glossy:


That's it! We're done.


What I use:

1. Essence base coat,

2. Essence Fun Fair mint green nail polish,

3. Rimmel Salon Pro purple polish,

4. Essence gold nail polish,

5. Sally Hansen Double Duty base&top coat,

6. Needle.


Thank you for stopping by my blog!

Come and join me,
Welcome to my:

YouTube channel: https://www.youtube.com/user/LifeWorldWomen

Feel free to ask me anything you'd like to know!

Instagram: https://www.instagram.com/ildikonailart/
Facebook: https://facebook.com/lifeworldwomen
Twitter: https://twitter.com/LWWEasyNailArt

Pinterest: http://www.pinterest.com/ildikomohos/

Music by Kevin MacLeod /Continue Life/
https://incompetech.com/music/royalty-free/

Licensed under Creative Commons: By Attribution


11/14/2016

Pale Pink Fall Nail Design Using Nail Art Brushes


Hi!

Today's manicure is a pale pink Fall design using nail art brushes.

Let's start this pretty nail art!


1. Apply base coat to protect your natural nails,

2. Paint your nails pale pink /mauve/ then add a second layer too:


3. For the leave-like pattern I use thin nail art brush and bronze gold nail polish:


4. By my thinnest brush I add burgundy polish to the leaves:


I make little changes on my nails:


5. Finally may come the top coat to protect your manicure from peeling and to keep it shiny and glossy:


That's it! We're done.


What I use:

1. Essence Pro White Active base coat,

2. Essence The Nudes pale pink nail polish,,

3. Essence burgundy polish,

4. Astor bronze gold nail polish,

5. Sally Hansen Double Duty base&top coat,

6. Nail art brushes.


Thank you so much for stopping by my blog!

Come and join me,
Welcome to my:

YouTube channel: https://www.youtube.com/user/LifeWorldWomen

Feel free to ask me anything you'd like to know!

Instagram: https://www.instagram.com/ildikonailart/
Facebook: https://facebook.com/lifeworldwomen
Twitter: https://twitter.com/LWWEasyNailArt

Pinterest: http://www.pinterest.com/ildikomohos/

Music by Kevin MacLeod /Autumn Day/
https://incompetech.com/music/royalty-free/

Licensed under Creative Commons: By Attribution


11/11/2016

Elegant Black Based Drag Marble Nail Art


Hi!

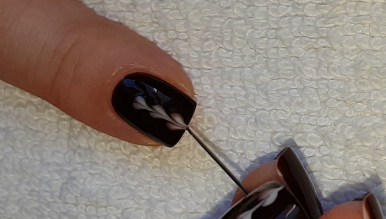
Today I share an elegant black based marble nail art using needle.

Let me show you how you can do this easy nail design!


1. Apply base coat to protect your natural nails,

2. We need wet nail polish, so paint one of your nails black:


3. For the marble design I use:

- pastel purple,
- holographic nail polish,
- gold nail polish:


4. Grab a needle and start to make the pattern:


5. At the end apply top coat to protect your manicure from peeling and to keep it shiny and glossy:


That's it!


What I use:

1. Essence base coat,

2. Sally Hansen Miracle Gel black polish,

3. Miss Sporty pastel purple and holographic nail polishes,

4. Essence gold polish,

5. Sally Hansen Double Duty base&top coat,

6. Needle.


Thanks alot for stopping by my blog!

Come and join me,
Welcome to my:

YouTube channel: https://www.youtube.com/user/LifeWorldWomen

Feel free to ask me anything you'd like to know!

Instagram: https://www.instagram.com/ildikonailart/
Facebook: https://facebook.com/lifeworldwomen
Twitter: https://twitter.com/LWWEasyNailArt

Pinterest: http://www.pinterest.com/ildikomohos/

Music by Kevin MacLeod /Clear Waters/
https://incompetech.com/music/royalty-free/

Licensed under Creative Commons: By Attribution


11/09/2016

Colorful Drag Marble Nail Art Using Only Toothpick


Hi!

Today's manicure is a colorful marble design using only a single toothpick.

So, let's start it!


1. Apply base coat to protect your natural nails,

2. Paint one of your nails pastel green - We need wet nail polish, so do it quickly as you can :)


3. Paint purple, yellow and pink lines over the wet base - As you see on the picture above, I use orange too..


4. Grab a toothpick and start to make the marble pattern:


5. Finally apply top coat to protect your manicure from peeling and to keep it shiny and glossy:


That's it! We're done..


What I use:

1. Essence Hardening Nail Base,

2. Essence Colour&Care pastel green nail polish,

3. Essence purple, pastel yellow and orange polishes,

4. Lovely pink nail polish,

5. Sally Hansen Double Duty base&top coat,

6. Toothpick.


Thanks alot for stopping by my blog!

Come and join me,
Welcome to my:

YouTube channel: https://www.youtube.com/user/LifeWorldWomen

Feel free to ask me anything you'd like to know!

Instagram: https://www.instagram.com/ildikonailart/
Facebook: https://facebook.com/lifeworldwomen
Twitter: https://twitter.com/LWWEasyNailArt
Pinterest: http://www.pinterest.com/ildikomohos/

Music by Kevin MacLeod /Life Of Riley/
https://incompetech.com/music/royalty-free/

Licensed under Creative Commons: By Attribution


11/07/2016

Dark Red Bridal Side French Manicure Nail Art


Hi!

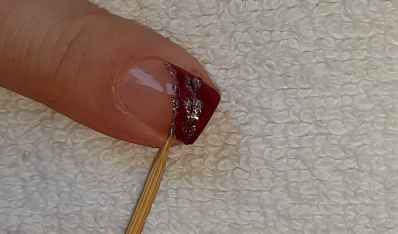
Today I share a requested red bridal nail design. I decided to put it into a French manicure.

Let's start it!


1. Apply base coat to protect your natural nails,

2. Paint dark red side French manicure over one of your nails - We need wet nail polish:


3. Put three gold blobs over the wet base:


4. By a needle make heart-like pattern:


5. Now grab a toothpick and cover the red edge by gold polish:


6. Finally apply top coat to protect your manicure from peeling and to keep it shiny and glossy:


That's it! We're done.


What I use:

1. Essence base coat,

2. Essence dark red nail and gold polishes,

3. Sally Hansen Double Duty base&top coat,

4. Needle,

5. Toothpick.


Thanks alot for stopping by my blog!

Come and join me,
Welcome to my:

YouTube channel: https://www.youtube.com/user/LifeWorldWomen

Feel free to ask me anything you'd like to know!

Instagram: https://www.instagram.com/ildikonailart/
Facebook: https://facebook.com/lifeworldwomen
Twitter: https://twitter.com/LWWEasyNailArt
Pinterest: http://www.pinterest.com/ildikomohos/

Music by Kevin MacLeod /Double Drift/
https://incompetech.com/music/royalty-free/

Licensed under Creative Commons: By Attribution


11/04/2016

Coffee Nail Design / Dotting Tool & Needle Nail Art


Hi!

Today I decided to make a dark brown coffee inspired nail art.

I just found this beautiful brown shade which is called 'Coffee Break', so I had to make a coffee design!

Hope you'll love this easy idea..

Let's do it then!


1. Apply base coat to protect your natural nails,

2. Paint your nails dark brown and let them dry... We need a second layer too, and now paint one of your nails because we need wet nail polish:


3. Put three dots over the wet base - I use light beige or it's also close to very light brown... Try to make the first one bigger at the edge of the nail:


4. Grab a needle and pull it across the blobs:


5. Finally apply top coat to protect the manicure from peeling and to keep it shiny and glossy:


The coffee nails are ready! :)


What I use:

1. Essence The Gel Nail Polish base coat,

2. Astor 'Coffee Break' dark brown nail polish,

3. Essence The Nudes very light brown polish,

4. Sally Hansen Double Duty base&top coat,

5. Big dotting tool,

6. Needle.


Thanks alot for stopping by my blog!

Come and join me,
Welcome to my:

YouTube channel: https://www.youtube.com/user/LifeWorldWomen

Feel free to ask me anything you'd like to know!

Instagram: https://www.instagram.com/ildikonailart/
Facebook: https://facebook.com/lifeworldwomen
Twitter: https://twitter.com/LWWEasyNailArt
Pinterest: http://www.pinterest.com/ildikomohos/

Music by Kevin MacLeod /Continue Life/
https://incompetech.com/music/royalty-free/

Licensed under Creative Commons: By Attribution


11/02/2016

Fire Inspired Toothpick Nail Art


Hi!

Today I show you a white based fire inspired toothpick nail design.

So, let's get started!


1. Apply base coat to protect your natural nails,

2. Paint one of your nails white - We need wet nail polish:


3. Paint black blob over the upper side, then small yellow ones on the top, finally pink blobs:


4. By a toothpick start to make the pattern:


5. We can fix the edge by a nail art brush and nail polish remover:


6. Finally may come the top coat to protect the manicure from peeling and to keep it shiny and glossy:


That's it! We're done.


What I use:

1. Essence base coat,

2. Essence white and pastel yellow nail polishes,

3. Lovely black nail polish,

4. Miss Sporty sparkly pink nail polish,

5. Sally Hansen Double Duty base&top coat,

6. Toothpick.


Thanks alot for stopping by my blog!

Come and join me,
Welcome to my:

YouTube channel: https://www.youtube.com/user/LifeWorldWomen

Feel free to ask me anything you'd like to know!

Instagram: https://www.instagram.com/ildikonailart/
Facebook: https://facebook.com/lifeworldwomen
Twitter: https://twitter.com/LWWEasyNailArt

Pinterest: http://www.pinterest.com/ildikomohos/

Music by Kevin MacLeod /Clear Waters/
https://incompetech.com/music/royalty-free/

Licensed under Creative Commons: By Attribution