9/18/2015

Sparkly Greenish Blue Gradient Striped Nail Art


Hi Guys!

Today I'm bringing a sparkly nail art.

I use greenish blue nail polish, black and white liner nail polishes - You may use simple nail brush with white and black nail polishes.


Let's start it!

1. Apply base coat to protect your natural nails from discoloration,

2. Paint your each nail sparkly green or blue if you don't have greenish blue, but don't use dark color:


3. By the black liner polish give a frame to the nail:


4. Draw a black line alongside in the middle area:


5. Paint three skew stripes on the both sides:


6. We now need the white polish for the next step:


7. Finally a thin white line over the tip:


8. Finish the nail art with top coat:


That's it! We're done.

Hope you loike this cute design.

Feel free to share your thoughts and opinions.


What I use:

1. Essence base coat,

2. Moyra sparkly greenish blue nail polish,

3. ADEN black and white liner polishes,

4. Essence QuickDry top coat.


Thanks for reading my blog!

Come and join me!
Welcome to my:

YouTube: https://www.youtube.com/user/LifeWorldWomen
Facebook: https://facebook.com/lifeworldwomen
Twitter: https://twitter.com/LWWEasyNailArt
Pinterest: http://www.pinterest.com/ildikomohos/

Music by Kevin MacLeod /Anamalie/
http://incompetech.com/music/royalty-free/


9/16/2015

Fall Nail Art - Leaves / Nail Brush Designs


Hi Guys!

The nail art I show you today is a fall design using nail brush.

Every season has its own beauty and colors - which ones for the autumn are mostly the orange, yellow and brown.

So let's get start it!


1. Apply base coat to protect your natural nails from discoloration,

2. Paint your nails:

- Thumb-, index- and middle finger nails are white - I use white sand nail polish,
- Ring- and little finger nails are salmon - This is a sparkly polish,

3. We now need a simple striping brush for the pattern, first draw the side lines using salmon nail polish - you may use dark orange instead of salmon:


4. For the leaves we need orange, yellow and burgundy nail polishes - also you may use dark red if you don't have burgundy polish:


5. Finally apply top coat - Important to wait 20-25 minutes or more before apply it because the light and dark colors may smudge each others easily:


That's it!

Hope you liked this fall nail design.

Feel free to ask me and tell me your opinion! :)


What I use:

1. Essence base coat,

2. Crystal Nails salmon and burgundy nail polishes,

3. Lovely white sand nail polish,

4. Maybelline orange nail polish,

5. Rimmel yellow nail polish,

6. Essence QuickDry top coat.


Thanks for reading my blog!

Join me... Welcome to my:

YouTube: https://www.youtube.com/user/LifeWorldWomen
Facebook: https://facebook.com/lifeworldwomen
Twitter: https://twitter.com/LWWEasyNailArt
Pinterest: http://www.pinterest.com/ildikomohos/

Music by Kevin MacLeod /Autumn Day/
http://incompetech.com/music/royalty-free/


9/14/2015

Rainbow Dotticure Nail Art Over Dark Blue Basic


Hi Guys!

Today's nail art is a rainbow dotticure nail design.

I use as basic one of my favorite nail polishes the blue 'Suede' polish.. This is half way between shiny and matte nail polishes.

So let's start this cute design!


1. Apply base coat to protect your natural nails from discoloration,

2. Paint your each nail dark blue - it's not big problem if you have only shiny one:


3. Grab a small headed dotting and: pink, yellow, light green and blue, pastel purple nail polishes for the rainbow dotticure design - try to paint smaller and bigger dots randomly:


That's it!

I don't use top coat to make it more shiny because of the suede basic.

Feel free to ask me anything you like to know even share your opinion! :)


What I use:

1. Essence base coat,

2, Rimmel yellow and light blue nail polishes,

3. Miss Sporty light green and pastel pink nail polishes,

4.Essence 'Suede' dark blue nail polish

5. Lovely pink nail polish.


Thanks for reading my blog!

Join me!
Welcome to my:

YouTube: https://www.youtube.com/user/LifeWorldWomen
Facebook: https://facebook.com/lifeworldwomen
Twitter: https://twitter.com/LWWEasyNailArt
Pinterest: http://www.pinterest.com/ildikomohos/

Music by Kevin MacLeod /Daily Beetle/
http://incompetech.com/music/royalty-free/


9/11/2015

Polka Dot & Easy Dotting Tool Rose Nail Art


Hi Guys!

Today's nail art is a polka dot and flower design in white and blue.

I was thinking for a whlie that should paint some blue flower nail art and this is what has come out of my thoughts :).

Let's begin this pretty and EASY nail design!


1. Apply base coat to protect your natural nails from discoloration,

2. Paint your nails white and blue /above you may see on the picture/ - thumb nail is empty,

3. We need big- and small headed dotting tools for the roses:


4. After waiting a little go on by using the smallest headed tool you have and dark nail polish:


5. With dark blue polish make the polka dot nails:


Over my thumb nail I paint white and light blue rose tip..

6. Finally apply top coat:


That's it! We're done.

Please feel free to ask me or tell me your opinion! Thank you! :)


What I use:

1. Essence base coat,

2. Rimmel light blue nail polish,

3. Lovely white nail polish,

4. Miss Sporty dark blue nail polish,

5 Essence QuickDry top coat,

6. Dotting tools.


Thanks for stopping at my blog!

Come and join me!
Welcome to my:

YouTube: https://www.youtube.com/user/LifeWorldWomen
Facebook: https://facebook.com/lifeworldwomen
Twitter: https://twitter.com/LWWEasyNailArt
Pinterest: http://www.pinterest.com/ildikomohos/

Music by Kevin MacLeod /I Feel You/
http://incompetech.com/music/royalty-free/


9/09/2015

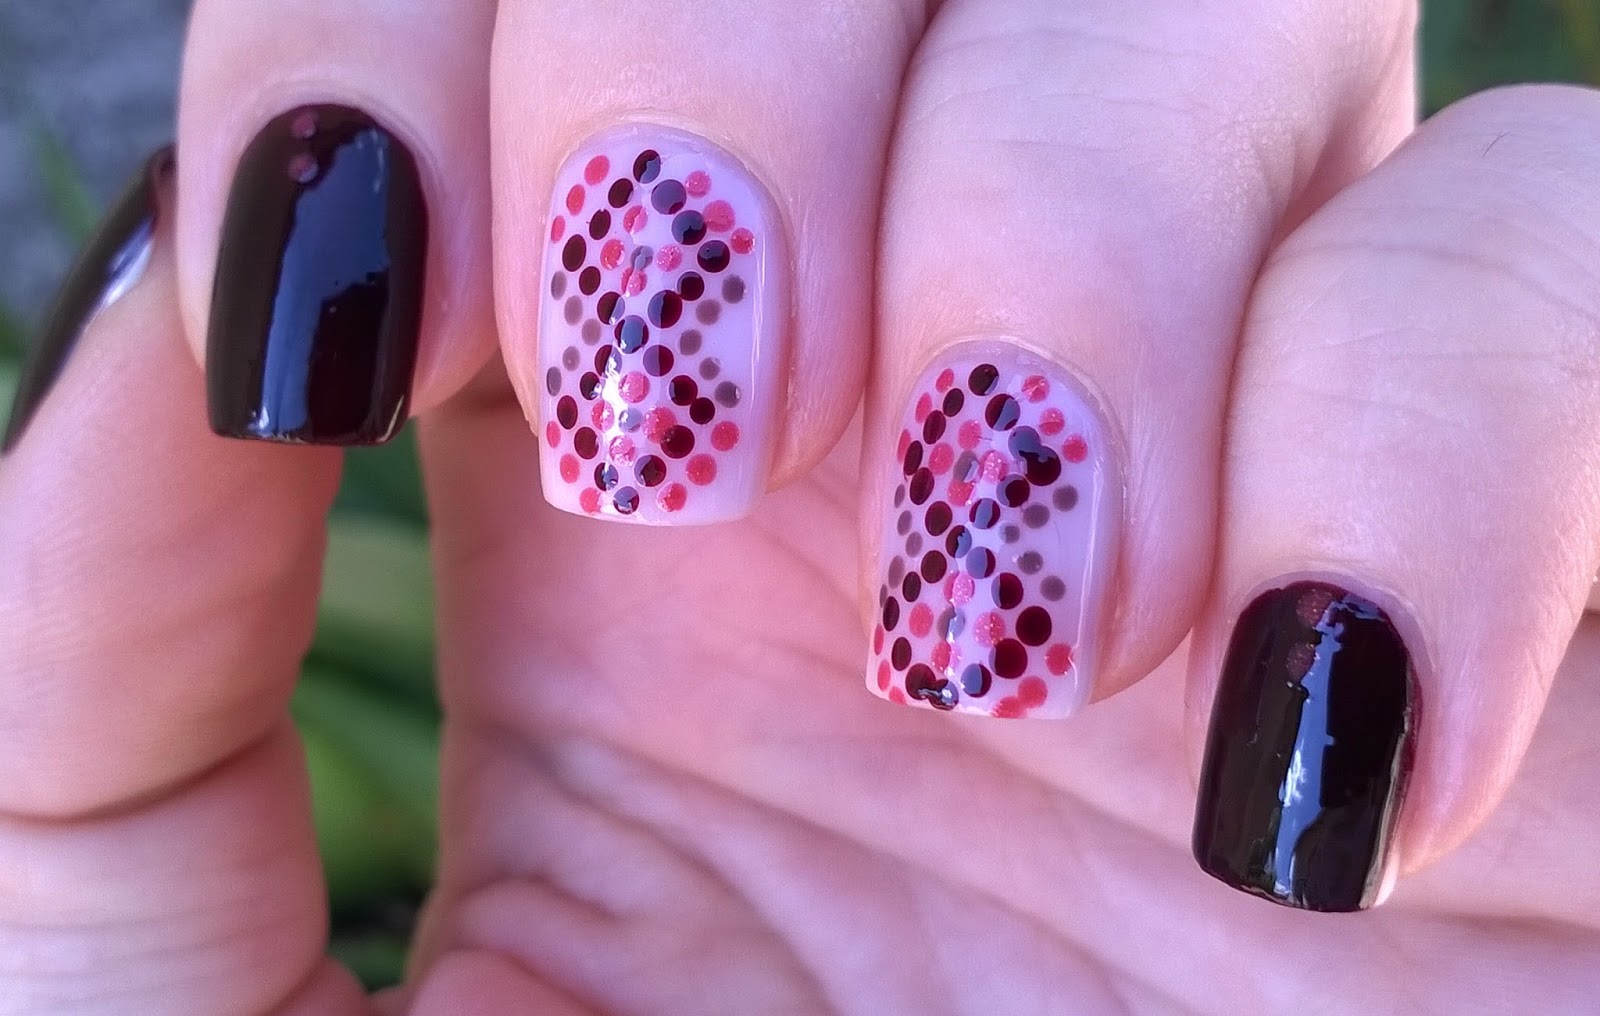
Dotticure Nails In Burgundy, Pastel Pink & Salmon


Hi Guys!

I just found this beautiful burgundy nail polish and felt I have to do some nail art using it, and what came out from it a dotticure design.

I don't talk - write - more, let's begin!


1. Apply base coat to protect your natural nails from discoloration,

2. Paint your nails pastel pink and burgundy - or dark red is perfect too - /Thumb nail is burgundy/

3. For the dotticure nails I use toothpick - I have cut its peak off before - but you may use dotting tool too... Needed burgundy, salmon and warm brown nail polishes:


4. I put two small dots over the burgundy nails:


5. Finally apply top coat:


That's it! We're done.

Hope you like this dotticure nail art... Share your opinion about it! :)

Feel free to ask me anything you like to know!


What I use:

1. Essence base coat,

2. Crystal Nails burgundy-, brown and salmon nail polishes,

3. Moyra pastel pink nail polish,

4.Essence QuickDry top coat.


Thanks for reading my blog!

Come and join me... Welcome to my:

YouTube: https://www.youtube.com/user/LifeWorldWomen
Facebook: https://facebook.com/lifeworldwomen
Twitter: https://twitter.com/LWWEasyNailArt
Pinterest: http://www.pinterest.com/ildikomohos/


Music by Kevin MacLeod /Clear Air/
http://incompetech.com/music/royalty-free/


9/07/2015

Negative Space Water Marble Nail Art In Pink & White


Hi Guys!

Today I'm bringing another easy water marble nail art with dotticure design in negative space.

So I hope you'll like it :)

Let me show you how to do!


1. Apply base coat to protect your natrual nails from discoloration,

2. Grab a small headed dotting tool, pink and baby pink nail polishes and make the dotticure design:


3. I use peel off base coat around my nails over the skin before the water marble pattern:


4. Take a little dish and room temperature water; white-, transparent- /it's like a nail care polish expl./ and white pearl nail polishes and start it... I put into the water: white-transparent-white pearl-transparent-white:


5. Carefully mix the polishes by a toothpick - we need narrow lines:


6. Put your finger into the water on the part you like but do it slowly:


By the toothpick pull the polish away from your finger.

7. Clean up by using nail polish removal:


8. Finally apply top coat:


We're done!

Please feel free to share your opinion, even ask me anything you like to know.


What I use:

1. Essence base coat,

2. Miss Sporty Peel Off base coat,

3. Lovely baby pink, pink and white nail polishes,

4. Maybelline white pearl nail polish,

5. Essence nail hardener - as a transparent polish,

6. Essence QuickDry top coat.


Come and join me!
Welcome to my:

YouTube: https://www.youtube.com/user/LifeWorldWomen
Facebook: https://facebook.com/lifeworldwomen
Twitter: https://twitter.com/LWWEasyNailArt
Pinterest: http://www.pinterest.com/ildikomohos/

Music by Kevin MacLeod /Laid Back Guitars/
http://incompetech.com/music/royalty-free/


9/04/2015

Monochrome Floral Nail Art In Black & White


Hi Guys!

Today's nail art is a monochrome floral nail design in black and white.

We need only two colors and three sized dotting tools.

Let's begin!


1. Apply base coat to protect your natural nails from discoloration,

2. Paint your nails black and white,

3. Pick a big, a medium and a small headed dotting tools and paint the flowers - first we use the biggest tool:


The next coat of flower by the medium headed tool:


And finally use the small headed dotting tool and drop dots in the middle:


4. For finish apply top coat:


That's it! We're done.

Hope you like this pretty nail art... Feel free to share me your opinion even ask me anything you like to know.


What I use:

1. Essence base coat,

2. Lovely black and white nail polishes,

3. Essence QuickDry top coat.


Come and join me!
Welcome to my:

YouTube: https://www.youtube.com/user/LifeWorldWomen
Facebook: https://facebook.com/lifeworldwomen
Twitter: https://twitter.com/LWWEasyNailArt
Pinterest: http://www.pinterest.com/ildikomohos/

Music by Kevin MacLeod /Life of Riley/
http://incompetech.com/music/royalty-free/