Showing posts with label how to paint perfect nails. Show all posts

11/05/2018

How To Paint Your Nails, Step By Step


Today I share that how you should paint your nails perfectly in a few steps.


1. Clean up the surface of your nails with a nail art brush and nail polish remover:


2. Apply base coat to protect your natural nails:


3. Apply the first layer nail polish:


4. After the first layer gets dry, apply the second layer:


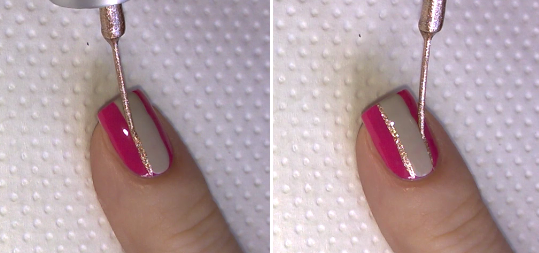
5. Fix the edge with a nail art brush and nail polish remover:


6. Apply top coat to protect the manicure from peeling and to keep it shiny and glossy:


What I use:

1. Essence Pro White Active base coat,

2. Astor dark pink nail polish,

3. Essence XXXL Volume Gel Look top coat,

4. Nail polish remover,

5. Nail art brush.


Thanks for stopping by my blog!

Come and join me,
Welcome to my:

YouTube channel: https://www.youtube.com/user/LifeWorldWomen

Feel free to ask me anything you'd like to know!

Instagram: https://www.instagram.com/ildikonailart/
Facebook: https://facebook.com/lifeworldwomen
Twitter: https://twitter.com/LWWEasyNailArt
Pinterest: http://www.pinterest.com/ildikomohos/

Music by Kevin MacLeod  /Finding The Balance/
https://incompetech.com/music/royalty-free/

Licensed under Creative Commons: By Attribution


3/18/2015

Sea waves inspired beach nail design


Back to the nature!

Today I got inpired by the sea especially the sea waves :) . Then I decided to make an easy beach nail art by using only TOOTHPICK!

Let's start this cute design!


First as always I apply the base coat to protect the natural nails...

Then I paint my nails white, then grab a small sponge and the light blue nail polish for making the sea:


When it's done then continue with the waves by using a simple toothpick:


I thought there are many girls who have no dotting tools, so I try my best to make nail designs that need only toothpick.

Just two step left, create a snail shell:


The toothpick I use for the snail shell it's shortcut - Just for a bit bigger dots I cut its end off.

The latest step is the top coat - always wait at least 10-15 minutes after you finish the previous coats.

 We've finished!

I'll be happy if you drop a comment how you like these nails! :)


What I use:

1. Essence base coat,

2. Crystal Nails white nail polish,

3. Rimmel light blue nail polish,

4. Miss Sporty light blue nail polish,

5. Moyra Aqua Jeans /Deep Forest/ green blue nail polish,

6. Essence top coat.


Thank you for visiting my blog!


Please join me :)
Welcome to my

YouTube: https://www.youtube.com/user/LifeWorldWomen
Facebook: https://facebook.com/lifeworldwomen
Twitter: https://twitter.com/LWWEasyNailArt
Pinterest: http://www.pinterest.com/ildikomohos/

Music by Kevin MacLeod /The Complex/
http://incompetech.com/music/royalty-free


2/04/2015

Pink striped nail art


I chose for this design pink, camel light brown nail polishes but of course you can use any other colors as well.

First of all I use base coat then I paint one of my nails with pink and other one with light brown polish.

Next step to draw a brush size stripe on the middle part:


After it I use the gold liner polish between the pink and brown parts:


And finally two black stripes next to gold ones:


Done!

I hope you'll love this nail design! :)

Thanks for your attention.


What I use:

1. Essence base coat,

2. Rimmel pink and camel light brown,

3. ADEN black and gold liner nail polish.


Join me :) Welcome to my

Facebook: https://facebook.com/lifeworldwomen
Twitter: https://twitter.com/IldikoMohos
Pinterest: http://www.pinterest.com/ildikomohos/

Music by Kevin MacLeod /Clear Air/
http://incompetech.com/music/royalty-free/