Showing posts with label DIY nail designs. Show all posts

9/14/2023

Black & White Marble Nails


Apply base coat to protect your natural nails,

Paint your middle nail white and don't let it dry. The little and thumb nails have the same design.

Add black dots to the left side of the nail.

Grab a needle and make the marble design.

Then paint black nails with white dots and do the same design.

Apply top coat to protect your manicure from peeling and to keep it shiny and glossy.


Products I use:


- Essence Active Whitener base coat,

- OPI black and white nail polishes,

- Essence All In One Complete Care top coat,

- Needle.


Thanks for stopping by my blog!


Come and join me,
Welcome to my:

YouTube channel: https://www.youtube.com/user/LifeWorldWomen


Feel free to ask me anything you'd like to know!

Instagram: https://www.instagram.com/ildikonailart/
Facebook: https://facebook.com/lifeworldwomen
Pinterest: http://www.pinterest.com/ildikomohos/

Music by Audio Library - YouTube  /Steps - Anno Domini Beats/


https://youtu.be/IThS3ej25HE

10/23/2015

Mix & Match Pinks! Another Easy Toothpick Nail Art


Hi Guys!

Today's nail art is a 'mix and match pinks' design using toothpick.

Let's start this super easy nail art!

1. Apply base coat to protect your natural nails from discoloration,

2. Paint your nails dark pink:


3. Wait some seconds then paint a line like the nail polish brush, grab a toothpick and draw like a spiral for making the pattern - I change the colors, I use pink and baby pink:


4. Finally apply top coat.

And.. we're done!

Hope you like it, please feel free to share your opinion.


What I use:

1. Essence base coat,

2. NYC dark pink nail polish,

3. Lovely baby pink and pink nail polishes,

4. Essence QuickDry top coat,

5. Toothpick.


Thanks for reading my blog!

Join me... Welcome to my:

YouTube: https://www.youtube.com/user/LifeWorldWomen
Facebook: https://facebook.com/lifeworldwomen
Twitter: https://twitter.com/LWWEasyNailArt
Pinterest: http://www.pinterest.com/ildikomohos/

Music by Kevin MacLeod /Continue Life/
http://incompetech.com/music/royalty-free/


8/31/2015

My First Water Marble Nail Art


Hi Guys!

Today I've made my first water marble nail design.
I'm so excited for you to see it and share me how you like it!

Let's start it!

1. Apply base coat to protect your natural nails from discoloration,

2. Paint your index- and little finegr nails pink and light blue,

3. I use 'peel off' base coat over my skin to avoid being polished:


4. I put nail polish drops into the water: orange, yellow, blue, pink, pastel green, another yellow and blue:


5. I grab a toothpick and make pattern:


At the end it slepped away but the pattern I wanted was ready :D

6. Carefully put my finger into the water and by using the toothpick I pull the polish away from my nail before take it out:


7. Then need to clear up the skin:


8. I pick my smallest dotting tool and draw some lines over the pattern:


8. I finish it with the top coat:


And we're done!

Please feel free to share your opinion :)


What I use:

1. Essence base coat,

2. Miss Sporty 'Peel off' base coat,

3. Maybelline orange nail polish,

4. Essence yellow nail polish,

5. Rimmel Salon Pro light blue nail polish,

6. S-he pastel green nail polish,

7. Miss Sporty pink nail polish,

8. Essence base coat,

9 Toothpick, dotting tool, water.


Thanks for visiting my blog!

Come and join me... Welcome to my:

YouTube: https://www.youtube.com/user/LifeWorldWomen
Facebook: https://facebook.com/lifeworldwomen
Twitter: https://twitter.com/LWWEasyNailArt
Pinterest: http://www.pinterest.com/ildikomohos/


Music by Kevin MacLeod /Easy Jam/
http://incompetech.com/music/royalty-free/


8/10/2015

Dotting Tool Nail Art With Multicolor Dots


Today's nail art is a super colorful dotticure nail art that needs three-sized dotting tool and some colors of nail polish.

Let me show you how to do it! :)


1. Apply base coat to protect the natural nails from discoloration,

2. Paint your nails:

- Pastel purple: Thumb-, index- and little finger nails / That not looks pastel on the picture even in the video, maybe the much light turns the shade of color /

- Pastel green: middle finger nail,

- Baby pink: ring finger nail.

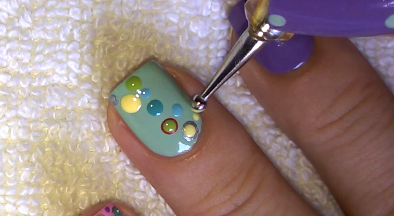
3. We need now a big headed dooting tool, a medium and a small one... You see I put two and three dots on the top of each other and paint single ones as well...

Important! Wait some minutes between two layers always! Let the under dot dry a little.


You see on the pictures how I paint the colors how I match them.

4. The 'empty' nails get two dots up and down... Little finger nails get baby pink, the index- and thumb nails get pastel green dots:


5. Finally apply top coat:


That's it! We're done :)

Hope you liked this multicolor dot design.

Please feel free to ask me anything you like to know!


What I use:

1. Essence base coat,

2. Essence pastel yellow nail polish,

3. Maybelline pastel green nail polish,

4. Catrice Nickel Minaj /silver/ nail polish,

5. Lovely Summer Trend baby pink nail polish,

6. Miss Sporty green, light green, light blue, pastel purple and pink nail polishes,

7. Essence QuickDry top coat.


Thanks for stopping at my blog!

Join me!
Welcome to my:

YouTube: https://www.youtube.com/user/LifeWorldWomen
Facebook: https://facebook.com/lifeworldwomen
Twitter: https://twitter.com/LWWEasyNailArt
Pinterest: http://www.pinterest.com/ildikomohos/

Music by Kevin MacLeod /Porch Swing Days - faster/
http://incompetech.com/music/royalty-free


3/18/2015

Sea waves inspired beach nail design


Back to the nature!

Today I got inpired by the sea especially the sea waves :) . Then I decided to make an easy beach nail art by using only TOOTHPICK!

Let's start this cute design!


First as always I apply the base coat to protect the natural nails...

Then I paint my nails white, then grab a small sponge and the light blue nail polish for making the sea:


When it's done then continue with the waves by using a simple toothpick:


I thought there are many girls who have no dotting tools, so I try my best to make nail designs that need only toothpick.

Just two step left, create a snail shell:


The toothpick I use for the snail shell it's shortcut - Just for a bit bigger dots I cut its end off.

The latest step is the top coat - always wait at least 10-15 minutes after you finish the previous coats.

 We've finished!

I'll be happy if you drop a comment how you like these nails! :)


What I use:

1. Essence base coat,

2. Crystal Nails white nail polish,

3. Rimmel light blue nail polish,

4. Miss Sporty light blue nail polish,

5. Moyra Aqua Jeans /Deep Forest/ green blue nail polish,

6. Essence top coat.


Thank you for visiting my blog!


Please join me :)
Welcome to my

YouTube: https://www.youtube.com/user/LifeWorldWomen
Facebook: https://facebook.com/lifeworldwomen
Twitter: https://twitter.com/LWWEasyNailArt
Pinterest: http://www.pinterest.com/ildikomohos/

Music by Kevin MacLeod /The Complex/
http://incompetech.com/music/royalty-free