Showing posts with label sparkly nail designs. Show all posts

11/27/2019

Elegant Dark Sparkly Blue Striping Brush Nail Art


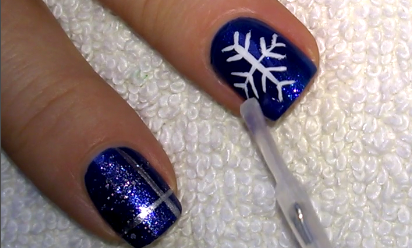
Today I am here with an elegant dark blue sparkly striping brush nail design.

First apply base coat to protect your natural nails:


I paint dot French tip over the thumb nail using the dark sparkly blue nail polish:


I paint the other nails with the same polish:


With a striping brush I paint silver lines on the left side of the nails:


Apply top coat to protect the manicure from peeling and to keep it shiny and glossy:


What I use:

- Essence Pro White Active base coat,

- Essence Out Of Space Stories silver polish, regular black polish,

- Essence 3D Shine Gel Look top coat,

- Dotting tool,

- Striping brush.


Thanks for stopping by my blog!

Come and join me,
Welcome to my:

YouTube channel: https://www.youtube.com/user/LifeWorldWomen

Feel free to ask me anything you'd like to know!

Instagram: https://www.instagram.com/ildikonailart/
Facebook: https://facebook.com/lifeworldwomen
Twitter: https://twitter.com/LWWEasyNailArt
Pinterest: http://www.pinterest.com/ildikomohos/

Music by Kevin MacLeod /I Feel You/
https://incompetech.com/music/royalty-free/


Licensed under Creative Commons: By Attribution


1/09/2019

Sparkly Red Nail Art With White Dry Marble Pattern


Today's manicure is an easy needle nail art using sparkly red and white nail polishes.

Let's begin!


1. Apply base coat to protect your natural nails:


2. Paint one of your nails sparkly red and don't let it dry! We need wet polish:


3. With a striping brush paint a white line over the wet base:


4. With a needle make the marble pattern:


5. We can fix the edge with a nail art brush and nail polish remover:


6. Apply top coat to protect the manicure from peeling and to keep it shiny and glossy:


What I use:

1. Essence Pro White Active base coat,

2. P2 sparkly red and white nail polishes,

3. P2 Quick Dry top coat,

4. Sewing needle.


Thanks for stopping by my blog!

Come and join me,
Welcome to my:

YouTube channel: https://www.youtube.com/user/LifeWorldWomen

Feel free to ask me anything you'd like to know!

Instagram: https://www.instagram.com/ildikonailart/
Facebook: https://facebook.com/lifeworldwomen
Twitter: https://twitter.com/LWWEasyNailArt
Pinterest: http://www.pinterest.com/ildikomohos/

Music by Kevin MacLeod /I Feel You/
https://incompetech.com/music/royalty-free/

Licensed under Creative Commons: By Attribution


12/03/2018

Sparkly White & Red Snowflake Nail Art


Today's manicure is a sparkly white and red dot snowflake design.


1. Apply base coat to protect your natural nails:


2. Paint your little, middle, index and thumb nails white:


We can fix the edge with a nail art brush and nail polish remover:


3. The ring nail is sparkly red:


4. Paint a white medium dot in the middle of the ring nail, then for the other dots use small dotting tool:


5. Apply sparkly white polish over the white nails, then also apply this sparkly polish over the snowflake dots:


6. Apply top coat to protect the manicure from peeling and to keep it shiny and glossy:


What I use:

1. Essence Pro White Active base coat,

2. P2 sparkly red and white nail polishes,

3. Crystal Nails sparkly white nail polish,

4. Essence 3D Gel Look top coat,

5. Dotting tool.


Thanks for stopping by my blog!

Come and join me,
Welcome to my:

YouTube channel: https://www.youtube.com/user/LifeWorldWomen

Feel free to ask me anything you'd like to know!

Instagram: https://www.instagram.com/ildikonailart/
Facebook: https://facebook.com/lifeworldwomen
Twitter: https://twitter.com/LWWEasyNailArt
Pinterest: http://www.pinterest.com/ildikomohos/

Music by Kevin MacLeod /Clear Air/
https://incompetech.com/music/royalty-free/

Licensed under Creative Commons: By Attribution


1/01/2016

Dark Blue & Silver Glitter Striped Nail Art - Elegant Nail Designs


Hello Everyone!

Today I'm bringing a dark blue nail art with silver glitter striped design.
I just love this 'half' matte suede effect nail polish, which one is so pretty with the glitter polish.
I hope you'll love it :)

Let's start it!


1. Apply base coat to protect your natural nails from hard discoloration - You may use peel off base coat because of glitter polish,

2. Paint your each nail dark blue - You can use ordinary nail polish plus matte top coat, or I use suede effect nail polish which one is half matte product:


3. For the striped design we need silver glitter polish and striping brush - I paint this pattern over the middle finger- and thumb nails:


4. The other nails get three glitter stripes and small white dots on the lines randomly:


And that's it!
We're done :)

I don't use top coat for this design because of the suede polish.

That's really so easy and elegant nail art for Winter or if you just need pretty dark nails.


What I use:

1. Essence base coat,

2. Essence 'The Suede' dark blue and white nail polishes,

3. Essence silver glitter polish,

4. Striping brush,

5. Dotting tool.


Thanks for reading my blog!

Join me... Welcome to my:

YouTube: https://www.youtube.com/user/LifeWorldWomen

Feel free to ask me anything you'd like to know!

Facebook: https://facebook.com/lifeworldwomen
Twitter: https://twitter.com/LWWEasyNailArt

Pinterest: http://www.pinterest.com/ildikomohos/

Music by Kevin MacLeod /I Feel You/
http://incompetech.com/music/royalty-free/


12/09/2015

Christmas Nail Design Using Tape & Striping Brush


Hello Everyone!

Today I'm bringing another Christmas nail design using Scotch tape and striping brush.
I used two color for this shiny nail art.

Let's start it!

1. Apply base coat to protect your natural nails,

2. Paint your ring finger nail gold, the other nails are pale pink /mauve/:


3. Take Scotch tape and scissors and cut two thin pieces off then fix them over the middle finge nail:


4. By using striping brush and gold nail polish start to paint the Christmas tree / the upper lines are in gradient shape as you see:


5. After removing the tapes paint start on the peak:


6. Over the index nail paint a shooting star / Unfortunately the appearance of this design is not so great under the lamp light because of the shiny gold polish, but under the natural light it is so beautiful... You'll see if you try it out.


7. Paint star on the little little finger nail and on the thumb nail as well:


8 Finally apply top coat:


That's it! We're done.

I wish you'll  Merry Christmas! :)


What I use:

1. Essence base coat,

2. Essence pale pink /mauve/ and gold nail polishes,

3. Sally Hansen Double Duty base & top coat,

4. Scotch tape and scissors,

5. Striping brush.


Thanks for stopping at my blog!

Join me... Welcome to my:

YouTube: https://www.youtube.com/user/LifeWorldWomen

Feel free to ask me anything you'd like to know!

Facebook: https://facebook.com/lifeworldwomen
Twitter: https://twitter.com/LWWEasyNailArt

Pinterest: http://www.pinterest.com/ildikomohos/

Music by Kevin MacLeod /Deck The Halls/
http://incompetech.com/music/royalty-free/


11/30/2015

Silver & Blue Christmas Nail Art Tutorial


Hello Everyone!

I start to make the Christmas nail designs :)

The first one is a blue and silver glitter nail art... I hope you'll try it out ;)

Let's begin!

1. Apply base coat to protect your natural nails from discoloration - I use 'peel off' base coat to make the removal of glitter polish easier.

2. Paint your nails:

- Thumb-, index- and middle finger nails are blue - what I use is a sparkly polish,
- Ring- and little finger nails are silver:


3. I put glitter coat on the silver nails:


4. For the snowflake I use white liner polish but you may use striping brush plus ordinary white nail polish - this design is over the middle finger- and thumb nails:


5. The next step is the index finger, where I use striping brush, silver nail polish; and at the end a small sponge and glitter polish:


6. Finally the top coat:


We're done!

Hope you like this sparkly nail art for holidays :)


What I use:

1. Miss Sporty Peel Off base coat,

2. Essence silver, white and sparkly blue nail polishes,

3. Essence Sand Effect silver glitter poilsh,

4. ADEN white liner polish,

5. Sally Hansen Double Duty base and top coat,

6. Makeup sponge.


Thanks for visiting my blog!

Join me... Welcome to my:

YouTube: https://www.youtube.com/user/LifeWorldWomen

Feel free to ask me anything you'd like to know!

Facebook: https://facebook.com/lifeworldwomen
Twitter: https://twitter.com/LWWEasyNailArt

Pinterest: http://www.pinterest.com/ildikomohos/

Music by Kevin MacLeod /Windswept/
http://incompetech.com/music/royalty-free/


2/23/2015

Sparkly 'Metal Flip' nail art in colors of purple and green


Today I've created a beautiful shiny nail design by using sparkly nail polish and gold liner nail polish.

This polish is shining in colors of green and purple... I hope you'll love it and will try it out! :)

Let's start this nail art!

First of all I apply base coat to protect my natural nails from discoloration... then I paint my each nail with the 'metal flip' nail polish:


The next steps to draw criss-cross lines by using the gold liner nail polish:


And we've already done it!

You see it's an easy but elegant design.


Usually I forget to notice that always wait at least some minutes between two coats for avoiding of smudging!


What I use:

1. Essence base coat,

2. Miss Sporty 'Metal Flip' nail polish,

3. ADEN gold liner nail polish.


Thank you so much for visiting my blog!


Please join me :)
Welcome to my

Facebook: https://facebook.com/lifeworldwomen
Twitter: https://twitter.com/IldikoMohos
Pinterest: http://www.pinterest.com/ildikomohos/

Music by Kevin MacLeod /Easy Lemon/
http://incompetech.com/music/royalty-free/


2/11/2015

Aquamarine colored sparkly nail art


I was thinking how to name this design. There are green and blue are found in these colors, so I decided aquamarine but we can call it colors of ocean or just greenish blue nails.

That's a really easy and sparkly design, let me show you I make it :).

As usually first I apply the base coat to protect my nails from discoloration /do it as well!/.

Then I paint my each nail with the Agua Jeans sparkly nail polish.. after it drawing 'V' shaped tips:


The pictures show a simple blue color / I don't know how :) / but it's really beautiful greenish blue.

Now we have only one thing to do dawing the dots :


Done it!!

Hope you like it! Try and send me comment about like or not / I hope you do like :)) /.

Thank you so much for visiting my blog!


What I use:

1. Essence base coat,

2. Rimmel light blue and greenish blue nail polish,

3. Moyra Aqua Jeans sparkly nail nail polish.


Join me :) Welcome to my

Facebook: https://facebook.com/lifeworldwomen
Twitter: https://twitter.com/IldikoMohos
Pinterest: http://www.pinterest.com/ildikomohos/

Music by Kevin MacLeod /Clear Waters/
http://incompetech.com/music/royalty-free/