Showing posts with label easy nail art designs. Show all posts

11/04/2021

5 Easy Black & White Nail Art Designs


First apply base coat to protect your natural nails,

1. Design is a fan brush nail art:


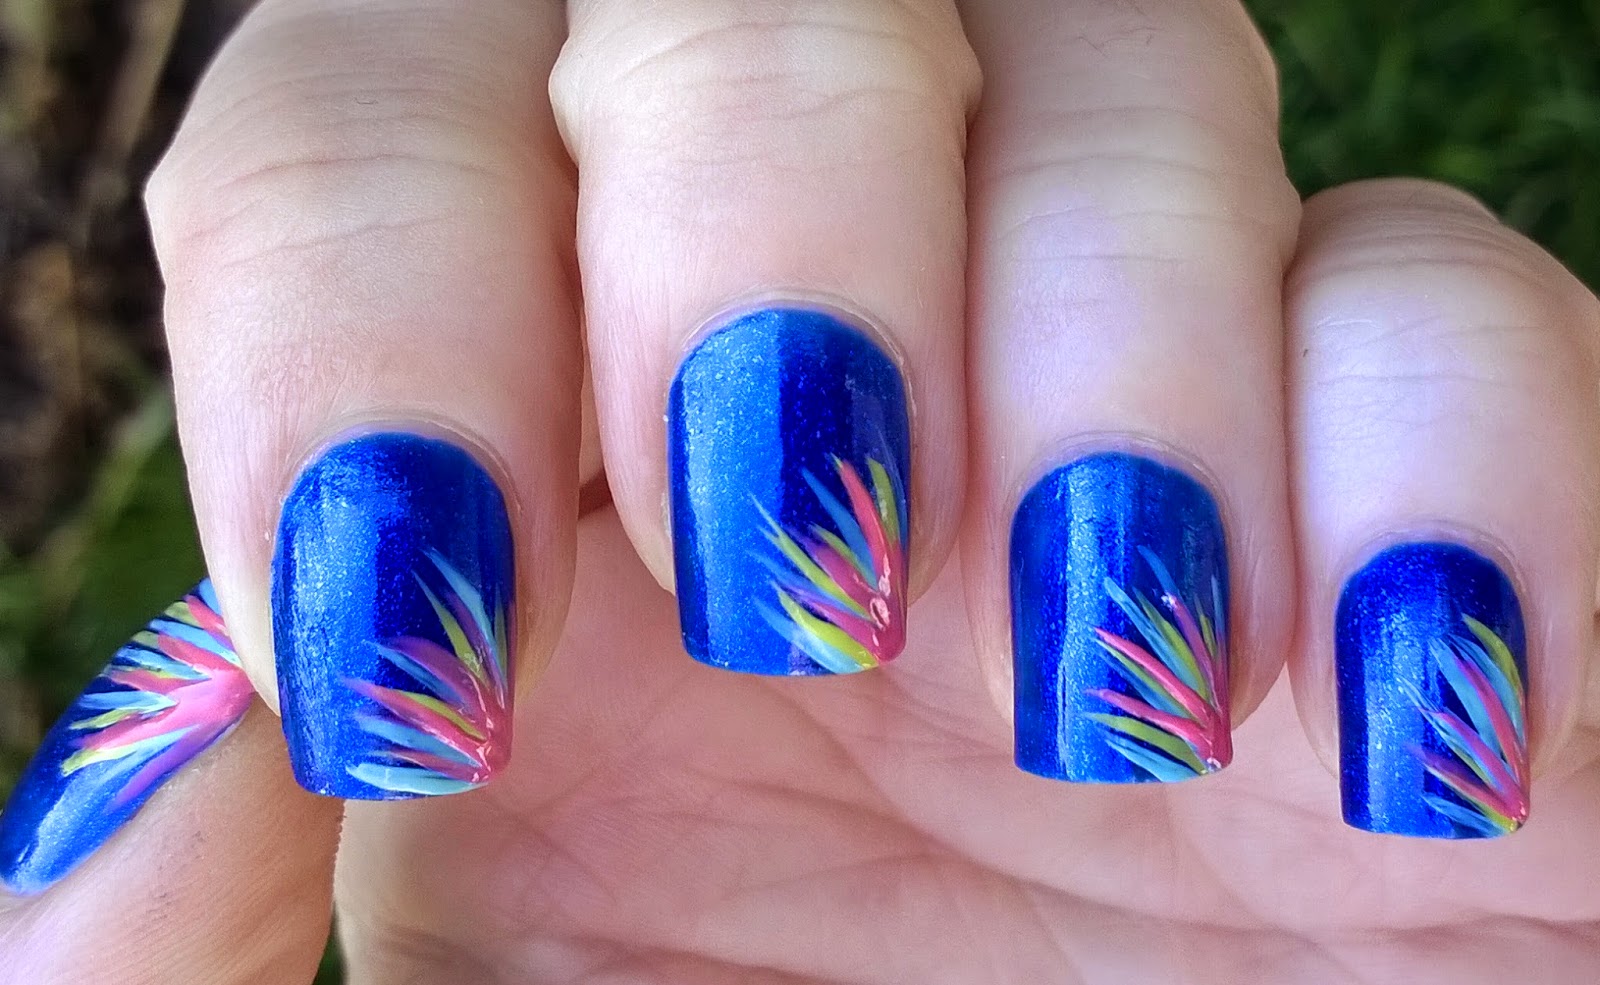
2. Design is a dry marble needle and dotting tool idea:


3. Design is a dotting tool flower nail art:


4. Design is a Scotch tape nail idea with dots:


5. Design is a dry marble needle heart nail art:


Finish the manicure with top coat to protect it from peeling and to keep it shiny and glossy:


What I use:


- Essence Active Whitener base coat,

- Essence black nail polish,

- P2 white nail polish,

- OPI black nail polish,

- Essence 3D Effect Gel Look Plumping top coat,

- Scotch tape,

- Needle,

- Dotting tool.


Thanks for stopping by my blog!


Come and join me,
Welcome to my:

YouTube channel: https://www.youtube.com/user/LifeWorldWomen


Feel free to ask me anything you'd like to know!

Instagram: https://www.instagram.com/ildikonailart/
Facebook: https://facebook.com/lifeworldwomen
Twitter: https://twitter.com/LWWEasyNailArt
Pinterest: http://www.pinterest.com/ildikomohos/

Music by Audio Library - YouTube  /Jindupe/


9/26/2021

Gold Autumn Nail Art


Apply base coat to protect your natural nails,

Paint your nails darker gold:


Paint the right corner dark brown:


Paint a smaller brown spot over the dark one:


Finish the design with a small beige spot over the left corner:


Apply top coat to protect your manicure from peeling and to keep it shiny and glossy:


What I use:


- Essence Active Whitener base coat,

- Essence beige, brown nail polishes,

- Astor dark brown nail polish 616 Dark Chocolate,

- Catrice dark gold nail polish,

- Essence 3D Effect Gel Look Plumping top coat.


Thanks for stopping by my blog!

Come and join me,
Welcome to my:

YouTube channel: https://www.youtube.com/user/LifeWorldWomen


Feel free to ask me anything you'd like to know!

Instagram: https://www.instagram.com/ildikonailart/
Facebook: https://facebook.com/lifeworldwomen
Twitter: https://twitter.com/LWWEasyNailArt
Pinterest: http://www.pinterest.com/ildikomohos/

Music by Audio Library - YouTube  /Plaidness/


9/12/2021

Abstract Autumn Nail Art


First apply base coat to protect your natural nails:


Using the nail polish brush paint white abstract motif over the left side of the nail:


We also need a thin nail art brush for this:


Over the right side paint similar motif using yellow and orange shades:


Finish the manicure with top coat to protect it from peeling and to keep it shiny and glossy:


What I use:


- Essence Active Whitener base coat,

- Essence pastel yellow nail polish,

- Sally Hansen Xtreme Wear white, orange nail polishes,

- Sally Hansen pastel orange nail polish,

- P2 orange nail polish,

- Essence 3D Effect Gel Look top coat,

- Thin nail art brush.


Thanks for stopping by my blog!

Come and join me,
Welcome to my:

YouTube channel: https://www.youtube.com/user/LifeWorldWomen


Feel free to ask me anything you'd like to know!

Instagram: https://www.instagram.com/ildikonailart/
Facebook: https://facebook.com/lifeworldwomen
Twitter: https://twitter.com/LWWEasyNailArt
Pinterest: http://www.pinterest.com/ildikomohos/

Music by Audio Library - YouTube  /Rollin/


3/16/2016

Red Smoky French Manicure Design


Hello Everyone!

I had request for doing nail art using black and red nail polishes.
Sure I'll make more design by these colors, but right now I just share this super quick smoky French nails.

Let's begin then!


1. Apply base coat to protect your natural nails from hard discoloration and to give the manicure fixed base,

2. Paint red French tip but only one at the same time because we need to dry layer:


3. Put black polish at the edge of nail tip:


4. By a small dotting tool start to make swirl motifs to mix the colors, that will give smoky look:


5. We can fix the corners of red tips by using a thin brush:


6. Also we can make nice edge by a brush and nail polish removal:


7. Finally apply top coat to protect your manicure from peeling and to keep it shiny and glossy:


That's it! We're done.. Hope you like this super quick design.


What I use:

1. Essence base coat,

2. MaxFactor red nail polish,

3. Catrice black nail polish,

4. Sally Hansen Double Duty base & top coat,

5. Dotting tool.


Thanks for stopping by my blog!

Come and join me... Welcome to my:
YouTube: https://www.youtube.com/user/LifeWorldWomen

Feel free to ask me anything you'd like to know!

Facebook: https://facebook.com/lifeworldwomen
Twitter: https://twitter.com/LWWEasyNailArt

Pinterest: http://www.pinterest.com/ildikomohos/

Music by Kevin MacLeod /I Feel You/
http://incompetech.com/music/royalty-free/

Licensed under Creative Commons: By Attribution


12/14/2015

Easy Gradient Red French Tip Nails For Holidays


Hello Everyone!
Happy Holidays as well!


I decided to make one more French manicure design for the holiday.
I had request for an easier Christmas nail art so, I did red French tip nails using gold and white colors.

I hope it's enough easy for Everyone :)

Let's begin!


1. Apply base coat to protect your natural nails from so much discoloration,

2. Paint red French tips in gradient shape:


3. When the tips get dry, paint a gold line at the edge of red - I use liner polish, but also perfect a striping brush with gold nail polish:


4. The next step is a shorter white stripe on the middle section:


5. Finally finish the design with top coat:


That's it! We're done..

Please share your opinion what you think about this easy holiday nail art.


What I use:

1. Essence base coat,

2.MaxFactor Glossfinity red nail polish,

3. ADEN white and gold liner polishes,

4. Sally Hansen Double Duty base & top coat.


Thank you so much for stopping by my blog!

Join me... Welcome to my:

YouTube: https://www.youtube.com/user/LifeWorldWomen

Feel free to ask me anything you'd like to know!

Facebook: https://facebook.com/lifeworldwomen
Twitter: https://twitter.com/LWWEasyNailArt

Pinterest: http://www.pinterest.com/ildikomohos/

Music by Kevin MacLeod /Jingle Bells 3./
http://incompetech.com/music/royalty-free/


3/09/2015

Blue nail art with colorful stripes


Good afternoon!

Today I bring a beautiful blue nail design. I just have seen this nail polish and fell in love! :)

I think this polish is a perfect base of a colorful and cheerful nail art.

Let me show you how I make it!


First I apply base coat to protect my natural nails.

Second step is the blue nail polish.

Then I start to paint the stripes by using first the neon green nail polish:


Then the light blue nail polish:


And finally the pink color:


Now we've finished!

I'm so excited for you too see it :)  Hopefully you'll love this cute design and will try it as soon as possible.


What I use:

1. Essence base coat,

2. Essence Colour&Go sparkly blue nail polish and neon green polish,

3. Miss Sporty light blue nail polish,

4. Moyra pink liner nail polish.


Thank you so much for visiting my blog!


Please join me :)
Welcome to my

YouTube: https://www.youtube.com/user/LifeWorldWomen
Facebook: https://facebook.com/lifeworldwomen
Twitter: https://twitter.com/LWWEasyNailArt
Pinterest: http://www.pinterest.com/ildikomohos/

Music by Kevin MacLeod /Sunshine A./
http://incompetech.com/music/royalty-free


1/14/2015

Black matte and pink Valentine's Day nail art


I like the matte nail art especially the black version, so I made this design by this way.

I use black and pink nail polishes but use matte top coat only top of black nails.

First of all I applied the base coat then the black and the pink polishes as you see above.

After them I paint the 'V' shape of ring finger nail by using pink and gold liner nail polish:


Then painting of hearts:


Then I make one dot on each nail (on the pink nails too as you see on the first picture):


And finally I draw the 'V' shape of middle finger nail:


Done!

It's not hard but nice :) I hope you like it!


What I use:

1. Essence base coat,

2. Lovely pink polish,

3. Lovely black polish,

4. Lovely Matte top coat,

5. Moyra pink liner polish,

6. ADEN gold liner polish.


Welcome to my

Facebook: https://facebook.com/lifeworldwomen
Blog: http://lifeworldwomen.blogspot.com
Twitter: https://twitter.com/IldikoMohos
Pinterest: http://www.pinterest.com/ildikomohos/


Music by Kevin MacLeod /Living Voyage/
http://incompetech.com/music/royalty-free/


12/29/2014

Two easy elegant nail designs for parties even for New Year's Eve


What I decided to make today that is two easy similair nail design for parties.

I used black, beige and sparkly orange nail polishes and a dotting tool.

Let me show you how I make it!

I applied base coat for protecting nails.. then I paint the tips:


After when I finished the tip, may come the dots.. I try to make them in different sizes that I just touch the nail softly for smaller ones:


This is the first disign.. And the next for the next design I paint my whole nail with black polish and make bigger orange dots and still small beige dots:


We've already done it!

I hope you like both nail art and will try them. :-)


What I use:

1. Essence base coat,

2. Lovely black nail polish,

3. Crystal Nails sparkly orange nail polish,

4. Lovely Nude nail polish.


Welcome to my Facebook:
https://facebook.com/lifeworldwomen


Music by Kevin MacLeod /Mandeville/
http://incompetech.com/music/royalty-free/