Showing posts with label dotting tool tutorial. Show all posts

12/23/2015

New Year's Eve French Manicure - Party Nail Designs


Hello Everyone!

Super easy New Year's Eve French manicure in black and white.

Let me show you how you can paint an easy but festive French nail art!


1. Apply base coat to ptotect your natural nails from hard discoloration,

2. First we need white nail polish for the nail tips:


3. Then grab black nail polish for the other section:


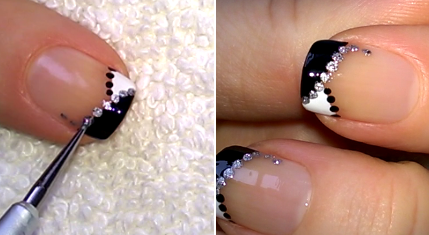
4. I use my smallest dotting tool for the dots, first the black ones at the white part:


5. I paint silver dots alongside the black section, even over it:


6. Then I put glitter dots on the top of each silver ones:


7. Finally the finish with top coat:


That's it!
We're done.

Thanks alot for reading my blog in this whole year!
I hope we'll meet here in the New Year as well :)

Happy And Successful New Year!


What I use:

1. Essence base coat,

2. Rimmel Brit Manicure white polish,

3. Lovely black nail polish,

4. Essence silver/metal and glitter nail polishes,

5. Sally Hansen Double Duty base & top coat,

6. Dotting tool.


Join me... Welcome to my:

YouTube: https://www.youtube.com/user/LifeWorldWomen

Feel free to ask me anything you'd like to know!

Facebook: https://facebook.com/lifeworldwomen
Twitter: https://twitter.com/LWWEasyNailArt

Pinterest: http://www.pinterest.com/ildikomohos/

Music by Kevin MacLeod /Living Voyage/
http://incompetech.com/music/royalty-free/


12/21/2015

Christmas & New Year's Eve Nail Art In Antique Style


Hello Everyone!

Today's nail art is in antique style, or at least that reminds me so much of it :)

This design is great for Christmas and for New Year's Eve as well.

Let's start it!


1. Apply base coat to protect your natural nails from hard discoloration,

2. Paint each nail burgundy,

3. We need then a small sponge and pale pink nail polish and can start the patterns - I do randomly pink parts even not the same on my nails:


4. When it's ready use top coat:


5. I use two kinds of gold polish, a sparkly one and a bronze look polish for the stripes around the pink sections, and a striping brush:


6. And finally the dot design, I use the bronze-gold nail polish and my smallest dotting tool for it:


That's it! We're done!

Hope you like it enough for trying out :)


What I use:

1. Essence base coat,

2. Crystal Nails burgundy nail polish,

3. Essence pale pink and sparkly gold nail polishes,

4. Catrice gold polish - the bronze look one,

5. Sally Hansen Double Duty base & top coat,

6. Striping brush,

7. Makeup sponge,

8. Dotting tool.


Thanks for reading my blog!

Join me... Welcome to my:

YouTube: https://www.youtube.com/user/LifeWorldWomen

Feel free to ask me anything you'd like to know!

Facebook: https://facebook.com/lifeworldwomen
Twitter: https://twitter.com/LWWEasyNailArt

Pinterest: http://www.pinterest.com/ildikomohos/

Music by Kevin MacLeod /Double Drift/
http://incompetech.com/music/royalty-free/


7/06/2015

French Manicure Ideas - White/Pink Flower & Net Nail Design


Today's nail art is a pink French manicure with flower and net design.

I used toothpick for the net. I did not want to make it by liner nail polish if you do not have one sure you can get a toothpick instead.

So, let's begin this nice floral nails!


1. Apply base coat to protect the natural nails from discoloration,

2. Paint each nail tip baby pink ( do not worry if the edge is not perfect because it will be covered:


3. Take a toothpick and put six points that will help you for making the net pattern:


4. By using white nail polish and the toothpick draw the lines between the points and even do not miss out the corners of nails:


5. When you are done, grab a big headed dotting tool and pink nail polish and paint four dots above the French tip over the middle and ring finger nails - then by using dark red poilsh and the toothpick, make the flower by mixing the colors:


6. We now need two shades of green for the leaves... first use the darker green nail polish then on the top of dark leaves put light green shade:


7. Finally apply top coat - but never forget to wait at least 20 minutes before apply it to avoid the smudging:


We're done!

Hope you like this cute summer design.

Feel free to ask me anything you want to know about my nail designs, or how to do, or if you do not understand something.

What I use:

1. Essence base coat,

2. Lovely white, baby pink and pink nail polish,

3. Essence green and light green nail polishes,

4. Astor dark red nail polish,

5. Essence Quick Dry top coat.


Thanks for stopping at my blog!

Join me... Welcome to my:

YouTube: https://www.youtube.com/user/LifeWorldWomen
Facebook: https://facebook.com/lifeworldwomen
Twitter: https://twitter.com/LWWEasyNailArt
Pinterest: http://www.pinterest.com/ildikomohos/

Music by Kevin MacLeod /Double Drift/
http://incompetech.com/music/royalty-free


5/01/2015

Multicolor Butterfly Dot Nail Art By Toothpick & Dotting Tool


Super easy and super cute dotted butterfly nail art!

We only need a few colors of nail polish, two sized dotting tool and a toothpick... and can start this pretty cheerful design.

Let me show you how it made:

1. Apply base coat to protect your natural nails,

2. Paint the index and the little finger pink and violet,

3. Let's begin the dotting by a medium headed dotting tool - using neon green, pink, violet, light blue and yellow colors / for the yellow polish I use a small headed tool:


4. Then draw the butterflies over the the index fingers and the thumbs:


5. Grab a toothpick and by black polish make the 'body' of the butterfly:


6. We still need to paint 1-1 light blue dot top of the wings:


7. And finally apply the top coat / Wait at least 10-15 minutes before paint it to avoid the smudging:


Finished!

Hope you love this pretty colorful design and will try it out :)


What I use:

1. Essence base coat,

2. Rimmel pink and light blue nail polish,

3. Miss Sporty violet and yellow nail polish,

4. Essence green nail polish,

5. Lovely black nail polish,

6. Essence Quick Dry top coat.


Thanks for visiting my blog!


Join me!
Welcome to my:

YouTube: https://www.youtube.com/user/LifeWorldWomen
Facebook: https://facebook.com/lifeworldwomen
Twitter: https://twitter.com/LWWEasyNailArt
Pinterest: http://www.pinterest.com/ildikomohos/

Music by Kevin MacLeod /Finding the Balance/
http://incompetech.com/music/royalty-free


4/29/2015

Romantic Rose Nail Art


Today's nail art is a romantic pastel rose design using toothpick and dotting tool.

Floral nails are always pretty especially at Spring and Summer.

So, let's start this beautiful nail design!


1. Apply base coat to protect your natural nails from discoloration,

2. Paint your nails white and pastel green colors,

3. Start to draw the rose! Grab a toothpick and dark pink nail polish at first then light pink polish:


4. After painting of petals draw the leaves:


5. Grab a medium headed dotting tool and put white dots alongside top of the green nails and pink dots top of the thumbs:


6. Finally apply top coat but be careful! Wait at least 10-15 minutes to avoid the smudging!


Finished!! :)

Hope you like this pretty and romantic floral nail design.


What I use:

1. Essence base coat,

2. Lovely white and pink nail polish,

3. S-he pastel green nail polish,

4. NYC dark pink nail polish,

5. Essence Quick Dry top coat.


Thanks for visiting my blog!

Join me!
Welcome to my:

YouTube: https://www.youtube.com/user/LifeWorldWomen
Facebook: https://facebook.com/lifeworldwomen
Twitter: https://twitter.com/LWWEasyNailArt
Pinterest: http://www.pinterest.com/ildikomohos/

Music by Kevin MacLeod /Autumn Day/
http://incompetech.com/music/royalty-free


3/23/2015

Super Easy Easter Bunny Nail Art


Today's nail art for Easter and this is a super easy and cute bunny nail design.

I use baby pink nail polish as basic color; then white, yellow, violet, black and pink colors of nail polish.

Let's start it!

First as always we need base coat for protecting the natural nails and may come the baby pink on each nail.

After then strat to paint the bunny and the sun:


I use two-size dotting tool a small and a big headed ones and a toothpick for the sunbeams and smallest dots.


When I finished bunny and sun then drop some small pink and violet dots alongside:


The final step is the top coat ( Never forget to wait at least 10-15 minutes before apply it for not to destroy previous coats! )


Done it! :)

Hope you like it and will try it.


What I use:

1. Essence base coat,

2. Essence baby pink nail polish,

3. Crystal Nails white nail polish,

4. Miss Sporty yellow and violet nail polish,

5. Rimmel pink nail polish,

6. Lovely black nail polish,

7. Essence top coat.


Thanks for visiting my blog!

Feel free to ask me anything it's not clear.


Please join me :)
Welcome to my

YouTube: https://www.youtube.com/user/LifeWorldWomen
Facebook: https://facebook.com/lifeworldwomen
Twitter: https://twitter.com/LWWEasyNailArt
Pinterest: http://www.pinterest.com/ildikomohos/

Music by Kevin MacLeod /Autumn Day/
http://incompetech.com/music/royalty-free


12/27/2014

Grey based but colurful nail art


This nail design works good for week days but its colour brings the spring too :-).

First I painted my nails with the base coat (always protect your nails from discoloration).

After grey nail polish I start the painting of dots:


I use five colours, now the two last ones:


And we've done it!

It's really not hard, try and see! :-)


What I use:

1. Essence base coat, 

2. Crystal Nails grey polish, 

3. Miss Sporty QuickDry yellow polish, 

4. Astor Quick'N'Go! middle pink polish, 

5. Miss Sporty light blue polish, 

6. Astor dark red polish, 

7. Lovely pink polish.


Welcome to my Facebook:

Music by Kevin MacLeod /Autumn Day/


12/15/2014

Black matte party nails: Perfect for New Year's Eve


Party nails that's perfect for New Year's Eve as well!

I applied base coat then black polish, and top of them matte top coat... so the base of nail art is ready.

After I start with the colours.

All what else we need a dotting tool or a toothpick.

I paint at first the pink, then the yellow and the blue colours:


When it's done, I use glitter polish between each line:


And we've already finished this nail art.

I am sure you'll like it when you try it, because it's so easy even cute :-).

Leave me comment or question if you want to ask anything!


What I use:

1. Essence base coat,

2. Lovely black polish,

3. Lovely Matte top coat,

4. Lovely middle pink polish,

5. Miss Sporty Guick Dry polish/yellow/,

6. Miss Sporty/light blue polish/,

7. Essence Sparkle Sand Effect/silver glitter polish/.


Welcome to my Facebook:
https://facebook.com/lifeworldwomen

Music by Kevin MacLeod /Cut and Dry/
http://incompetech.com/music/royalty-free/


12/03/2014

Easy party and Christmas nail art


Easy and sparkly party nails for Christmas too!

I used black, silver and glitter polishes for this design.

First I apply base coat and silver polish... then starting the black tip:


After tip may come black dots alongside:


.. And finally sparkly dot in each black dot: I use two sized dotting tools, bigger for black dots and smaller for glitter dots.


We've done it!

Try and see how much it's easy and cute! :-)


 What I use:

1. Essence base coat,

2. Catrice polish Nickel Minaj/42/,

3. Lovely black polish,

4. Essence sparkle sand effect polish.


Music by Kevin MacLeod /Living Voyage/
http://incompetech.com/music/royalty-free/

Welcome to my Facebook:
https://facebook.com/lifeworldwomen


11/28/2014

Matte nail art - Christian nails


One of my favorite designs is the matte nail design.

I used dark blue nail polish, but it looks black maybe. (Before the blue polish I used base coat.)

After I applied the matte top coat, then started dotting.

At first the silver and white dots by larger headed dotting tool:


Then I chose smaller tool for the other colours:


When I finished with dotting, I put a line of sparkly silver glitter polish on the edge of dots.


What I use:

1. Essence base coat,

2. Crystal Nails dark blue polish/47/,

3. Lovely Matte top coat,

4. Catrice Nickel Minaj/42/,

5. Crystal Nails white polish,

6. Astor, Sweet Lavender/201/,


7. Astor Quick&Go/321/, Essence silver sparkle sand.


I hope you like that matte Christian nail design.


Welcome to my Facebook:
https://facebook.com/lifeworldwomen

Music by Kevin MacLeod /Easy Lemon/
http://incompetech.com/music/royalty-free/