3/18/2016

Flower Frame & Tips Nail Design / Toothpick Nails


Hello Everyone!

Today I'm bringing a floral toothpick design, what I named flower frame and tips nail art.

I use only toothpick, burgundy and purple nail polishes.

Let's begin it!


1. Apply base coat to protect your natural nails from hard discoloration,

2. Paint your nails pastel baby pink:


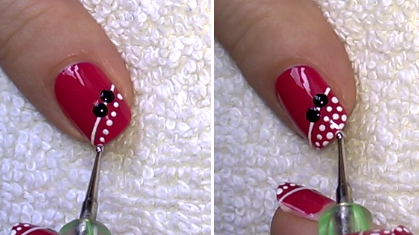
3. Start to make the floral pattern, one purple and one bugundy flower and this combiation will repeat around the index and thumb nails /there is the frame design/... the other nails get flower tips by the same way:


4. In the middle of flowers pur opposite color dots:


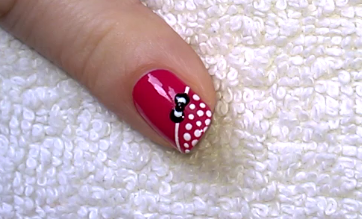
5. Finally finish the nail art with top coat, to protect your manicure from peeling and to keep it shiny and glossy:


Finished!

When I start to paint today's design, I did a different nail art over my right hand, but when I finished it just didn't like :))
But I want to show you and I'm curious what you think :)


I painted the same color flowers randomly over my nails, then drew some leaves too and I didn't even like it :))

What's your opinion? Which one is the better?


What I use:

1. Essence base coat,

2. Astor Perfect Stay Gel Shine pastel baby pink polish,

3. Miss Sporty burgundy and purple nail polish,

4. Sally Hansen Double Duty base & top coat,

5. Toothpick.


Thanks for stopping by my blog!

Come and join me... Welcome to my:

YouTube: https://www.youtube.com/user/LifeWorldWomen

Feel free to ask me anything you'd like to know!

Facebook: https://facebook.com/lifeworldwomen
Twitter: https://twitter.com/LWWEasyNailArt

Pinterest: http://www.pinterest.com/ildikomohos/

Music by Kevin MacLeod /Autumn Day/
http://incompetech.com/music/royalty-free/

Licensed under Creative Commons: By Attribution


3/16/2016

Red Smoky French Manicure Design


Hello Everyone!

I had request for doing nail art using black and red nail polishes.
Sure I'll make more design by these colors, but right now I just share this super quick smoky French nails.

Let's begin then!


1. Apply base coat to protect your natural nails from hard discoloration and to give the manicure fixed base,

2. Paint red French tip but only one at the same time because we need to dry layer:


3. Put black polish at the edge of nail tip:


4. By a small dotting tool start to make swirl motifs to mix the colors, that will give smoky look:


5. We can fix the corners of red tips by using a thin brush:


6. Also we can make nice edge by a brush and nail polish removal:


7. Finally apply top coat to protect your manicure from peeling and to keep it shiny and glossy:


That's it! We're done.. Hope you like this super quick design.


What I use:

1. Essence base coat,

2. MaxFactor red nail polish,

3. Catrice black nail polish,

4. Sally Hansen Double Duty base & top coat,

5. Dotting tool.


Thanks for stopping by my blog!

Come and join me... Welcome to my:
YouTube: https://www.youtube.com/user/LifeWorldWomen

Feel free to ask me anything you'd like to know!

Facebook: https://facebook.com/lifeworldwomen
Twitter: https://twitter.com/LWWEasyNailArt

Pinterest: http://www.pinterest.com/ildikomohos/

Music by Kevin MacLeod /I Feel You/
http://incompetech.com/music/royalty-free/

Licensed under Creative Commons: By Attribution


3/14/2016

Pink Bow Nail Art With Dotticure Tips


Hello Everyone,

This nail design is actually a dotticure nail art... Pink bow nails with white dotticure tips.

So, let's started!


1. Apply base coat, to protect your nails from hard discoloration, and to give the manicure fixed base,

2. Paint your nails pink - this shade is close to red as the picture shows but it isn't:


3. Paint a white gradient stripe over your nail:


4. By a big dotting tool put 2 black dots next to each other:


5. Until the dots are drying we can make the dotticure tip by using a small dotting tool:


6. Wait minimum 10-15 minutes between two dots that put on the top of each other - Paint 2 medium white dots on the black ones:


7. Then a small black dot on the center, and a silver point on the black one:


8. At the end apply top coat to protect your manicure from peeling and to keep it shiny and glossy:


That's it! We're done..

Hope you love this pretty bow design.. Let me know it! :)


What I use:

1. Essence base coat,

2. Miss Sporty Gel Shine pink nail polish,

3. Essence white nail polish,

4. Lovely black nail polish,

5. Catrice silver nail polish,

6. ADEN white striping nail polish,

7. Sally Hansen Double Duty base & top coat,

8. Dotting tools.


Thanks for reading my blog!

Come and join me... Welcome to my:

YouTube: https://www.youtube.com/user/LifeWorldWomen

Feel free to ask me anything you'd like to know!

Facebook: https://facebook.com/lifeworldwomen
Twitter: https://twitter.com/LWWEasyNailArt

Pinterest: http://www.pinterest.com/ildikomohos/

Music by Kevin MacLeod /Continue Life/
http://incompetech.com/music/royalty-free/

Licensed under Creative Commons: By Attribution


3/11/2016

Spring Nail Art For Easter With Bunny Ears Design


Hello Everyone!

Today I share a Spring nail art for Easter with bunny ears.

I use acrylic paints for this grassy nails.

Let's begin this cute design!


1. Apply base coat to protect your natural nails from hard discoloration, and to give your manicure a fixed base,

2. Paint your each nail light blue - pure blue, very light nail polish,

3. Paint grass tips over your nails except the index nail, this will be the 'bunny nail'

I use two shades of green, a medium and a light green.
I change these shades.. I begin with the medium one then the light green, back to medium, and if needed again the light shade:


4. For the bunny ears we need white and baby pink paint and also a thin nail brush:


5. Under the ears I also paint grass by the same way as before - it hides itself :))


6. Finally paint small white and pink flowers over the grass:


7. At the end apply top coat to protect your manicure from peeling and to keep it shiny and glossy:


That's it!

Hope you like this cute Easter nail art.. Let me know that :)


What I use:

1. Essence base coat,

2. Catrice light blue - pure blue nail polish,

3. Moyra acrylic paints:
- medium green,
- light green,
- baby pink,
- white,

4. Sally Hansen Double Duty base & top coat,

5. Nail brush /thin/


Thanks for stopping by my blog!

Come and join me... Welcome to my:

YouTube: https://www.youtube.com/user/LifeWorldWomen

Feel free to ask me anything you'd like to know!

Facebook: https://facebook.com/lifeworldwomen
Twitter: https://twitter.com/LWWEasyNailArt

Pinterest: http://www.pinterest.com/ildikomohos/

Music by Kevin MacLeod /Montauk Point/
http://incompetech.com/music/royalty-free/

Licensed under Creative Commons: By Attribution


3/09/2016

Colorful Dot French Tip Nails


Hello Everyone!

Today I share a colorful French nail art using dotting tool.

We need some cheerful summer colors, like:
pink, yellow, light green or blue, orange.


Let's start this easy design!

1. Apply base coat to protect your natural nails from hard discoloration and to give the manicure a fixed base,

2. Paint pastel pink tip - it won't cover perfectly by one layer, but doesn't matter the dots will hide it:


3. Take a big dotting tool and start to paint the colorful tip - I make two dots by each color:


4. Finally apply top coat to protect your manicure from peeling and to keep it shiny and glossy:


That's it!
We're done..

What I use:

1. Essence base coat,

2. Astor pastel pink nail polish,

3. Lovely two shades of pink,

4. Essence pastel yellow,

5. Essence light greenish blue,

6. Miss Sporty orange nail polish,

7. Sally Hansen Double Duty base & top coat,

8. Dotting tool.


Thanks for reading my blog!

Come and join me... Welcome to my:
YouTube: https://www.youtube.com/user/LifeWorldWomen

Feel free to ask me anything you'd like to know!

Facebook: https://facebook.com/lifeworldwomen
Twitter: https://twitter.com/LWWEasyNailArt

Pinterest: http://www.pinterest.com/ildikomohos/

Music by Kevin MacLeod /Neo Western/
http://incompetech.com/music/royalty-free/

Licensed under Creative Commons: By Attribution


3/07/2016

Matte Pastel Nail Art For Spring & Easter In French Manicure Design


Hello Everyone!

I've decided to do today, a matte pastel nail art for Spring and Easter in French manicure design.

I love this color combination and to make it matte is so beautiful for my opinion.

So, let's start this pastel design!


1. Apply base coat to protect your nails from hard discoloration, and to give your manicure a fixed base,

2. Paint your nails:

- Yellow: index and little nails,
- Greenish blue: middle and thumb nails,
- Baby pink: ring nail:


3. Paint white French tips:


4. Take a medium dotting tool and paint greenish blue dots alongside:


5. Then by a small dotting tool make baby pink and white dots:


6. Finally apply matte top coat:


You see on this picture, how I change the colors:


Hope you like this colorful spring nail art.. Let me know it! :)


What I use:

1. Essence base coat,

2. Essence white, pastel yellow and greenish blue nail polishes,

3. Lovely baby pink nail polish,

4. Rimmel Brit Manicure white polish for the French tips,

5. Lovely Matte Top Coat,

6. Dotting tools.


Thanks for stopping by my blog!

Come and join me... Welcome to my:

YouTube: https://www.youtube.com/user/LifeWorldWomen

Feel free to ask me anything you'd like to know!

Facebook: https://facebook.com/lifeworldwomen
Twitter: https://twitter.com/LWWEasyNailArt

Pinterest: http://www.pinterest.com/ildikomohos/

Music by Kevin MacLeod /Double Drift/
http://incompetech.com/music/royalty-free/

Licensed under Creative Commons: By Attribution


3/04/2016

Tricolor Swirl Nail Art / Pink Toothpick Nail Idea


Hello Everyone!

Today's nails are really easy to do.

This is a tricolor swirl design using white and pink nail polishes, and a single toothpick.


Let's begin this easy nail art!

1. Apply base coat to protect your nails from hard discoloration, and to give the manicure a fixed base,

2. Start to paint your nails:

- First the white part, then the pink and finally on the top of them a narrow baby pink stripe:


3. Grab a toothpick and start to make the swirl - Don't wait much because after the nail polish getting dry you can't do the pattern:


4. At the end apply top coat to protect your manicure from peeling, and to keep it shiny and glossy:


That's it! We're done..


What I use:

1. Essence base coat,

2. Essence white nail polish,

3. MaxFactor pink Gel Shine Lacquer,

4. Lovely baby pink nail polish,

5. Sally Hansen Double Duty base & top coat,

6. Toothpick.


Thanks for stopping by my blog!

Come and join me... Welcome to my:

YouTube: https://www.youtube.com/user/LifeWorldWomen

Feel free to ask me anything you'd like to know!

Facebook: https://facebook.com/lifeworldwomen
Twitter: https://twitter.com/LWWEasyNailArt

Pinterest: http://www.pinterest.com/ildikomohos/

Music by Kevin MacLeod /Daily Beetle/
http://incompetech.com/music/royalty-free/