1/13/2016

Three Easy Purple Metallic Nail Art Designs For 2016


Hello Everyone!

The metallic nail art won't disappear in 2016, so I did three easy designs today.
I chose purple metallic nail polish with white base.

Let's start it!


1. Apply base coat, to protect your natural nails from hard dicoloration,

2. Paint your each nail white,

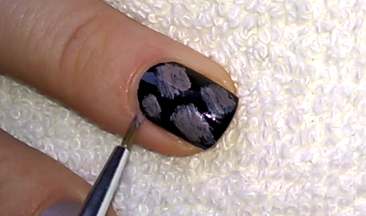
3. Start to paint the purple metallic sections over the nail - middle- and ring finger nail are the same, index- and little finger nail are also the same:


4. Over the thumb nail I paint wide metallic tip:


5. Then I use black liner polish at the edge of shiny purple parts of each design:


6. I drop a row of small dots alongside on the middle- and ring finger nail design:


7. Finally I finish the nails with the top coat:


We're done!

Let me know what you think and which one you like the most! :)


What I use:

1. Essence base coat,

2. Essence white nail polish,

3. Miss Sporty Metal Flip nail polish - purple shade,

4. ADEN black liner polish,

5. Sally Hansen Double Duty base & top coat,

6. Dotting tool.


Thanks for stopping by my blog!

Joine me... Welcome to my:

YouTube: https://www.youtube.com/user/LifeWorldWomen

Feel free to ask me anything you'd like to know!

Facebook: https://facebook.com/lifeworldwomen
Twitter: https://twitter.com/LWWEasyNailArt

Pinterest: http://www.pinterest.com/ildikomohos/

Music by Kevin MacLeod /Daily Beetle/
http://incompetech.com/music/royalty-free/


1/11/2016

Black & Nude Matte Nail Art Inspired By Leopard Print


Hello Everyone!

Today's nail art is a matte black and beige design inspired by leopard print.

I love always the matte nails and hope you'll like this design as well.

Let's start it!


1. Apply base coat to protect your natural nails from the hard discoloration,

2. Paint you nails:

- Middle and ring finger nails are black,
- The other nails are dark beige:


3. For the pattern we need a drop and beige polish and nail brush and we can start to paint the spots:


4. Then we need to mix beige and black nail polishes for the smaller middle parts:


5. By the brush paint black tips over the beige nails - it won't be an average French tip that's why we do it with nail art brush:


6. Apply matte top coat on the each nail:


7. Finally by striping brush paint the beige sections gold:


That's it! We're done!

Hope you like this simple but elegant matte nail art :) Let me know what you think!


What I use:

1. Essence base coat,

2. Lovely black nail polish,

3. Catrice Luxury Nudes dark beige polish,

4. Essence gold nail polish,

5. Lovely matte top coat,

6. Nail art brush.


Thanks for reading my blog!

Join me... Welcome to my:

YouTube: https://www.youtube.com/user/LifeWorldWomen

Feel free to ask me anything you'd like to know!

Facebook: https://facebook.com/lifeworldwomen
Twitter: https://twitter.com/LWWEasyNailArt

Pinterest: http://www.pinterest.com/ildikomohos/

Music by Kevin MacLeod /Double Drift/
http://incompetech.com/music/royalty-free/


1/08/2016

Gold & White Floral & Dry Brush Nail Art Design


Hello Everyone!

Today I share a gold and white nail art, which includes floral and dry brush designs.

Let's begin!


1. Apply base coat to protect your natural nails from hard discoloration,

2. Paint your nails white:


3. For the floral pattern we need striping brush and two kinds of gold nail polish, each one similar to bronze and the other one is brighter:


On the each corner I paint something like a golden bush:


Over the bronze gold pattern I put the bright gold polish:


4. I apply dry brush technique over the middle finger and thumb nails:


Also draw small bright gold lines using striping brush:


5. The index- and little finger nails get three gold dots alongside:


6. Finally the top coat:


And we're done!

I'm excited for your opinion... Please share.


What I use:

1. Essence base coat,

2. Essence white and bright gold nail polishes,

3. Catrice gold nail polish - similar to bronze,

4. Sally Hansen Double Duty base & top coat,

5. Striping brush,

6. Dotting tool.


Thank you so much for reading my blog!

Join me... Welcome to my:

YouTube: https://www.youtube.com/user/LifeWorldWomen

Feel free to ask me anything you'd like to know!

Facebook: https://facebook.com/lifeworldwomen
Twitter: https://twitter.com/LWWEasyNailArt

Pinterest: http://www.pinterest.com/ildikomohos/

Music by Kevin MacLeod /Finding the Balance/
http://incompetech.com/music/royalty-free/


1/06/2016

Disney's Frozen Inspired Winter Nail Art


Hello Everyone!

Winter is here so I did a blue Disney inspired nail design today... Hope you'll like it ;)


Let's start!

1. Apply base coat to protect your natural nails from discoloration,

2. Paint your nails light blue,

3. We need a small makeup sponge and dark blue nail polish for the ombre tips:


4. Then glitter polish, which includes silver and blue glitters:


5. Over the ring finger nail I paint a half snowflake by using nail brush and small dotting tool:


At the cuticle I paint two more lines that I didn't record, you can see it on the first picure :)

6. At the end the top coat:


We're done!

I'll be happy if you share your opinion..


What I use:

1. Essence base coat,

2. Rimmel Salon Pro Lycra light blue nail polish,

3. Miss Sporty dark blue and glitter nail polishes,

4. Essence white nail polish,

5. Miss Sporty quick dry top coat,

6. Nail brush,

7. Dotting tool.


Thanks for stopping by my channel!

Join me... Welcome to my:

YouTube: https://www.youtube.com/user/LifeWorldWomen

Feel free to ask me anything you'd like to know!

Facebook: https://facebook.com/lifeworldwomen
Twitter: https://twitter.com/LWWEasyNailArt

Pinterest: http://www.pinterest.com/ildikomohos/

Music by Kevin MacLeod /Dream Culture/
http://incompetech.com/music/royalty-free/


1/04/2016

Snowy Winter Nails - Fir Tree Nail Design


Hello Everyone!

Today's nail art tutorial is a Winter design, snowy fir tree nail art.
We need a striping brush, dotting tool and nail polishes.

Let's do it!

1. Apply base coat to protect your natural nails from hard discoloration,

2. Paint your nails light blue,

3. Take a striping brush and green nail polish for making the fir tree:


4. As the tree is ready, take white polish and paint snowy parts over the fir:


5. By a small dotting tool paint a little snowfall around the tree:


6. And finally put glitter polish over the snowy parts for the icy appearance:


That's it!  We're done..

I didn't use top coat for this design.


Hope you like this Winter design, please tell your opinion.. Thank you!


What I use:

1. Essence base coat,

2. Catrice pure blue nail polish,

3. Miss Sporty green nail polish,

4. Essence white and glitter nail polishes,

5. Striping brush,

7. Dotting tool.


Thanks for stopping by my channel!

Join me... Welcome to my:

YouTube: https://www.youtube.com/user/LifeWorldWomen

Feel free to ask me anything you'd like to know!

Facebook: https://facebook.com/lifeworldwomen
Twitter: https://twitter.com/LWWEasyNailArt

Pinterest: http://www.pinterest.com/ildikomohos/

Music by Kevin MacLeod /Life Of Riley/
http://incompetech.com/music/royalty-free/


1/01/2016

Dark Blue & Silver Glitter Striped Nail Art - Elegant Nail Designs


Hello Everyone!

Today I'm bringing a dark blue nail art with silver glitter striped design.
I just love this 'half' matte suede effect nail polish, which one is so pretty with the glitter polish.
I hope you'll love it :)

Let's start it!


1. Apply base coat to protect your natural nails from hard discoloration - You may use peel off base coat because of glitter polish,

2. Paint your each nail dark blue - You can use ordinary nail polish plus matte top coat, or I use suede effect nail polish which one is half matte product:


3. For the striped design we need silver glitter polish and striping brush - I paint this pattern over the middle finger- and thumb nails:


4. The other nails get three glitter stripes and small white dots on the lines randomly:


And that's it!
We're done :)

I don't use top coat for this design because of the suede polish.

That's really so easy and elegant nail art for Winter or if you just need pretty dark nails.


What I use:

1. Essence base coat,

2. Essence 'The Suede' dark blue and white nail polishes,

3. Essence silver glitter polish,

4. Striping brush,

5. Dotting tool.


Thanks for reading my blog!

Join me... Welcome to my:

YouTube: https://www.youtube.com/user/LifeWorldWomen

Feel free to ask me anything you'd like to know!

Facebook: https://facebook.com/lifeworldwomen
Twitter: https://twitter.com/LWWEasyNailArt

Pinterest: http://www.pinterest.com/ildikomohos/

Music by Kevin MacLeod /I Feel You/
http://incompetech.com/music/royalty-free/


12/30/2015

Black Glitter Nails For New Year's Eve - Happy New Year!


Hello Everyone!

This nail art is a 'last minute' quick design for New Year's Eve parties.

We need black nail polish, dark grey glitter polish, silver and purple glitters.

Let's start this bright nail design!


1. Apply base coat, to protect your natural nails - I use 'Peel Off' base coat because of glitters,

2. Paint each nail black:


3. Prepare silver and purple glitters:


4. Apply dark grey glitter polish over the black nails, but only one at a time, because we don't need to wait until getting dry:


5. By using a dotting tool, start to put the glitters over the nail randomly:


6. Finally apply to coat:


That's it! We're done..

Let me know what you think! :)


What I use:

1. Miss Sporty Peel Off base coat,

2. Lovely black nail polish,

3. Miss Sporty CrushOnYou 3D Texture dark grey silver glitter polish,

4. Silver and purple glitters,

5. Sally Hansen Double Duty base and top coat,

6. Dotting tool.


Thanks for stopping by my blog!

Join me... Welcome to my:

YouTube: https://www.youtube.com/user/LifeWorldWomen

Feel free to ask me anything you'd like to know!

Facebook: https://facebook.com/lifeworldwomen
Twitter: https://twitter.com/LWWEasyNailArt

Pinterest: http://www.pinterest.com/ildikomohos/

Music by Kevin MacLeod /Pilot Error/
http://incompetech.com/music/royalty-free/